In the Hardware and Sound window, select Calibrate the Screen for Pen or Touch Input (it’s under Tablet PC Settings); see Figure 14-6.The Tablet PC dialog box appears (see Figure 14-7).
Select the Calibrate button. User Account Control may ask you to confirm that you want to run the Digitizer Calibration Tool. If so, select Yes.
 If your touchscreen is badly calibrated, you may not be able to tap the Calibrate button. In that case, plug in a mouse to make the selection, and then continue using touch.
The screen displays lines around its perimeter, forming a box near the edge of the screen and a second box inside the first about half an inch from the edge. Lines connect these boxes near each corner. The result is 16 intersections. Starting at the upper-left corner, use your finger or a stylus to tap each intersection, which displays two short black lines forming crosshairs. As you touch each intersection, Windows 11 measures your touch and adjusts touch settings accordingly. After each touch is recorded, the crosshairs move to the next intersection to the right. (If the crosshairs don’t move, tap the previous intersection again.) As the crosshairs move, tap the highlighted intersection, left to right, down, and then left to right again. The process takes much longer to read about than to do.
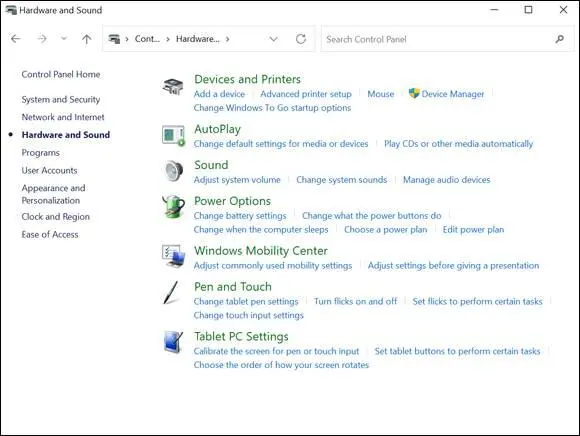
FIGURE 14-6
 If Windows 11 doesn’t recognize your touch, it won’t continue with the process. The screen says Right-click anywhere to return to the last calibration point . What if you don’t have a mouse? Tap and hold until you see the little box under your fingertip, and then release — that’s the touch equivalent of a click of the right mouse button.
After you have selected each of the 16 calibration points in turn, a box pops up asking whether you want to save the calibration data. Select OK unless you think something went wrong. In that case, select Cancel.
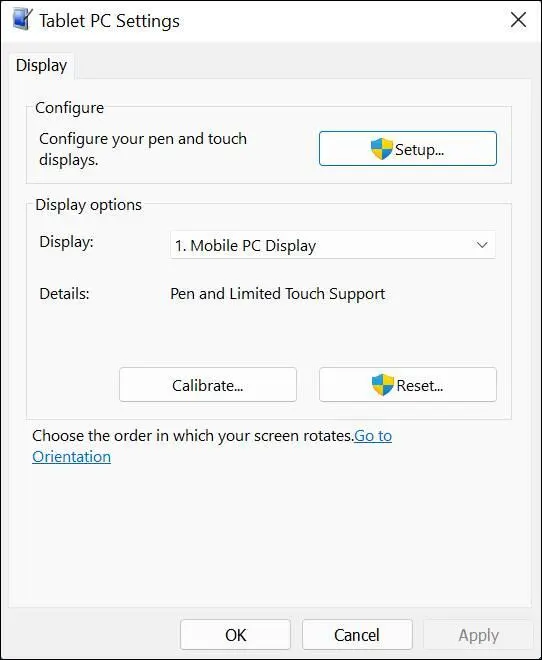
FIGURE 14-7
Chapter 15
Working with Files
IN THIS CHAPTER
 Saving, opening, searching for, and organizing files
 Organizing files in folders
 Renaming and deleting files and folders
 Retrieving a deleted file from the Recycle Bin
All the data inside your computer is stored on a disk. Your computer has a primary disk, formally called the internal hard drive. You may see this disk referred to as the C: drive. (The terms drive and disk are interchangeable.)
The contents of a disk are organized into individual files. When you create a file and save it for the first time, you create a file on a disk. Many other files on the disk belong to the programs you use, including the thousands of files that make up Windows 11.
Disks also are organized into folders, which are containers for files. For its own files, Windows 11 has a main folder that contains dozens of other folders (called subfolders ). Inside or below that user account folder, Windows 11 creates more folders to help you organize your files by type. For example, by default, all your photos go into the Pictures folder, and all your documents go into the Documents folder.
In this chapter, you discover how to save and open a file, search for files, and explore your disk, folders, and files. You work with File Explorer as you create new folders to organize documents and move files from one folder to another. You also copy files from your hard drive to other disks to take with you or give to other people. This chapter also explains how to rename and delete files and folders. What if you delete a file or folder and you regret doing so? Don’t worry, because this chapter shows how to get back a file or folder that you mistakenly deleted.
Save and Open a File
In computer land, nothing is more important than files. Computer programs are stored in files. Data is stored in files. To start working, you open a file. When you’re finished working, you save and close your file. To experiment with files, open WordPad, the word processing app that comes with Windows 11.
 Chapter 2 explains how to open apps. Chapter 9 looks into WordPad and how it can serve your word processing needs.
As shown in Figure 15-1,type a few words into WordPad and then save your file. Most apps (WordPad included) offer three ways to save a file:
Select the Save button.
Press Ctrl+S.
Open the File menu and choose Save.
When you save a file for the first time, the Save As dialog box appears (refer to Figure 15-1). It invites you to give the file a name and to tell Windows 11 which folder to keep it in. Enter the name My Filein the File Name text box. The Save As dialog box offers the means of choosing a folder for your file. For now, you can store your file in the Documents folder, the folder that Windows 11 selected for you (refer to Figure 15-1). Notice that the Documents folder is already selected in the navigation pane on the left side of the Save As dialog box.
Select the Save button in the Save As dialog box. Congratulations! You just saved your file. The title bar at the top of the WordPad window shows the name of your file, “My File.” When you’re not sure what a file is called, look at the title bar along the top of the screen.
Close WordPad. The fastest way to close an app is to select the Close button (the X ) in the upper-right corner of the screen.
Open WordPad as you did in Step 1. Where is My File, the file you saved and named in Steps 4 and 5?
Open the File menu (select the word File in the upper-left corner of the screen) and choose Open. The Open dialog box appears, as shown in Figure 15-2.This dialog box is the mirror image of the Save As dialog box that you saw earlier. Use it to locate the file you want to open. In this case, Windows 11 has opened the dialog box to its favorite folder, Documents, which also happens to be the folder where My File is stored.
Choose My File and then select the Open button (refer to Figure 15-2). My File opens onscreen.
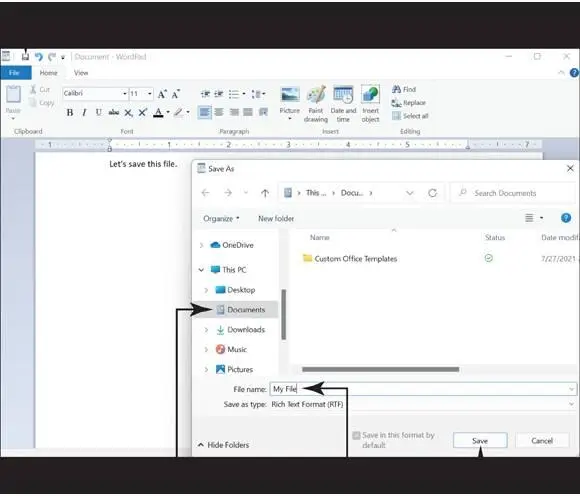
FIGURE 15-1
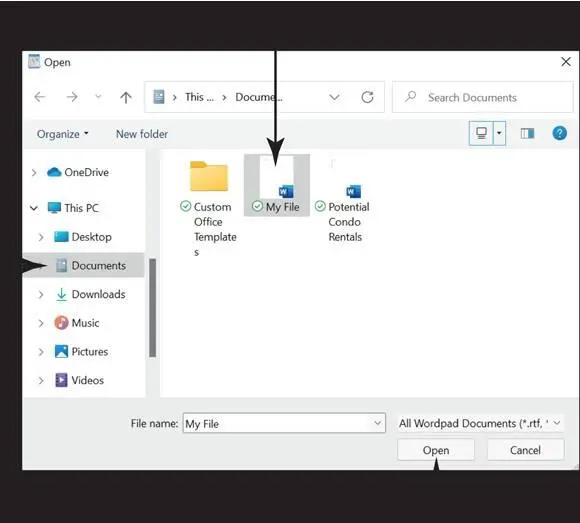
FIGURE 15-2
 Most apps offer shortcuts for opening files. In WordPad, for example, you see a list of files that you recently opened on the File menu. You can select a filename on the list to open a file straightaway.
Читать дальше
Конец ознакомительного отрывка
Купить книгу

 If your touchscreen is badly calibrated, you may not be able to tap the Calibrate button. In that case, plug in a mouse to make the selection, and then continue using touch.

 Saving, opening, searching for, and organizing files


