 The keyboard shortcut to open File Explorer is
  + E.
+ E.
On the left, select Music, and then Pictures, and then Videos, while noting the files in the content area on the right. Many Windows 11 apps store files by default in the Documents, Music, Pictures, and Videos folders. Select the Documents folder again.
To create a practice document that you can use in later sections, select the New Folder menu on the toolbar. In the New section, select Text Document, as shown in Figure 15-9.(If you don’t see this option, make sure that the Documents folder is selected.) An empty text document is created and the words New Text Document are highlighted so that you can type a new name. Type practice file. (You’ll rename this file in a later section.) Feel free to repeat this step to create additional items for practice, such as Microsoft Word Documents or Bitmap Images.
 On a touchscreen, the virtual keyboard doesn’t appear on the desktop until you select the keyboard icon on the right side of the taskbar.
Select the View button on the taskbar. In the drop-down menu that appears, select each option, such as Extra Large Icons and Large, Medium, and Small Icons. Try them all, if you like.
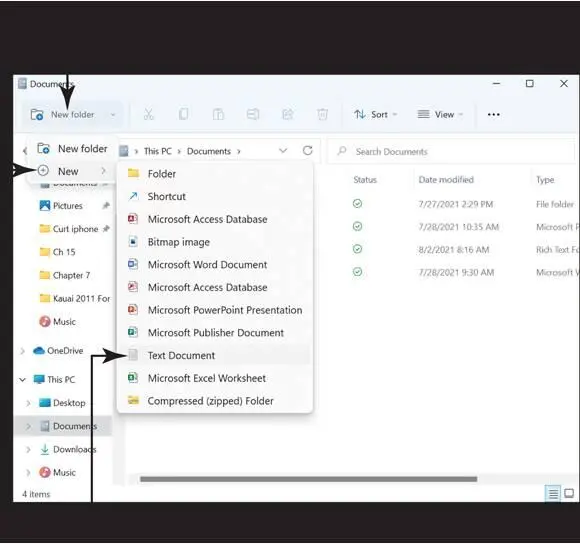
FIGURE 15-9
 Certain layouts are better for certain purposes. For example, photos are easier to recognize as Extra Large Icons than as a List. Figure 15-10shows documents using the Details view, which includes the date the file was modified.
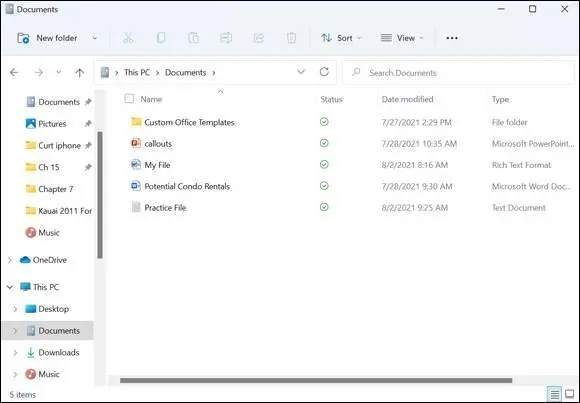
FIGURE 15-10
Create a Folder to Organize Your Files
In the File Explorer navigation pane, select the Documents folder.
Select the New Folder button on the taskbar. An icon for the new folder appears in the content area on the right, with the name New folder next to it and already selected (see Figure 15-11).
 On a touchscreen, the virtual keyboard doesn’t appear on the desktop until you select the keyboard icon on the right side of the taskbar.
Type practice folderas the new name. Don’t move the cursor or mouse before you start typing. Your new text will replace the highlighted text automatically. Press the Enter key to make the new name stick. (If you have a problem naming the folder, see the “Rename a File or a Folder” section, later in this chapter.)
Open your new folder by double-clicking or double-tapping its icon. Notice that the content area is empty.
To return to the Documents folder, select Documents in the navigation pane.
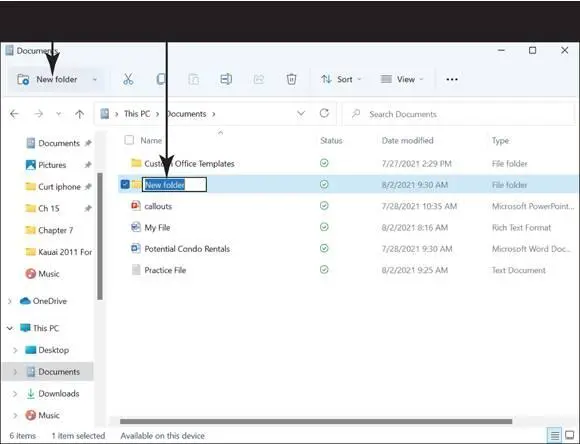
FIGURE 15-11
 Don’t worry too much about creating folders, because the folders that Windows 11 provides may be all you ever need. As you accumulate more files, however, placing them into other folders can help you stay organized. In the Documents folder, for example, you might create a subfolder called Finances for files related to income, expenses, and investments, and another subfolder called Family for family-related documents. Which folders and subfolders to create and how to name them depends entirely on your own sense of order.
Use Check Boxes to Select Files
In File Explorer, you select files to move, copy, rename, or delete. You can add a check box to make selecting multiple files easier. This option may be turned on by default. Select a file or folder in File Explorer, and if a check box appears next to it, you don’t need to do anything else. If not, however, you can turn on this feature. In File Explorer, select the View button on the toolbar and then select Show. Click the Item Check Boxes option on the menu that appears, as shown in Figure 15-12.
Select the Documents folder (or any folder that contains more than one file). To select a file, click or tap its filename. (You won’t see the check box until you select it with a tap or a click, or hover over it with the mouse pointer.) Repeat to select additional files. If you want to deselect a file, select the check box again to remove the check mark. Close the window after you've seen how these check boxes work. Figure 15-13shows four selected files.
 If you want to select only a single file, you can select anywhere on the filename. You use the check box when you want to select more than one file at a time.
The See More button on the toolbar offers other methods for selecting. Select All does just what it says — selects all objects in a folder or library. Select None works similarly. Invert Selection switches the selection. For example, if we chose Invert Selection in the context of Figure 15-13,the four selected files would be deselected and all the other files would be selected. Sometimes it’s easier to select the files you don’t want and then invert the selection.
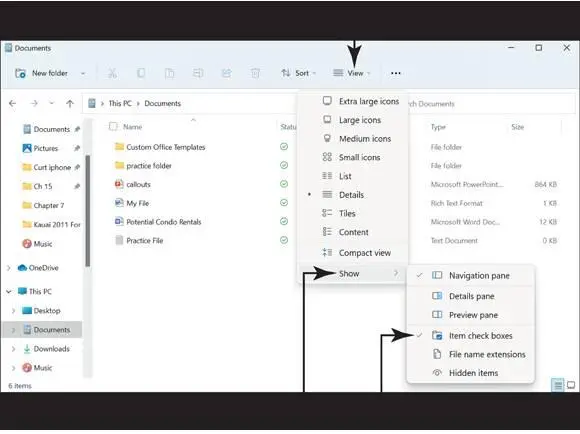
FIGURE 15-12
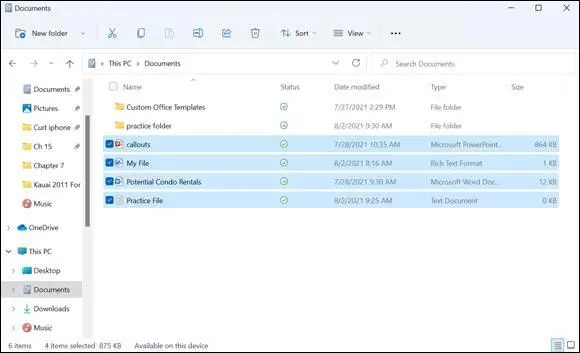
FIGURE 15-13
Undo or Redo an Action
Sometimes you make mistakes when you’re working with Windows 11. For example, you may give a file the wrong name or move a file to the wrong folder. The good news is that you can easily undo your last action. Just click the See More button on the toolbar and you see Undo in the menu list, as shown in Figure 15-14.
If you make a mistake and want to undo your last action, just click the Undo button. Note that there is no time limit for Undo, so no rush. However, also note that Undo undoes only your last action. You can’t use this feature to undo something you did several steps back as you’re working in File Explorer.
 The keyboard shortcut for undo is Ctrl+Z.
You can also redo an action that you’ve chosen to undo. Say you undo a filename for a document, but then you realize that the original file name was correct after all. In that case, just select See More and then select Redo, as shown in Figure 15-14.
 The keyboard shortcut for redo is Ctrl+Y.
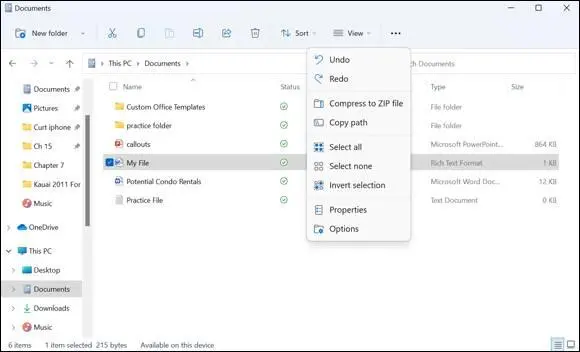
FIGURE 15-14
Читать дальше
Конец ознакомительного отрывка
Купить книгу
 The keyboard shortcut to open File Explorer is
  + E.
+ E.


