Curt Simmons - Windows 11 For Seniors For Dummies
Здесь есть возможность читать онлайн «Curt Simmons - Windows 11 For Seniors For Dummies» — ознакомительный отрывок электронной книги совершенно бесплатно, а после прочтения отрывка купить полную версию. В некоторых случаях можно слушать аудио, скачать через торрент в формате fb2 и присутствует краткое содержание. Год выпуска: 2022, ISBN: 2022, Издательство: Wiley, Жанр: ОС и Сети, tbg_computers, на английском языке. Описание произведения, (предисловие) а так же отзывы посетителей доступны на портале библиотеки ЛибКат.
- Название:Windows 11 For Seniors For Dummies
- Автор:
- Издательство:Wiley
- Жанр:
- Год:2022
- ISBN:978-1-119-84652-9
- Рейтинг книги:4 / 5. Голосов: 1
-
Избранное:Добавить в избранное
- Отзывы:
-
Ваша оценка:
Windows 11 For Seniors For Dummies: краткое содержание, описание и аннотация
Предлагаем к чтению аннотацию, описание, краткое содержание или предисловие (зависит от того, что написал сам автор книги «Windows 11 For Seniors For Dummies»). Если вы не нашли необходимую информацию о книге — напишите в комментариях, мы постараемся отыскать её.
What do you want to do with your Windows computer? Sign up for Facebook to keep up with your friends? Watch a video taken during the latest family trip? Find your latest email messages with a single click of the mouse? Look no further than Windows 11 For Seniors For Dummies to discover how to do these tasks and others that you depend on a daily basis. With this guide to the popular operating system, you find the clear and easy instructions to checking tech tasks off your to-do list.
Windows 11 For Seniors For Dummies — читать онлайн ознакомительный отрывок
Ниже представлен текст книги, разбитый по страницам. Система сохранения места последней прочитанной страницы, позволяет с удобством читать онлайн бесплатно книгу «Windows 11 For Seniors For Dummies», без необходимости каждый раз заново искать на чём Вы остановились. Поставьте закладку, и сможете в любой момент перейти на страницу, на которой закончили чтение.
Интервал:
Закладка:
Move a File from One Folder to Another
You can move files to organize them. For this exercise, select the Documents folder in File Explorer. Select one of your documents.
 To move more than one file at a time, see the section “Use Check Boxes to Select Files,” earlier in this chapter.
In the navigation pane, scroll to find the folder you want to move the file to. When you see it, just drag the file to the new folder in the navigation pane and release it. This action moves the file out of the original folder and to the new folder you’ve chosen.
Use these same steps to move a subfolder from one folder to another. However, don't move folders that Windows 11 creates.
Rename a File or a Folder
You can change the name of any file or folder you create. (Don’t rename files in the Windows or Program Files folders.) For this exercise, select the Documents folder in File Explorer. Then select one of your files.
To rename more than one file at a time, see the section “Use Check Boxes to Select Files,” earlier in this chapter. On completion of the rename operation, the files you selected will share the name you provide; each file will have a unique number added to the name, starting with (1) .
On the toolbar, select the Rename button. In the content area, the current name of the file or folder is selected, as shown in Figure 15-15.If you type anything while the text is selected, you erase the current name, which is convenient if the new name is completely different from the old name. If you want to keep most of the current name and edit it, select inside the name or press the left- or right-arrow key to move to the place in the name where you want to type new text.
Type the new name, which can be more than 200 characters long (although a dozen characters may be more than enough). You can capitalize letters and use spaces and dashes, but you can’t use slashes or asterisks, which Windows 11 reserves for other purposes.
On a touchscreen, the virtual keyboard doesn’t appear on the desktop until you select the keyboard icon on the right side of the taskbar.
When you’ve typed the new name, press the Enter key to finish the process.
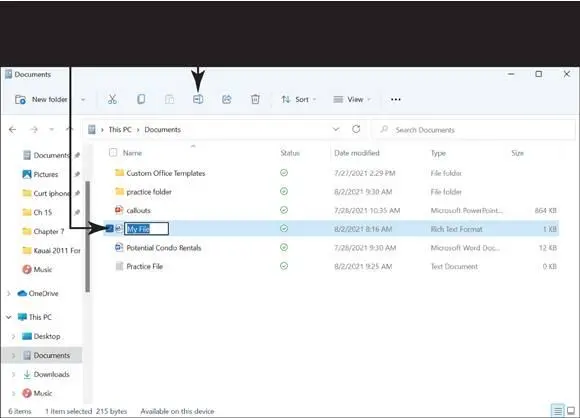
FIGURE 15-15
You can right-click a file’s icon to see the Rename option on the context menu that appears. You may find this method faster.
Delete a File or Folder
You can delete any of your files that you no longer need. (Don’t delete files in the Windows or Program Files folders.) For this exercise, select the Documents folder in File Explorer. Then select one of your files.
To delete more than one file at a time, see the section “Use Check Boxes to Select Files,” earlier in this chapter.
On the toolbar, select the Delete button.
The keyboard shortcut to delete the selected file is the Delete key (surprise!).
A confirmation dialog box appears and asks whether you really want to delete the file, as shown in Figure 15-16.Here’s your chance to change your mind if you want. However, for this exercise, select Yes in the dialog box to delete the file.
If you don’t see a confirmation dialog box like the one in Figure 15-16,tell Windows 11 that you want to see this dialog box when you delete files and folders. Just right-click the Recycle Bin and click Properties. On the Properties dialog box, select Display Delete Confirmation Dialog and click OK, as shown in Figure 15-17.
Select another file, and then select the Delete button. The Delete File confirmation window appears. This time, select No to cancel the operation.
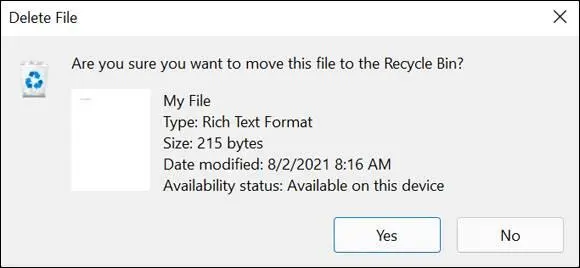
FIGURE 15-16
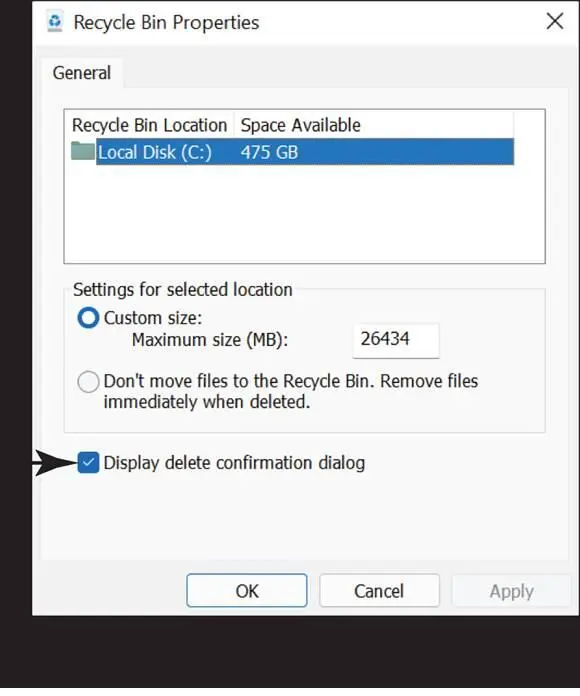
FIGURE 15-17
Get Back a File or Folder You Deleted
Normally, when you delete a file or folder, Windows 11 moves the object to the Recycle Bin. Objects remain in the Recycle Bin indefinitely, allowing you to restore something you deleted long after you did so. To open the Recycle Bin, go to the desktop and double-click or double-tap the Recycle Bin icon. The Recycle Bin opens, as shown in Figure 15-18.
If many files or folders are listed in the Recycle Bin window, type the name of the item you want in the Search box in the top-right corner of the window. If any files match what you type, they appear in the content area.
Note that on a touchscreen, the virtual keyboard doesn’t appear on the desktop until you select the keyboard icon on the right side of the taskbar.
To restore a file or folder to its original location, select the file or folder in the Recycle Bin window. Select See More on the toolbar and select Restore the Selected Items. The selected file or folder returns to the folder it was in before it was deleted.
If Windows 11 needs disk space, it will automatically clear out the oldest files in the Recycle Bin first. If you want to get rid of everything in the Recycle Bin, select Empty Recycle Bin on the toolbar. After you empty the Recycle Bin, you can’t undo your action.
Don’t select the Restore All Items button, because doing so puts every single item in the Recycle Bin back in its original location. Most of the files in the Recycle Bin are probably files that you really meant to delete. Choosing this command would be like dumping the trash can on your living-room floor to find a penny you threw away.
See Chapter 16 for information on backing up and restoring files.
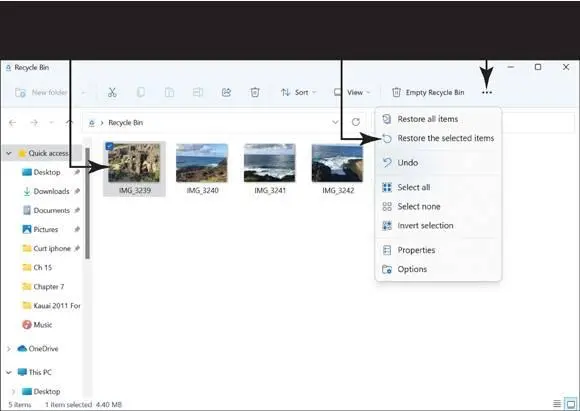
FIGURE 15-18
Chapter 16
Backing Up and Restoring Files
IN THIS CHAPTER
 Attaching files and copying them to a storage drive
Managing files on OneDrive
Интервал:
Закладка:
Похожие книги на «Windows 11 For Seniors For Dummies»
Представляем Вашему вниманию похожие книги на «Windows 11 For Seniors For Dummies» списком для выбора. Мы отобрали схожую по названию и смыслу литературу в надежде предоставить читателям больше вариантов отыскать новые, интересные, ещё непрочитанные произведения.


Обсуждение, отзывы о книге «Windows 11 For Seniors For Dummies» и просто собственные мнения читателей. Оставьте ваши комментарии, напишите, что Вы думаете о произведении, его смысле или главных героях. Укажите что конкретно понравилось, а что нет, и почему Вы так считаете.