Curt Simmons - Windows 11 For Seniors For Dummies
Здесь есть возможность читать онлайн «Curt Simmons - Windows 11 For Seniors For Dummies» — ознакомительный отрывок электронной книги совершенно бесплатно, а после прочтения отрывка купить полную версию. В некоторых случаях можно слушать аудио, скачать через торрент в формате fb2 и присутствует краткое содержание. Год выпуска: 2022, ISBN: 2022, Издательство: Wiley, Жанр: ОС и Сети, tbg_computers, на английском языке. Описание произведения, (предисловие) а так же отзывы посетителей доступны на портале библиотеки ЛибКат.
- Название:Windows 11 For Seniors For Dummies
- Автор:
- Издательство:Wiley
- Жанр:
- Год:2022
- ISBN:978-1-119-84652-9
- Рейтинг книги:4 / 5. Голосов: 1
-
Избранное:Добавить в избранное
- Отзывы:
-
Ваша оценка:
Windows 11 For Seniors For Dummies: краткое содержание, описание и аннотация
Предлагаем к чтению аннотацию, описание, краткое содержание или предисловие (зависит от того, что написал сам автор книги «Windows 11 For Seniors For Dummies»). Если вы не нашли необходимую информацию о книге — напишите в комментариях, мы постараемся отыскать её.
What do you want to do with your Windows computer? Sign up for Facebook to keep up with your friends? Watch a video taken during the latest family trip? Find your latest email messages with a single click of the mouse? Look no further than Windows 11 For Seniors For Dummies to discover how to do these tasks and others that you depend on a daily basis. With this guide to the popular operating system, you find the clear and easy instructions to checking tech tasks off your to-do list.
Windows 11 For Seniors For Dummies — читать онлайн ознакомительный отрывок
Ниже представлен текст книги, разбитый по страницам. Система сохранения места последней прочитанной страницы, позволяет с удобством читать онлайн бесплатно книгу «Windows 11 For Seniors For Dummies», без необходимости каждый раз заново искать на чём Вы остановились. Поставьте закладку, и сможете в любой момент перейти на страницу, на которой закончили чтение.
Интервал:
Закладка:
 To quickly open a file (or application) you opened recently, click or tap in the Search box on the left side of the taskbar. A pop-up menu appears with the names of files you opened recently. You can select a filename in the list to open a file. Select an application name to open an application.
Find a Misplaced File
To search for a misplaced file, begin with the Search icon, located on the taskbar. Type the name of a document or photo you have on your computer. The search results appear, as shown in Figure 15-3.
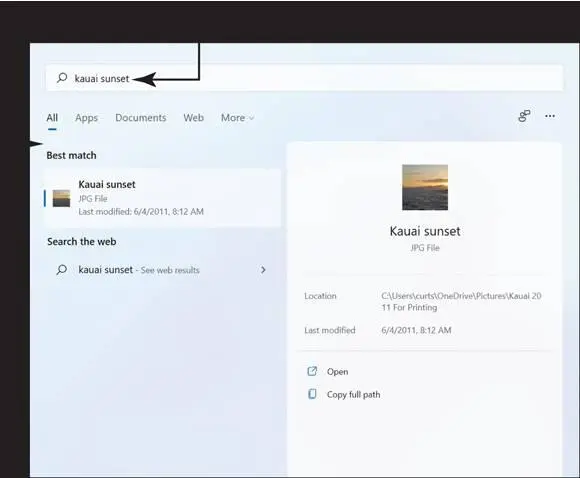
FIGURE 15-3
Initially, the search results shows all and sundry — settings, apps, files, websites, and other search opportunities — in the search results. If you don’t see the item you want in a search, narrow the list of items by selecting one of the tabs at the top of the search window — Apps, Documents, Web, or More. Documents, for example, narrows the search to items on your computer.
To open a file, select it in the search results. If more than one application on your computer is capable of opening the file, you may see the How Do You Want to Open This File? dialog box, as shown in Figure 15-4.Select an application to open the file.
The How Do You Want to Open This File? dialog box offers a means of telling Windows 11 to always open files of a certain type with a particular application (refer to Figure 15-4). Selecting the Always Use This App to Open check box tells Windows 11 to open files of a certain type automatically with the app you chose.
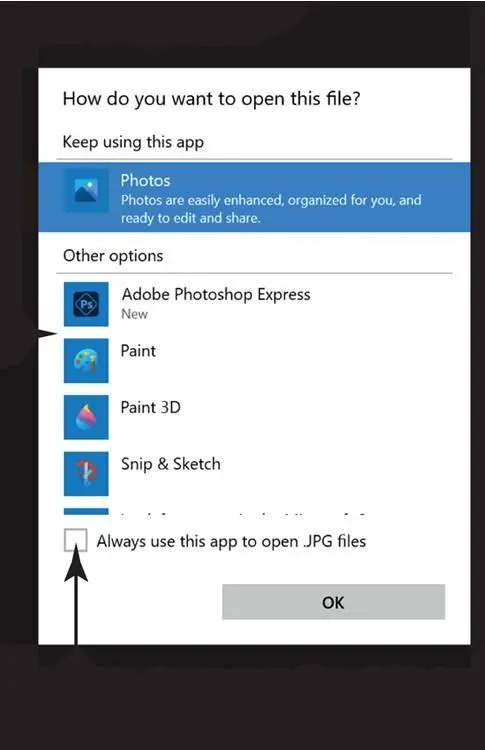
FIGURE 15-4
Close the app that opens the file by using one of these methods:
Click or tap the Close button (the X located in the upper-right corner of the screen).
Press Alt+F4.
Strictly speaking, if you find what you’re looking for, stop looking. (No extra charge for pearls of wisdom.) In this case, however, keep looking, because doing so reveals important information about how files are organized and how you can take control of that organization.
On the taskbar, select the File Explorer icon (the yellow folder). File Explorer opens. Notice that File Explorer contains a toolbar, a left navigation pane, and a right content pane that displays the contents of the selected folder, as shown in Figure 15-5.
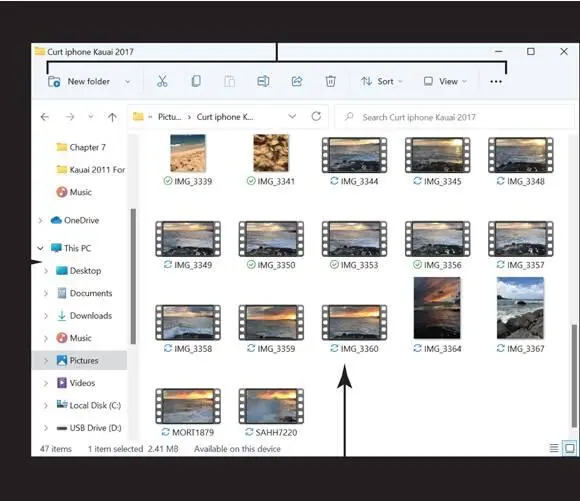
FIGURE 15-5
Select This PC on the left side of the File Explorer window, and then select the box labeled Search (probably followed by This PC ), below the toolbar and to the right. Type the same search term you used in Step 1. As you type, File Explorer displays any matching files, highlighting the text that matches. Figure 15-6shows the results of a search on a computer using the search term Kauai sunset .
On a touchscreen, the virtual keyboard doesn’t appear on the desktop until you select the keyboard icon on the right side of the taskbar.
If the search results include too many files, thereby making it hard to see the one you want, type more of the filename in the Search box. The number of matching files should decrease as you type more text in the box.
The focus of a search — where File Explorer searches — determines what files and folders are found. In Step 5, you selected This PC, making all the files on your computer the focus of the search. Accordingly, Windows 11 searched for files and folders throughout your computer. To change the focus of your search to the Pictures folder, select the Pictures folder in the navigation pane. Then select the box labeled Search and enter your search term again. The search results focus on files in the Pictures folder.
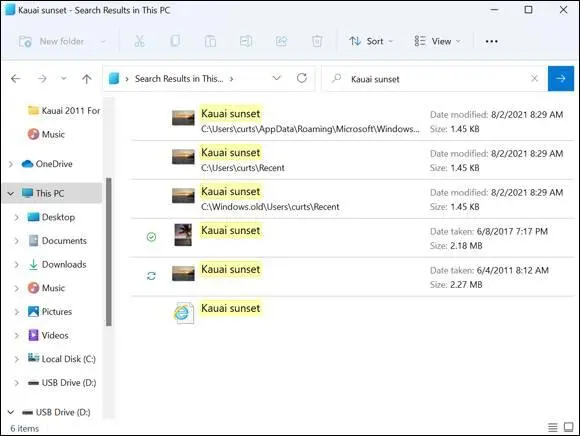
FIGURE 15-6
You can use the Sort feature on the toolbar to refine a search, as needed. Start a search and then click Sort ⇒ More. You can then choose to sort by date created, authors, tags, and so forth.
Add a Location to Quick Access
If you frequently access a specific location using File Explorer, you might want to add that location to the Quick Access section of the navigation pane for easy access. The Quick Access section is located at the top of the navigation pane. Windows 11 places some folders in the Quick Access folder list automatically, including the Documents folder and the Pictures folder. As well, it lists in alphabetical order folders that you visit frequently.
Display the Quick Access folders. To do so, click or tap the arrow next to Quick Access in the navigation pane to expand it, as shown in Figure 15-7.
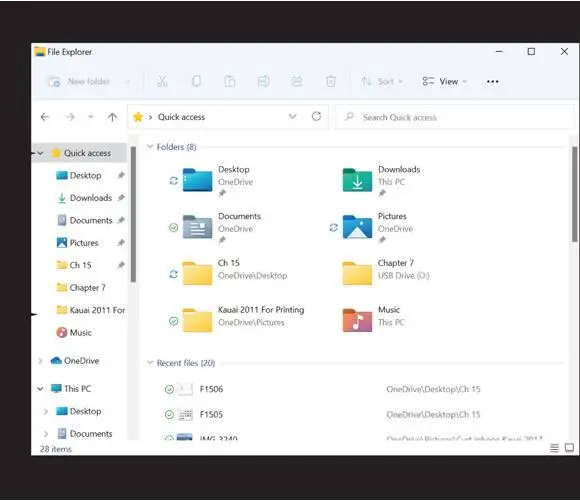
FIGURE 15-7
Select a folder that you access frequently. For example, if you’re currently working on files you keep in a folder called My Work, select that folder in the navigation pane.
On the See More button on the toolbar (it looks like three dots), select the Pin to Quick Access option on the menu (refer to Figure 15-8). The name of the folder you selected in Step 3 now appears in the Quick Access folder list. Notice the pin beside its name.
Select your folder in the Quick Access folder list. Next time you want to get to this folder, you can get there quickly by selecting Quick Access in the navigation pane and then selecting your folder.
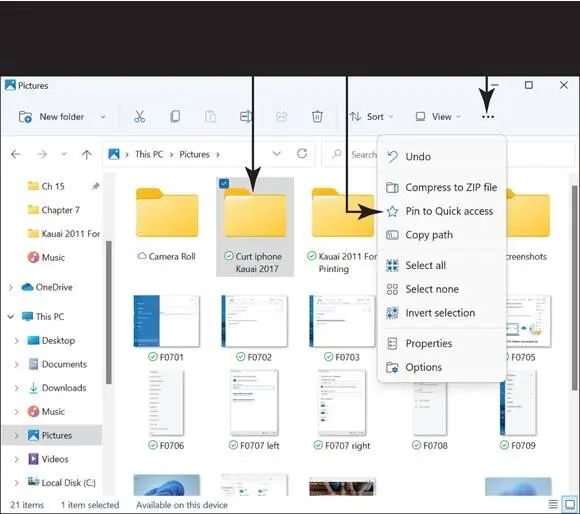
FIGURE 15-8
To remove a folder from the Quick Access list, select the folder you want to remove. Then right-click the folder and choose Unpin from Quick Access on the shortcut menu.
Use File Explorer for Easy Access to Files
Select the File Explorer icon on the taskbar if File Explorer is not already open. The right side of Explorer is called the content area. The left side of Explorer is called the navigation pane and contains folders. Explorer starts with its focus on your Quick Access and This PC folders, and on your C: drive and Network drives (if your computer is connected to a network).
Читать дальшеИнтервал:
Закладка:
Похожие книги на «Windows 11 For Seniors For Dummies»
Представляем Вашему вниманию похожие книги на «Windows 11 For Seniors For Dummies» списком для выбора. Мы отобрали схожую по названию и смыслу литературу в надежде предоставить читателям больше вариантов отыскать новые, интересные, ещё непрочитанные произведения.


Обсуждение, отзывы о книге «Windows 11 For Seniors For Dummies» и просто собственные мнения читателей. Оставьте ваши комментарии, напишите, что Вы думаете о произведении, его смысле или главных героях. Укажите что конкретно понравилось, а что нет, и почему Вы так считаете.