Curt Simmons - Windows 11 For Seniors For Dummies
Здесь есть возможность читать онлайн «Curt Simmons - Windows 11 For Seniors For Dummies» — ознакомительный отрывок электронной книги совершенно бесплатно, а после прочтения отрывка купить полную версию. В некоторых случаях можно слушать аудио, скачать через торрент в формате fb2 и присутствует краткое содержание. Год выпуска: 2022, ISBN: 2022, Издательство: Wiley, Жанр: ОС и Сети, tbg_computers, на английском языке. Описание произведения, (предисловие) а так же отзывы посетителей доступны на портале библиотеки ЛибКат.
- Название:Windows 11 For Seniors For Dummies
- Автор:
- Издательство:Wiley
- Жанр:
- Год:2022
- ISBN:978-1-119-84652-9
- Рейтинг книги:4 / 5. Голосов: 1
-
Избранное:Добавить в избранное
- Отзывы:
-
Ваша оценка:
Windows 11 For Seniors For Dummies: краткое содержание, описание и аннотация
Предлагаем к чтению аннотацию, описание, краткое содержание или предисловие (зависит от того, что написал сам автор книги «Windows 11 For Seniors For Dummies»). Если вы не нашли необходимую информацию о книге — напишите в комментариях, мы постараемся отыскать её.
What do you want to do with your Windows computer? Sign up for Facebook to keep up with your friends? Watch a video taken during the latest family trip? Find your latest email messages with a single click of the mouse? Look no further than Windows 11 For Seniors For Dummies to discover how to do these tasks and others that you depend on a daily basis. With this guide to the popular operating system, you find the clear and easy instructions to checking tech tasks off your to-do list.
Windows 11 For Seniors For Dummies — читать онлайн ознакомительный отрывок
Ниже представлен текст книги, разбитый по страницам. Система сохранения места последней прочитанной страницы, позволяет с удобством читать онлайн бесплатно книгу «Windows 11 For Seniors For Dummies», без необходимости каждый раз заново искать на чём Вы остановились. Поставьте закладку, и сможете в любой момент перейти на страницу, на которой закончили чтение.
Интервал:
Закладка:
 You are unlikely to need the Add a Bluetooth or Other Device button because most devices are added automagically (that’s a word nerds like to use). However, if you select Add a Device, Windows 11 scans for additional hardware that you may have connected to the computer. No harm in doing so.
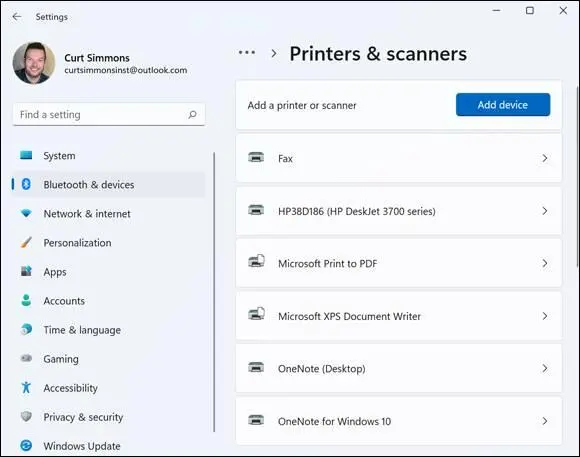
FIGURE 14-3
Connect a Printer or Other Device
Take your printer out of the box. Keep all the packing material together until you know you won’t need to return the printer. Arrange all the components for easy access. In addition to the printer, you’ll probably find ink cartridges or a toner cartridge, a power cable, and some basic installation instructions. Read the setup instructions that come with your printer before you do anything else!
Some of these steps apply to other devices, such as a mouse, a webcam, or a microphone. Printers often have more packaging and require more assembly than other devices.
Most printers connect wirelessly to your home Internet router. That way, you can wirelessly print from any computer, tablet, or even your phone. If you need to connect the printer to your computer using a USB cable, you’ll need to buy one because USB cables aren’t typically included with the printer. Fortunately, they are cheap and available at most big-box stores or online.
Remove all tape from the printer. Most printers ship with the print mechanism locked in place to prevent it from moving during shipping. Look for brightly colored tape, paper, or plastic indicating what you need to move or remove to release the print mechanism.
Put the printer within cable length of your computer if you’re not using a wireless printer. Insert the ink or toner cartridge before you turn on the printer for the first time. Place some paper in the paper drawer or tray. Connect the printer to the power supply. Plug the printer cable into the printer and into the computer. If you’re using a wireless printer, follow the setup instructions for connecting the computer to your Internet router.
Very likely, you have to download and install a software program from your printer’s manufacturer in order to install your printer. Chapter 13 describes how to install programs from a company website.
Turn on the printer. A notification tells you that Windows is “setting up a device.” If all goes well, you soon see this notification: Device is ready, your printer (the brand and model number of your printer) is set up and ready to go. You may see other informational messages as Windows 11 handles the configuration, and you may see messages from the printer software as well. Just follow the printer manufacturer’s instructions as needed.
To confirm that your printer is installed properly, see the preceding section, “See All Devices.”
Access Device Options
For more control over device setup, open the Control Panel to the Devices and Printers window. To do so, select the Search icon on the taskbar and type control panelin the Search box. Select Control Panel in the search results to open the Control Panel, and select View Devices and Printers (under Hardware and Sound) to display the window shown in Figure 14-4.
The Device and Printers window shows the devices attached to your computer, including the computer itself, the display (or monitor), external add-on devices (such as a hard drive, flash drive, or memory card), and the mouse.
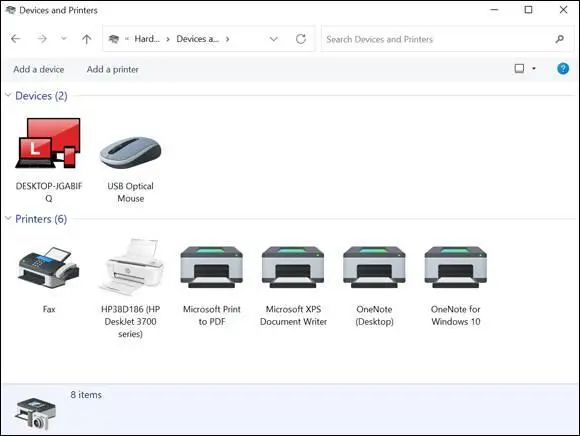
FIGURE 14-4
Most of these devices also appear in the Devices category of the Settings app (refer to Figure 14-3). However, you’ll find options under Devices and Printers that aren’t available in the Settings app.
Windows 11 automatically installs the Microsoft Print to PDF software. This software doesn't print but does create files that you can print later using a real printer. For example, if you’re in a coffee shop and want to print a web page or an email message, you can use this device and then open the file it creates when your computer is connected to a printer.
Double-click or double-tap the device you want to examine. This action opens the device's properties in a window with options or in a smaller box with limited information and options. (Older devices have more limited information.) Figure 14-5shows information about a printer. When you’re finished reviewing the information or selecting available options, return to the previous screen by clicking the back arrow on the toolbar.
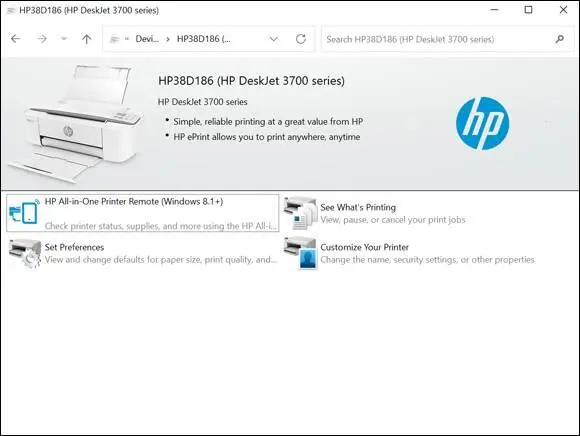
FIGURE 14-5
Display the context menu of options for your printer (or any device) using one of these methods: Click the right mouse button, or tap and hold until you see a small box appear under your finger, and then release. Select Printer Properties from the context menu. (Oddly, the menu also has a separate Properties option — be sure to select Printer Properties instead.)
In the Properties window, select the Print Test Page button. Another window opens indicating A test page has been sent to your printer. Select Close.
If a test page doesn’t print, check that both ends of the cable are plugged in properly and make sure the printer is turned on. If you’re using a wireless printer, make sure the printer is connected to your Internet router. Try to print a test page again. For more help, contact the printer manufacturer or the store where you bought the printer, or search the web.
If you’re having problems with any device, select the Troubleshoot option on the context menu to open a guided troubleshooting program that will walk you through options for resolving problems with the device.
The top of the Devices and Printers window has the Add a Device and Add a Printer buttons, but you need to use them only if Windows 11 doesn't automatically detect and install your device. With USB and plug-and-play technology, most devices install automatically.
Calibrate Your Touchscreen
If you have a problem accurately selecting objects on your screen using touch, you can calibrate your screen alignment. In this case, calibrating means to help Windows 11 understand what constitutes a tap on the screen. Select the Search icon on the taskbar and type control panelin the Search box. Select Control Panel in the search results and then select Hardware and Sound in the Control Panel window. You see the Hardware and Sound window, shown in Figure 14-6.
Читать дальшеИнтервал:
Закладка:
Похожие книги на «Windows 11 For Seniors For Dummies»
Представляем Вашему вниманию похожие книги на «Windows 11 For Seniors For Dummies» списком для выбора. Мы отобрали схожую по названию и смыслу литературу в надежде предоставить читателям больше вариантов отыскать новые, интересные, ещё непрочитанные произведения.


Обсуждение, отзывы о книге «Windows 11 For Seniors For Dummies» и просто собственные мнения читателей. Оставьте ваши комментарии, напишите, что Вы думаете о произведении, его смысле или главных героях. Укажите что конкретно понравилось, а что нет, и почему Вы так считаете.