Curt Simmons - Windows 11 For Seniors For Dummies
Здесь есть возможность читать онлайн «Curt Simmons - Windows 11 For Seniors For Dummies» — ознакомительный отрывок электронной книги совершенно бесплатно, а после прочтения отрывка купить полную версию. В некоторых случаях можно слушать аудио, скачать через торрент в формате fb2 и присутствует краткое содержание. Год выпуска: 2022, ISBN: 2022, Издательство: Wiley, Жанр: ОС и Сети, tbg_computers, на английском языке. Описание произведения, (предисловие) а так же отзывы посетителей доступны на портале библиотеки ЛибКат.
- Название:Windows 11 For Seniors For Dummies
- Автор:
- Издательство:Wiley
- Жанр:
- Год:2022
- ISBN:978-1-119-84652-9
- Рейтинг книги:4 / 5. Голосов: 1
-
Избранное:Добавить в избранное
- Отзывы:
-
Ваша оценка:
Windows 11 For Seniors For Dummies: краткое содержание, описание и аннотация
Предлагаем к чтению аннотацию, описание, краткое содержание или предисловие (зависит от того, что написал сам автор книги «Windows 11 For Seniors For Dummies»). Если вы не нашли необходимую информацию о книге — напишите в комментариях, мы постараемся отыскать её.
What do you want to do with your Windows computer? Sign up for Facebook to keep up with your friends? Watch a video taken during the latest family trip? Find your latest email messages with a single click of the mouse? Look no further than Windows 11 For Seniors For Dummies to discover how to do these tasks and others that you depend on a daily basis. With this guide to the popular operating system, you find the clear and easy instructions to checking tech tasks off your to-do list.
Windows 11 For Seniors For Dummies — читать онлайн ознакомительный отрывок
Ниже представлен текст книги, разбитый по страницам. Система сохранения места последней прочитанной страницы, позволяет с удобством читать онлайн бесплатно книгу «Windows 11 For Seniors For Dummies», без необходимости каждый раз заново искать на чём Вы остановились. Поставьте закладку, и сможете в любой момент перейти на страницу, на которой закончили чтение.
Интервал:
Закладка:

FIGURE 13-4
To uninstall a program, select it. For this example, select Audacity, as shown in Figure 13-5.You don’t have to uninstall Audacity, but if you do, you can follow the steps in the preceding section to reinstall it.

FIGURE 13-5
Select the Uninstall button (located above the list of program names). Some programs offer the Change and Repair options as well as Uninstall. Repair or Change may be useful for a program that you want to keep but isn’t running as expected. When Windows 11 asks whether you really to uninstall, select Yes or No.
If you uninstalled Audacity or another program, it will no longer appear in the Programs and Features window.
 Just because you can uninstall a program doesn't mean you should. You can simply ignore programs you don't use. Look at a program's name, publisher, and date installed to determine whether you actually use a program. You may recognize a program you installed recently, as opposed to one installed before you got your computer. If you find that it's more productive to remove large programs than small ones, repeat Steps 3 and 4 to group by size.
After you install a program, take note of whether your computer runs differently. If your computer slows or behaves sluggishly, the program you recently installed could be the culprit. Uninstall it, if necessary.
Control Startup Apps
Startup apps are applications that start running when you turn on your computer. You might be surprised by how many startup apps run in the background without your knowing it. Occasionally you install new software or download a program from the Internet and discover that it runs automatically whether you like it or not. Sometimes the number of startup apps slows the computer down. To see which apps start running automatically when you turn on your computer, start the Task Manager with one of these techniques:
Keyboard:Press Ctrl+Alt+Del and select Task Manager on the blue screen.
Search:Select the search icon on the taskbar, enter taskin the Search box, and then select the Task Manager in the search results.
Select More Details (if necessary) in the Task Manager window and then select the Startup tab, as shown in Figure 13-6.This is the list of applications that start when your computer starts.
Use one of these techniques to open your browser, go on the Internet, and find out what one of these startup applications does:
Mouse:Right-click an application and choose Search Online.
Touchscreen:Tap and hold down the name of an application. When a box appears around your fingertip, select Search Online.
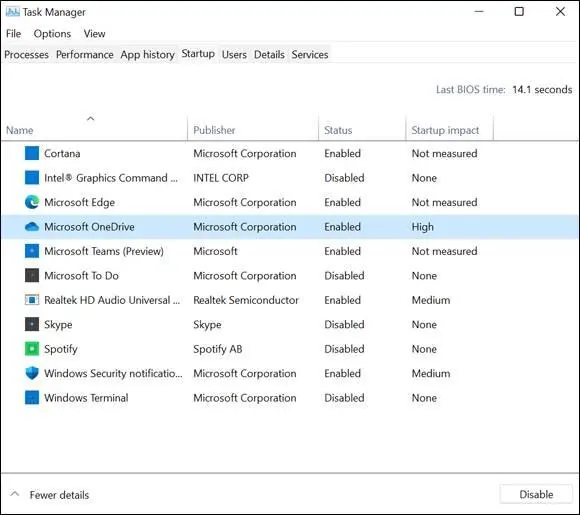
FIGURE 13-6
Notice the Startup Impact column in the Task Manager. Applications with a high impact such as Microsoft OneDrive may be slowing down your computer. If you decide that one of these applications is unwanted or is slowing you down, disable it. (Don’t worry, you can enable it later on very easily, as we explain shortly.) To disable an application, select its name in the list and then select the Disable button.
To enable a startup application in the Task Manager (refer to Figure 13-6), select its name and then select the Enable button. The Status column in the Task Manager tells you whether a startup application has been disabled.
Explore System Information
Select the search icon on the taskbar and type control panelin the Search box.
Select Control Panel in the Search results. In the Control Panel, select System and Security.
In the System and Security window, select System. The System window shown in Figure 13-7appears. This screen is chock-full of information and functions. (You need to scroll down the screen to see everything.) Note each of the following areas onscreen:
Windows edition:Of course, you have Windows 11. However, Windows 11 comes in two primary editions: the Home edition, which you are likely to have, and the Pro edition, for computer professionals. You may find information here about so-called Service or Experience Packs, which are large collections of updates to Windows 11.
Device Specifications:This section displays details about your hardware, including the processor, the amount of installed memory (RAM), and other details.
Computer name, domain, and workgroup settings:This information pertains to your network, if you have one. If a computer can’t connect to a network, the problem is often related to the name of the Workgroup (a network). The Change Settings function lets you change the Workgroup name to match other computers on the same network.
Windows 11 gives your computer a nondescript, generic name to begin with. To give your computer a more descriptive name, select Rename this PC at the very top of the System window (refer to Figure 13-7). Enter a new name in the Rename Your PC dialog box.
Product key and activation:In an effort to control software piracy involving bootlegged copies of Windows 11, each copy of Windows 11 must be activated. Odds are that you activated your copy the first time you started your computer.
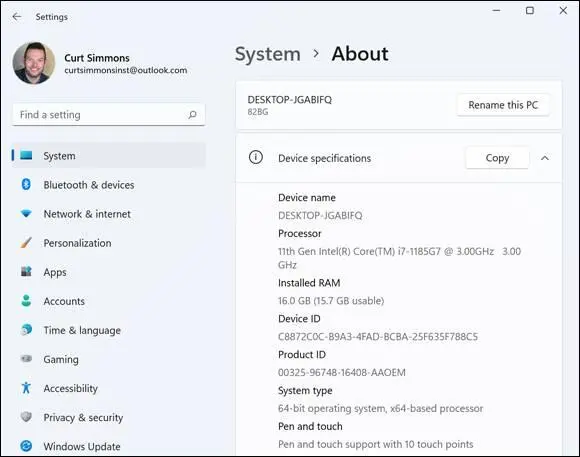
FIGURE 13-7
Don’t be alarmed by the System information and options. If all goes well, you don’t have to use most of what you find here. Some familiarity with this screen will be useful, however, if all doesn’t go well later.
Check Your Security and Maintenance Status
In Control Panel, select System and Security, and on the next screen, choose Security and Maintenance (see Figure 13-8). The Security and Maintenance window appears, as shown in Figure 13-9.
Another way to open the Security and Maintenance window is to type Security and Maintenanceusing Search on the Windows taskbar.
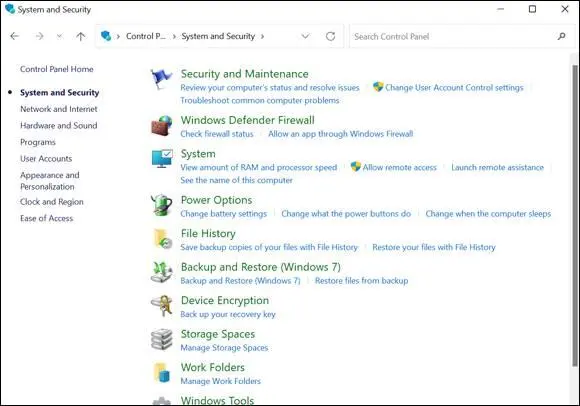
FIGURE 13-8
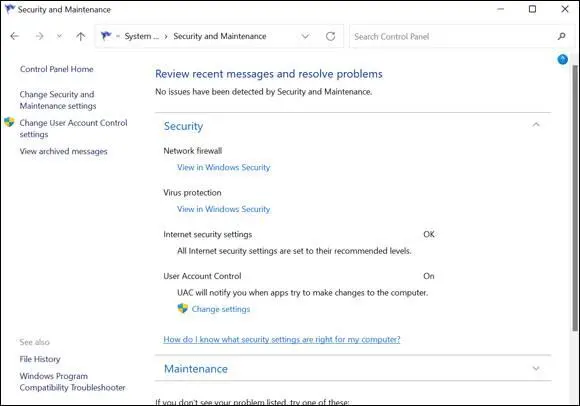
FIGURE 13-9
Note any message displayed under Review Recent Messages and Resolve Problems. Ideally, you see No issues have been detected by Security and Maintenance. If you see a message concerning a specific problem, select that message for more information.
Читать дальшеИнтервал:
Закладка:
Похожие книги на «Windows 11 For Seniors For Dummies»
Представляем Вашему вниманию похожие книги на «Windows 11 For Seniors For Dummies» списком для выбора. Мы отобрали схожую по названию и смыслу литературу в надежде предоставить читателям больше вариантов отыскать новые, интересные, ещё непрочитанные произведения.


Обсуждение, отзывы о книге «Windows 11 For Seniors For Dummies» и просто собственные мнения читателей. Оставьте ваши комментарии, напишите, что Вы думаете о произведении, его смысле или главных героях. Укажите что конкретно понравилось, а что нет, и почему Вы так считаете.