Unless you store your videos in the C:\Users\ Your Name \Videos folder, you don’t see any videos. To tell the Video app where you store your videos, select the Add Folders button. You come to the Build Your Collection screen. Select the Add button (the plus sign), and in the Select Folder dialog box, select the folder where videos are stored and then select the Add This Folder to Video button. Repeat these instructions to add all the folders where you store videos.
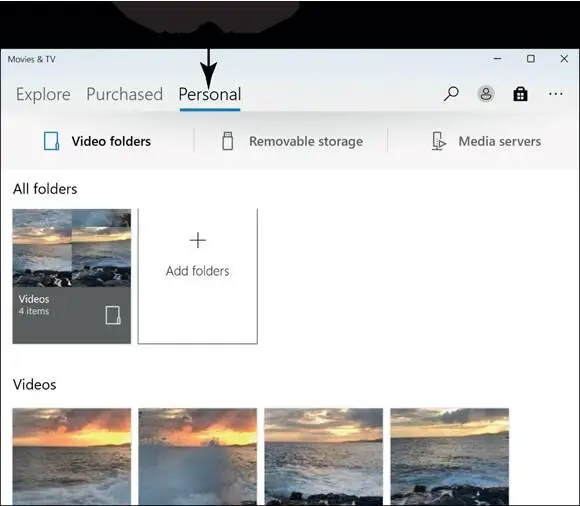
FIGURE 12-11
To play a video, select it on the home screen. The video appears in the video player screen, as shown in Figure 12-12.Along the bottom of this screen are controls for pausing, playing, and changing the volume level. Drag the slider below the video screen to rewind and fast-forward.
Select the Back button (located in the upper-left corner of the screen) to return to the Movies & TV home screen.
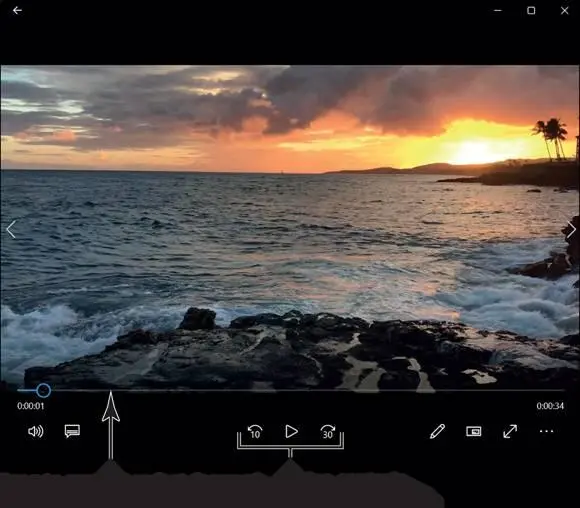
FIGURE 12-12
Burn a CD
Burning a CD means to copy songs from a computer to a CD. Burn a CD so that you can play the songs on your car’s CD player or pass along your favorite songs to a friend. To burn a CD, start by opening Windows Media Player, as shown in Figure 12-13.
 Earlier in this chapter, “Play and Copy Music from a CD” explains Windows Media Player in detail.
 To burn a CD, your computer needs an optical disk drive, a hardware device for playing and recording to CDs and DVDs. If your computer doesn’t have one and you want to burn CDs, you can buy optical disk drives that plug into your computer.
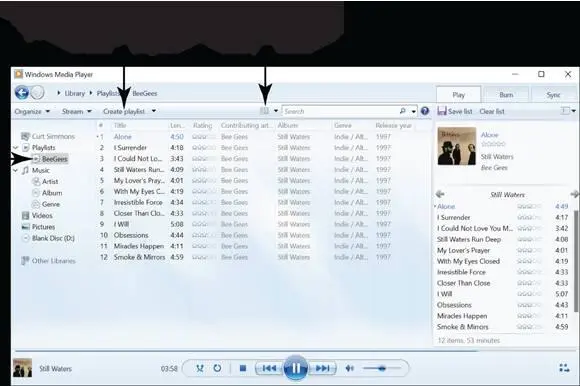
FIGURE 12-13
Create a playlist so that Windows Media Player knows which songs to burn to the CD. To create a playlist, select the Create Playlist button and enter a name for the playlist where the words Untitled Playlist appear. The name you enter then appears under Playlists on the left side of the screen.
Locate songs for your playlist and drag and drop their titles one by one onto your playlist name. The words Add to [Playlist Name] appear when you drag a song title onto your list. Use these techniques to locate songs so that you can drag them in the playlist:
Browse for songs:Under Music, select Artist, Album, or Genre on the left side of the screen (refer to Figure 12-13). A list of artists, albums, or genres appears.
Change views:Open the Change Views drop-down menu and choose Icon, Title, or Details to make finding a song title easier.
Search for songs:Enter a search term in the Search box.
Select your playlist on the left side of the screen. The songs you selected for the list appear, as shown in Figure 12-13.To listen to the songs on a playlist, select its name and click or tap the Play button at the bottom of the screen.
 You can edit a playlist. While the list is playing, place more songs on the list (follow Step 3) or remove songs from the list by right-clicking and choosing Remove from List.
After you create a playlist, you can burn it to a CD. With Windows Media Player open, insert a blank CD in your computer’s CD or DVD drive or an optical drive plugged into your computer. Then select the Burn tab (refer to Figure 12-14) and drag a playlist from the left side of the screen to Burn List on the right.
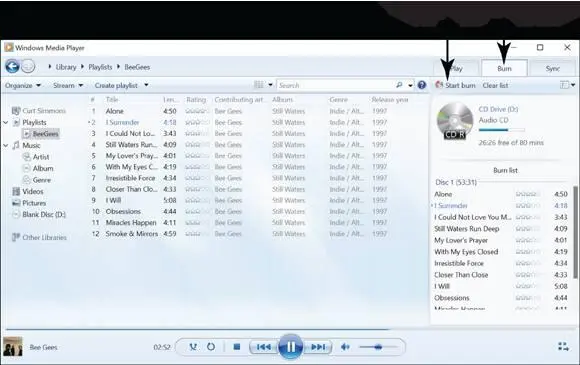
FIGURE 12-14
 You can change the order of the songs before you burn them onto a CD. Drag song titles up or down the list to change the song order.
Note the Audio CD bar on the right side of the screen. It tells you whether there is enough disc space to burn all the songs on the list. If there is enough space, select the Start Burn button. It can take a few minutes to burn a CD. When the job is complete, your computer ejects the CD. We suggest playing it to see whether the songs copied correctly to the CD. While you’re at it, label the CD by writing on it with a felt-tip (not a ballpoint) pen. Label the top of the CD, not the bottom.
Make a Voice Recording
Open the Voice Recorder app to record your voice. As shown in Figure 12-15,Voice Recorder lists recordings you already made (if you made any recordings).
 It goes without saying, but your computer needs a built-in microphone or microphone jack for plugging in a microphone if you want to make voice recordings.
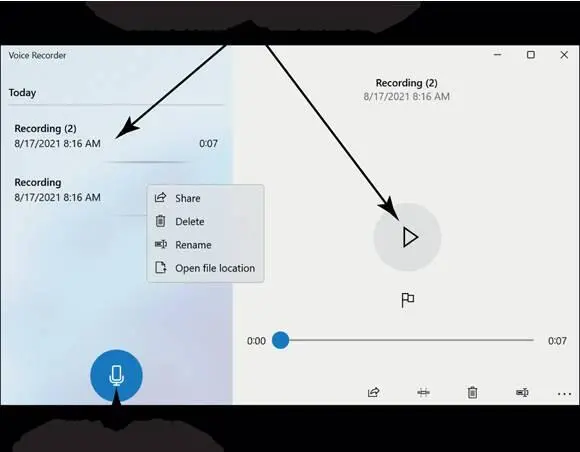
FIGURE 12-15
 The first time you run Voice Recorder, a dialog box asks, “Let Voice Recorder access your documents library?” Select Yes. To change this later, go to the Settings app.
Select the Record button (or press Ctrl+R) to begin a recording. A timer tells you how long your recording is. You can select the Pause/Resume Recording button to temporarily stop a recording. Select the Pause/Resume Recording button again to continue recording.
Select the Stop Recording button (located in the middle of the screen) to end a recording. The name of your recording appears in the list under the generic name Recording. To give it a more descriptive name, right-click or tap to display the recording’s context menu (refer to Figure 12-15), choose Rename, enter a name, and select the Rename button.
 To delete a recording, display its context menu and choose Delete.
 To access a Sound Recorder file, perhaps to copy or move it, display its context menu (refer to Figure 12-15) and choose Open File Location. The Sound Recordings folder opens. From here, you can copy or move the file. See Chapter 15 if you need instructions for handling files.
IN THIS PART …
Fine-tune Windows 11.
Manage printers and other peripherals.
Manipulate files and folders.
Keep backup copies of files and folders.
Chapter 13
Maintaining Windows 11
Читать дальше
Конец ознакомительного отрывка
Купить книгу


 Earlier in this chapter, “Play and Copy Music from a CD” explains Windows Media Player in detail.


