Curt Simmons - Windows 11 For Seniors For Dummies
Здесь есть возможность читать онлайн «Curt Simmons - Windows 11 For Seniors For Dummies» — ознакомительный отрывок электронной книги совершенно бесплатно, а после прочтения отрывка купить полную версию. В некоторых случаях можно слушать аудио, скачать через торрент в формате fb2 и присутствует краткое содержание. Год выпуска: 2022, ISBN: 2022, Издательство: Wiley, Жанр: ОС и Сети, tbg_computers, на английском языке. Описание произведения, (предисловие) а так же отзывы посетителей доступны на портале библиотеки ЛибКат.
- Название:Windows 11 For Seniors For Dummies
- Автор:
- Издательство:Wiley
- Жанр:
- Год:2022
- ISBN:978-1-119-84652-9
- Рейтинг книги:4 / 5. Голосов: 1
-
Избранное:Добавить в избранное
- Отзывы:
-
Ваша оценка:
Windows 11 For Seniors For Dummies: краткое содержание, описание и аннотация
Предлагаем к чтению аннотацию, описание, краткое содержание или предисловие (зависит от того, что написал сам автор книги «Windows 11 For Seniors For Dummies»). Если вы не нашли необходимую информацию о книге — напишите в комментариях, мы постараемся отыскать её.
What do you want to do with your Windows computer? Sign up for Facebook to keep up with your friends? Watch a video taken during the latest family trip? Find your latest email messages with a single click of the mouse? Look no further than Windows 11 For Seniors For Dummies to discover how to do these tasks and others that you depend on a daily basis. With this guide to the popular operating system, you find the clear and easy instructions to checking tech tasks off your to-do list.
Windows 11 For Seniors For Dummies — читать онлайн ознакомительный отрывок
Ниже представлен текст книги, разбитый по страницам. Система сохранения места последней прочитанной страницы, позволяет с удобством читать онлайн бесплатно книгу «Windows 11 For Seniors For Dummies», без необходимости каждый раз заново искать на чём Вы остановились. Поставьте закладку, и сможете в любой момент перейти на страницу, на которой закончили чтение.
Интервал:
Закладка:
Select the Folders tab to open the Folders window. By default, the Photos app keeps track of photos found in the Pictures folder (and its subfolders) on your computer. Suppose you want to manage photos in other folders with the Photos app. Select Add a Folder. The Select Folder dialog box appears. Select a Folder and then select the Add Folder to Pictures button. Photos in the folder you select are now available for viewing in the Photos app.
Edit Photos Using the Photos App
You can use the Photos app to change a photo’s size or appearance. In the Photos app, click or tap the photo you want to edit so that it fills the screen; then select the Edit & Create button, and choose Edit on the drop-down menu. The Editing window opens, as shown in Figure 11-11.This window offers many tools for touching up photos. To edit a photo, select a retouching method along the top of the screen (Crop & Rotate, Filters, or Adjustments) and then choose editing options.
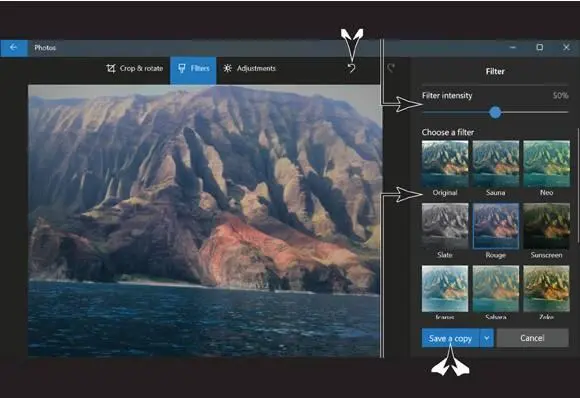
FIGURE 11-11
Using the Filters method, you can take advantage of preset edits to photographs. After you select Filters, filter presets appear on the right side of the screen (refer to Figure 11-11). They offer the chance to change the light and color of a photograph in one fell swoop. Drag the Filter Intensity slider at the top of the screen to further change the look of a photograph.
 If you make mincemeat of a photograph and you want the original version back, select the Undo button. Selecting this button restores a photograph to its original, pristine state.
Choose the Adjustments method to alter the brightness and color of your photograph (refer to Figure 11-12). By dragging sliders on the right side of the screen, you can do much to change the appearance of a photo.
Many photos can be improved by cropping, which involves cutting out distracting elements and keeping just part of the photo. You might crop a photo to concentrate on its most important part. To crop, select the Crop & Rotate method at the top of the screen. Then either select an aspect ratio or choose the Custom aspect ratio and drag the size or corners of the picture box until the photo is to your liking. The box tells you which parts will remain after cropping, as shown in Figure 11-13.
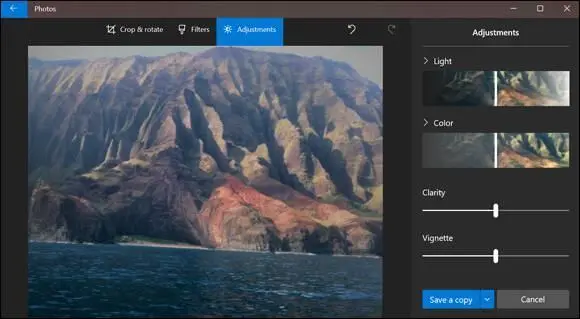
FIGURE 11-12
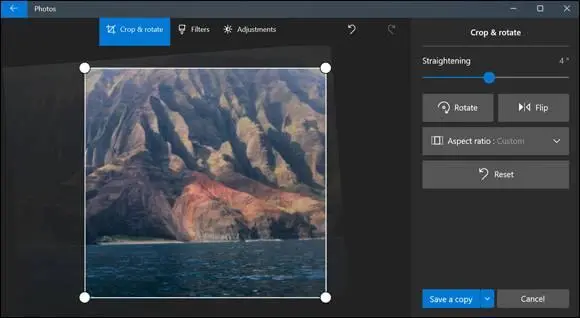
FIGURE 11-13
Sometimes when you import photos from a digital camera or scanner, they arrive askew because the photographer turned the camera the wrong way when shooting. You can correct this error by selecting Crop & Rotate and then selecting the Rotate button until the photo turns right-side-up.
Select Save a Copy when you finish doctoring your photograph to keep the original photograph as well as the edited version.
Print Photos Using the Photos App
If necessary, connect the cable from your printer to the USB port on your computer and make sure that your printer is turned on.
In the Photos app, select the photo you want to print using a click or tap to display the photo at full screen.
Select the Print button on the right side of the toolbar (it looks like a printer; refer to Figure 11-8). The Print window appears, as shown in Figure 11-14.
Here’s a handy keyboard shortcut that works in any app: Press Ctrl+P to open the Print window straightaway.
Select a printer. Note the preview. Select the Print button.
Chapter 14 explains printing in detail.
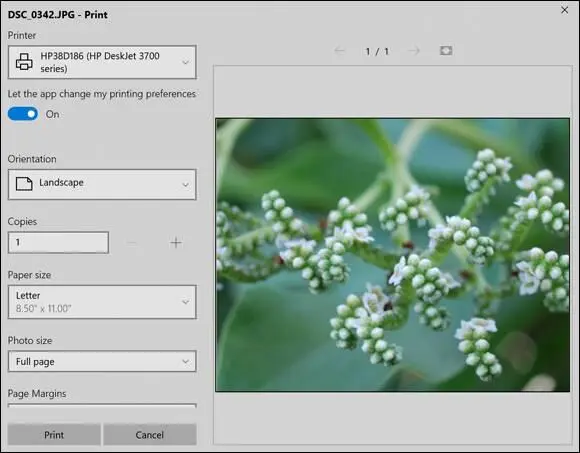
FIGURE 11-14
Scan Photos and Documents
Scan photos and documents to preserve them in digital form. Old family photos and heirloom documents such as birth certificates are candidates for scanning. Scanning means to render a paper photograph or document as a computer file so that you can post it on the Internet or send it by email. To scan photos and documents, you must have a scanner or a printer that is capable of scanning (most printers have a scanning capability). To start, connect the cable from your scanner or printer to the USB port on your computer. Make sure that your scanner or printer is turned on. If you’re using a printer, put it in Scan mode (you’ll need to check your printer documentation for instructions and details).
Put the item you want to scan in your scanner or printer.
Select the Search icon on the taskbar and type scanin the Search box. In the search results, select Windows Fax and Scan. The Windows Fax and Scan app opens.
In the navigation window, select the New Scan button on the toolbar. The New Scan dialog box appears (see Figure 11-15). Starting here, you can tell Windows whether you want a high-quality or low-quality scan. On the Color Format menu, for example, choose Grayscale or Black and White instead of Color if you’re scanning a black-and-white document. Choose a Resolution (DPI) higher than 300 to render your photo or document in greater detail.
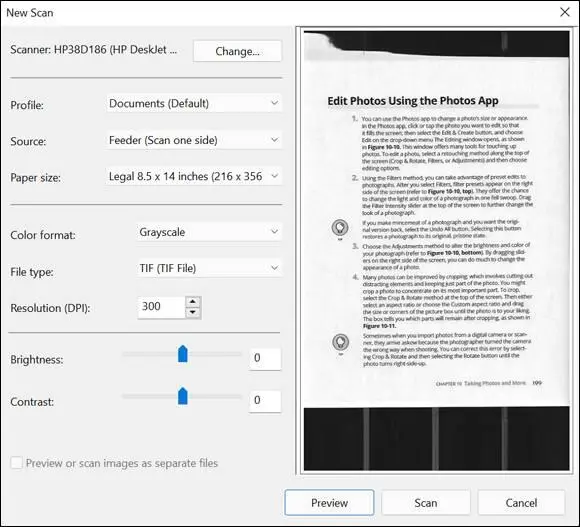
FIGURE 11-15
Unless you’re scanning more than one item, deselect the Preview or Scan Images as Separate Files option. This option creates a separate digital file for each item in your scanner.
Select the Preview button. The preview window shows what your photo or document will look like when it is scanned. If you don’t like what you see, play with the settings in the New Scan dialog and select the Preview button again.
Select the Scan button when you’re ready to scan your document. Your scanned photo or document appears in the Windows Fax and Scan window with the generic filename “Image.”
Select your newly scanned image and then select the Save As button. The Save As dialog box appears. Enter a descriptive name for the item, choose a folder to store it in, and select the Save button.
Chapter 15 explains how to save files.
Chapter 12
Enjoying Music and Videos
IN THIS CHAPTER
 Listening to music and burning it to CDs
Playing music on the Groove Music app
Интервал:
Закладка:
Похожие книги на «Windows 11 For Seniors For Dummies»
Представляем Вашему вниманию похожие книги на «Windows 11 For Seniors For Dummies» списком для выбора. Мы отобрали схожую по названию и смыслу литературу в надежде предоставить читателям больше вариантов отыскать новые, интересные, ещё непрочитанные произведения.


Обсуждение, отзывы о книге «Windows 11 For Seniors For Dummies» и просто собственные мнения читателей. Оставьте ваши комментарии, напишите, что Вы думаете о произведении, его смысле или главных героях. Укажите что конкретно понравилось, а что нет, и почему Вы так считаете.