Curt Simmons - Windows 11 For Seniors For Dummies
Здесь есть возможность читать онлайн «Curt Simmons - Windows 11 For Seniors For Dummies» — ознакомительный отрывок электронной книги совершенно бесплатно, а после прочтения отрывка купить полную версию. В некоторых случаях можно слушать аудио, скачать через торрент в формате fb2 и присутствует краткое содержание. Год выпуска: 2022, ISBN: 2022, Издательство: Wiley, Жанр: ОС и Сети, tbg_computers, на английском языке. Описание произведения, (предисловие) а так же отзывы посетителей доступны на портале библиотеки ЛибКат.
- Название:Windows 11 For Seniors For Dummies
- Автор:
- Издательство:Wiley
- Жанр:
- Год:2022
- ISBN:978-1-119-84652-9
- Рейтинг книги:4 / 5. Голосов: 1
-
Избранное:Добавить в избранное
- Отзывы:
-
Ваша оценка:
Windows 11 For Seniors For Dummies: краткое содержание, описание и аннотация
Предлагаем к чтению аннотацию, описание, краткое содержание или предисловие (зависит от того, что написал сам автор книги «Windows 11 For Seniors For Dummies»). Если вы не нашли необходимую информацию о книге — напишите в комментариях, мы постараемся отыскать её.
What do you want to do with your Windows computer? Sign up for Facebook to keep up with your friends? Watch a video taken during the latest family trip? Find your latest email messages with a single click of the mouse? Look no further than Windows 11 For Seniors For Dummies to discover how to do these tasks and others that you depend on a daily basis. With this guide to the popular operating system, you find the clear and easy instructions to checking tech tasks off your to-do list.
Windows 11 For Seniors For Dummies — читать онлайн ознакомительный отрывок
Ниже представлен текст книги, разбитый по страницам. Система сохранения места последней прочитанной страницы, позволяет с удобством читать онлайн бесплатно книгу «Windows 11 For Seniors For Dummies», без необходимости каждый раз заново искать на чём Вы остановились. Поставьте закладку, и сможете в любой момент перейти на страницу, на которой закончили чтение.
Интервал:
Закладка:
 See Chapter 4 for information on creating a Microsoft Account.
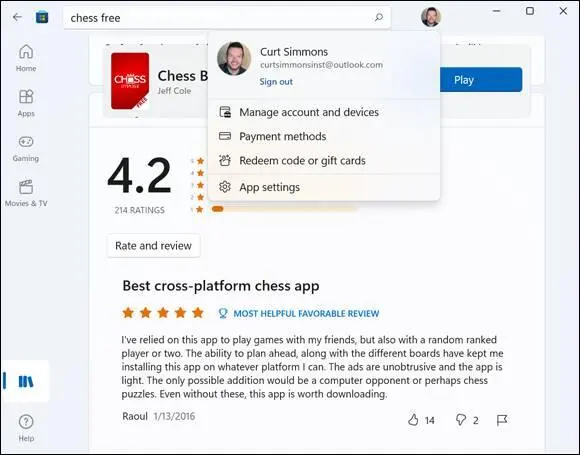
FIGURE 10-12
For security purposes, Microsoft asks you to enter your email address and password on the next screen. Enter your password and select the Sign In button.
Scroll through the screen to make sure that the information here is accurate. If you are not being billed to the correct credit card or you want to change the credit card to which you are billed, select Payment & Billing on the toolbar and choose Payment Options on the drop-down menu that appears.
Select a payment method (or select Payment Options if Microsoft already has credit card information on you) and do the following:
Select your credit card type.
You must fill out all parts of this form except for Address Line 2.
Enter your credit card number in the box provided. Don’t enter dashes or spaces.
Under Expiration Date, select the month (MM) and year (YYYY) your card expires.
Enter your name as it appears on your credit card.
Under CVV, enter the three- or four-digit verification code from your credit card. (Select What’s This? for an illustration of the location of this code on your card.)
In the Billing Address section, do the following:
Enter your street address, city, state, and ZIP code.
Select your Country/region.
Under Phone Number, enter your area code in the first box and the remainder of your number in the second box.
When you’re ready to continue, select Save.
If any of your data is incomplete or invalid, the form remains onscreen. Look for indications of a problem. Review each entry before selecting Submit.
If your information was accepted, you return to the Your Account screen. Under Payment and billing info, note your credit card type, the last four digits of your number, and the expiration date.
Chapter 11
Taking Photos and More
IN THIS CHAPTER
 Shooting photos and video
Loading photos from a digital camera
Viewing, editing, and organizing photos with the Photos app
Scanning documents and photos
Windows 11 makes enjoying digital photos easy. You can pick and choose photos to look at or display a group of photos in a slide show. You set a favorite photo to be your Lock screen background so that you see it every time you start Windows 11.
If you have a printer, you can print photos for yourself or to send them to someone. Even black-and-white prints of color photos may be nice. If you have a scanner, you can even scan photos to make digital copies of photographs that as yet exist only in paper form.
Of course, if you want to take your own photos, nothing beats having a digital camera. Copy photos from your camera to your Pictures folder for viewing and sharing. Or use the Camera app with the built-in camera found in many laptops and tablets.
In this chapter, you use the tools that come with Windows 11 for working with, printing, scanning, and editing photos.
Take Photos (and Videos) with Your Computer
Select the Search button on the taskbar and type camera. Windows 11 will locate the Camera app for you. If you don’t have a webcam, the app screen displays We can’t find your camera. If you don’t have a built-in webcam, or the resolution of the one you have is too low, you can easily add a webcam. Simply plug the camera into your computer — it’s that easy.
You can choose from many good webcam models. Generally, get the highest video resolution you can afford, because you’ll probably use the camera for video chats. Consider the size of the camera, its attachment to your computer, and whether it has a microphone (you definitely need a microphone).
For instructions about opening apps such as the Camera app, visit Chapter 2.
The first time you use the Camera app, you may see a screen that says Let Windows camera access your location? Select Yes to continue.
The Camera app opens, and there’s a good chance you recognize the face staring back at you, such as the example in Figure 11-1.To take a photo, smile and then click or tap the Take Photo button (it’s on the right side of the screen). You may notice a blue box dancing around your face as you get ready to take the photo (see Figure 11-1). This is a focusing box that the camera uses, but it won’t actually show up in your photo. You may hear a shutter click when you take the shot. Your photo is placed automatically in a folder called Camera Roll in the Pictures folder.
Select the Camera Roll icon in the lower-right corner of the Camera app to view the photo you most recently took. After that, you can select See All Photos to open the Photos App and view photos there. (Select the Back button in the upper-left corner of the screen to resume taking photos.)
To take a time-lapse photo, use the Photo Timer button on the left side of the screen. Select this button one, two, or three times to tell the Camera app to wait 2, 5, or 10 seconds before taking the photo. Then click or tap the Camera button and wait 2, 5, or 10 seconds for the photo to be taken.

FIGURE 11-1
Select the Video button (shown in Figure 11-1). Nothing happens until you click or tap the Video button a second time, at which point you’re in moving pictures. A counter indicates the length of the video. Short is sweet in video. You can speak, too. Click or tap the Video button to stop the video. As with photos you take with the Camera app, videos are saved initially in the Camera Roll subfolder of the Pictures folder. Select the Camera button to turn off the video function and return to taking still photos (with the next click or tap).
Leave the Camera app open to explore the Camera settings, which we explain next.
Choose Camera Settings
If the Camera app isn’t open, open it now. Then select the Settings button located in the upper-left corner of the Camera window (refer to Figure 11-1). The Settings panel opens, as shown in Figure 11-2and Figure 11-3.From here, you can tell the Camera app how to take photos and videos.
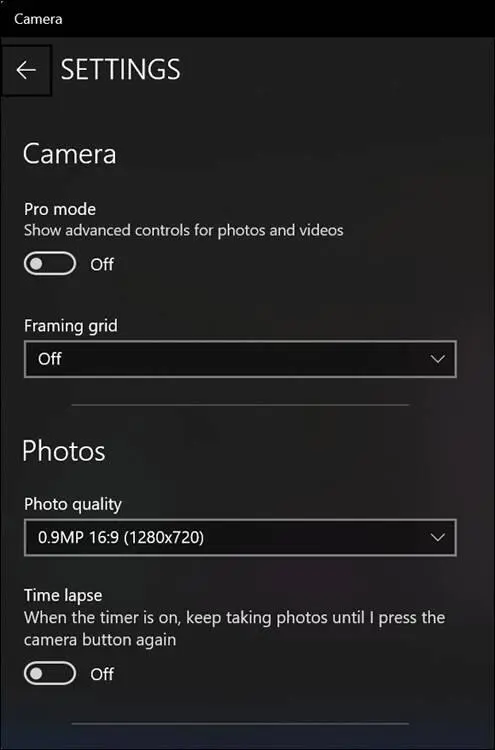
FIGURE 11-2
Читать дальшеИнтервал:
Закладка:
Похожие книги на «Windows 11 For Seniors For Dummies»
Представляем Вашему вниманию похожие книги на «Windows 11 For Seniors For Dummies» списком для выбора. Мы отобрали схожую по названию и смыслу литературу в надежде предоставить читателям больше вариантов отыскать новые, интересные, ещё непрочитанные произведения.


Обсуждение, отзывы о книге «Windows 11 For Seniors For Dummies» и просто собственные мнения читателей. Оставьте ваши комментарии, напишите, что Вы думаете о произведении, его смысле или главных героях. Укажите что конкретно понравилось, а что нет, и почему Вы так считаете.