Curt Simmons - Windows 11 For Seniors For Dummies
Здесь есть возможность читать онлайн «Curt Simmons - Windows 11 For Seniors For Dummies» — ознакомительный отрывок электронной книги совершенно бесплатно, а после прочтения отрывка купить полную версию. В некоторых случаях можно слушать аудио, скачать через торрент в формате fb2 и присутствует краткое содержание. Год выпуска: 2022, ISBN: 2022, Издательство: Wiley, Жанр: ОС и Сети, tbg_computers, на английском языке. Описание произведения, (предисловие) а так же отзывы посетителей доступны на портале библиотеки ЛибКат.
- Название:Windows 11 For Seniors For Dummies
- Автор:
- Издательство:Wiley
- Жанр:
- Год:2022
- ISBN:978-1-119-84652-9
- Рейтинг книги:4 / 5. Голосов: 1
-
Избранное:Добавить в избранное
- Отзывы:
-
Ваша оценка:
Windows 11 For Seniors For Dummies: краткое содержание, описание и аннотация
Предлагаем к чтению аннотацию, описание, краткое содержание или предисловие (зависит от того, что написал сам автор книги «Windows 11 For Seniors For Dummies»). Если вы не нашли необходимую информацию о книге — напишите в комментариях, мы постараемся отыскать её.
What do you want to do with your Windows computer? Sign up for Facebook to keep up with your friends? Watch a video taken during the latest family trip? Find your latest email messages with a single click of the mouse? Look no further than Windows 11 For Seniors For Dummies to discover how to do these tasks and others that you depend on a daily basis. With this guide to the popular operating system, you find the clear and easy instructions to checking tech tasks off your to-do list.
Windows 11 For Seniors For Dummies — читать онлайн ознакомительный отрывок
Ниже представлен текст книги, разбитый по страницам. Система сохранения места последней прочитанной страницы, позволяет с удобством читать онлайн бесплатно книгу «Windows 11 For Seniors For Dummies», без необходимости каждый раз заново искать на чём Вы остановились. Поставьте закладку, и сможете в любой момент перейти на страницу, на которой закончили чтение.
Интервал:
Закладка:
 Depending on the size of your screen, you may need to scroll down to see all of the Settings panel. Just move your mouse over the panel, and a scroll bar appears on the right side.
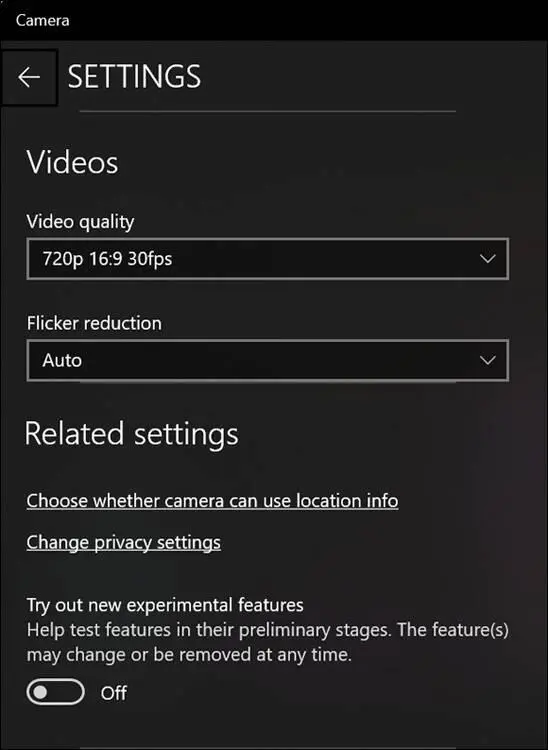
FIGURE 11-3
Turn Pro Mode on if you want to choose a brightness setting for your photos. After you turn on Pro Mode, a Brightness icon appears on the left side of the Camera app screen. Selecting this icon makes a slider appear so that you can adjust the brightness of photos from 100 percent (very bright) to 0 percent (very dark).
Choose a Framing Grid option to help aim the camera. For example, the Crosshairs option places crossing lines in the center of the screen so that you know where the center of your photos will be.
Under Photos, decide how you want to take photos:
Photo quality:These options determine the aspect ratio and size of photos in pixels. For example, you can shoot narrow (the 4:3 options) or widescreen (the 16:9 options) photos.
Time lapse:Choose this option when you want to take a series of time-lapse photos (the previous topic in this chapter explains how to take a time-lapse photo). For example, with this option selected and the Photo Timer set to 2 seconds, the Camera app takes a time-lapse photo every 2 seconds until you click or tap the Camera button a second time, which tells the app to stop taking photos.
Under Videos, decide how you want to take videos:
Video quality:These options determine the aspect ratio and the number of pixels that appear in video frames. Notice that the fps (frames per second) setting in each option is the same, 30. Aspect ratio refers to the proportional relationship between a video’s width and height. The most common aspect ratios are 16:9 (widescreen) and 4:3 (old-fashioned TV). A pixel is one point of color. Suffice it to say, the more pixels in the setting, the clearer the video is.
Flicker reduction:These options reduce the flickering that can occur when video is taken under fluorescent light. The 50 Hz (hertz) setting applies to the U.S. and Canada, where the AC (alternating electrical current) runs at 50 Hz; the 60 Hz setting applies to the rest of the world.
Return to the Camera app by clicking or tapping the Camera app screen.
Return to the Start screen. See the section “View Photos with the Photos App” to see and maybe edit the photos you just took.
Copy Photos from Your Camera
If your digital camera came with a cable, connect that cable to the camera, connect the other end of the cable to a USB port on your computer, and turn your camera on. If your laptop or tablet has a built-in card slot, you can take the memory card out of the camera and insert it in that slot.
If your computer doesn’t have a built-in card slot, consider buying a small memory card reader that plugs into your computer and works with your camera’s memory card. You don’t need a multicard reader, just a reader with a single slot the size of your camera card. We consider a card reader to be more convenient than using a cable.
The techniques described here for importing photos from a camera also apply to videos. Follow these steps as well to copy videos from your digital camera to your computer.
Windows 11 detects your camera and may briefly display a notification indicating Select to choose what happens with this device. If you’re quick enough to tap or click this notification, Windows 11 displays your choices, as shown in Figure 11-4.Select Open Device to View Files, if that option is available, to open File Explorer to the photos on your camera, as shown in Figure 11-5.Then skip to Step 4. If you didn’t catch the notification in time or you didn’t see the notification, continue to Step 4 to import photos another way.
See Chapter 3 for information on increasing the time a notification remains onscreen.
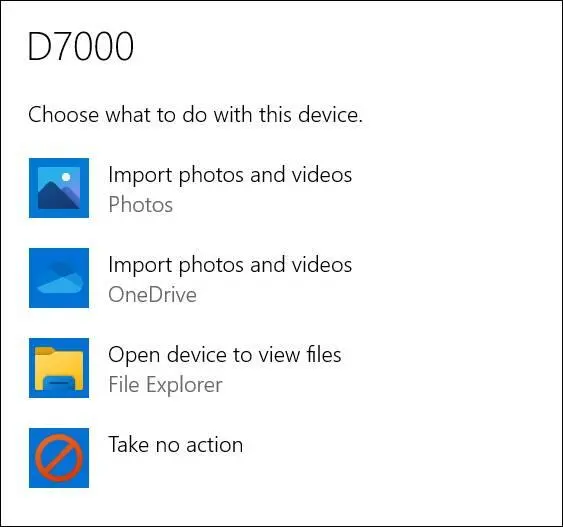
FIGURE 11-4
Select the File Explorer icon on the taskbar to start File Explorer. Then look for and select your camera in the navigation pane on the left side of the screen (refer to Figure 11-5). Your camera is located under This PC in the Navigation pane.
See Chapter 15 for detailed information about using File Explorer.
In File Explorer, select the photos you want to copy from your camera to your computer. Depending on your camera setup, the photos may be in a subfolder (refer to Figure 11-5). Use these techniques to select the photos:
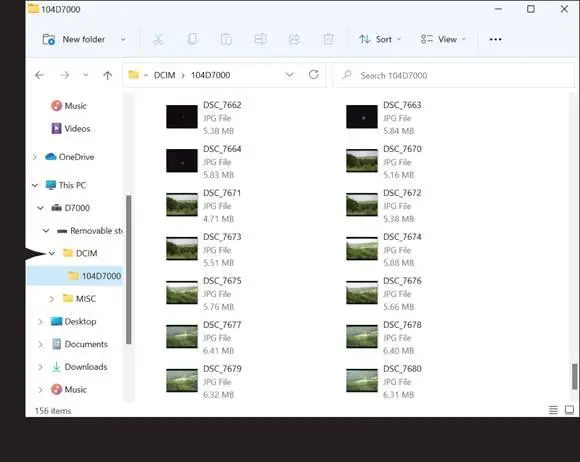
FIGURE 11-5
Hold down the Ctrl button and click or tap photos to select them individually.
Press Ctrl+A to select all the photos in a folder.
Copy the photos you selected so that you can paste them into a folder on your computer. Use one of these techniques to copy the photos:
Press Ctrl+C.
On the toolbar in File Explorer, select the Copy button.
In File Explorer, select the folder where you want to copy your photos.
If you want to be able to view and edit your photos with the Photos app, select the Pictures folder or one of its subfolders and copy the photos there.
Organizing photos can be a challenge. If you dump more than a few dozen photos into the Pictures folder without using folders, finding a specific photo later will be difficult. Using folders with unintelligible names doesn’t help, either. Most of our folder names are based on the year and month (such as 2021–06) or the subject or location where we took the photos. You can name your folders whatever you want, but choose names that are meaningful to you and will help you find specific photos later.
Paste the photos into the folder you selected in Step 7. Use one of these techniques:
Press Ctrl+V.
On the toolbar in File Explorer, select the Paste button.
If you often import photos from a digital camera or memory card, you can speed the process by telling Windows to open File Explorer immediately when you attach your camera or memory card to your computer. Select the Search icon on the taskbar and type autoplay settings; and then select that option when it appears in your search. The AutoPlay window opens, as shown in Figure 11-6.In the Memory Card and Camera sections, choose Open Folder (or Open Device) to View Files (File Explorer).
Интервал:
Закладка:
Похожие книги на «Windows 11 For Seniors For Dummies»
Представляем Вашему вниманию похожие книги на «Windows 11 For Seniors For Dummies» списком для выбора. Мы отобрали схожую по названию и смыслу литературу в надежде предоставить читателям больше вариантов отыскать новые, интересные, ещё непрочитанные произведения.


Обсуждение, отзывы о книге «Windows 11 For Seniors For Dummies» и просто собственные мнения читателей. Оставьте ваши комментарии, напишите, что Вы думаете о произведении, его смысле или главных героях. Укажите что конкретно понравилось, а что нет, и почему Вы так считаете.