Curt Simmons - Windows 11 For Seniors For Dummies
Здесь есть возможность читать онлайн «Curt Simmons - Windows 11 For Seniors For Dummies» — ознакомительный отрывок электронной книги совершенно бесплатно, а после прочтения отрывка купить полную версию. В некоторых случаях можно слушать аудио, скачать через торрент в формате fb2 и присутствует краткое содержание. Год выпуска: 2022, ISBN: 2022, Издательство: Wiley, Жанр: ОС и Сети, tbg_computers, на английском языке. Описание произведения, (предисловие) а так же отзывы посетителей доступны на портале библиотеки ЛибКат.

- Название:Windows 11 For Seniors For Dummies
- Автор:
- Издательство:Wiley
- Жанр:
- Год:2022
- ISBN:978-1-119-84652-9
- Рейтинг книги:4 / 5. Голосов: 1
-
Избранное:Добавить в избранное
- Отзывы:
-
Ваша оценка:
Windows 11 For Seniors For Dummies: краткое содержание, описание и аннотация
Предлагаем к чтению аннотацию, описание, краткое содержание или предисловие (зависит от того, что написал сам автор книги «Windows 11 For Seniors For Dummies»). Если вы не нашли необходимую информацию о книге — напишите в комментариях, мы постараемся отыскать её.
What do you want to do with your Windows computer? Sign up for Facebook to keep up with your friends? Watch a video taken during the latest family trip? Find your latest email messages with a single click of the mouse? Look no further than Windows 11 For Seniors For Dummies to discover how to do these tasks and others that you depend on a daily basis. With this guide to the popular operating system, you find the clear and easy instructions to checking tech tasks off your to-do list.
Windows 11 For Seniors For Dummies — читать онлайн ознакомительный отрывок
Ниже представлен текст книги, разбитый по страницам. Система сохранения места последней прочитанной страницы, позволяет с удобством читать онлайн бесплатно книгу «Windows 11 For Seniors For Dummies», без необходимости каждый раз заново искать на чём Вы остановились. Поставьте закладку, и сможете в любой момент перейти на страницу, на которой закончили чтение.
Интервал:
Закладка:
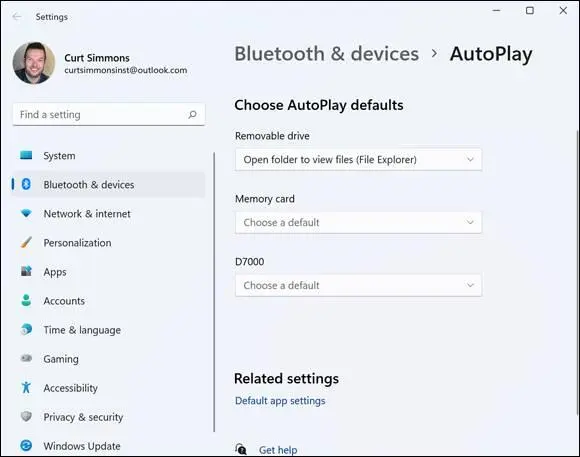
FIGURE 11-6
View Photos with the Photos App
To see photos on your computer, select the Search icon on the taskbar and type photosin the Search box; then select the Photos app in the search results. The Photos screen opens to the Collection window, as shown in Figure 11-7.It shows the contents of the Pictures folder (and its subfolders) on your computer. Your screen will look different.
If you don’t see any pictures, go to one of these earlier sections:
If you have a digital camera, see “Copy Photos from Your Camera.”
If your computer has a built-in camera or a webcam, see “Take Photos (and Videos) with Your Computer.”
If you see pictures, either scroll down or drag the timeline on the right side of the screen to see more photos. Photos are presented by the dates on which they were taken.
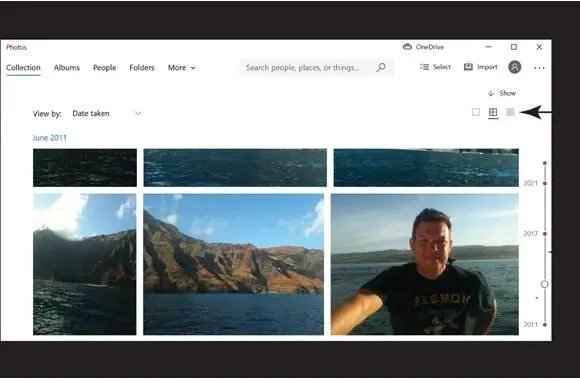
FIGURE 11-7
 You can take a screenshot — a picture of the current screen — by pressing
  +Print Screen. (A touchscreen or mouse equivalent is not available.) The screen dims slightly to indicate the capture, which is stored automatically in the Screenshots folder in your Pictures folder. Use this technique to create your own documentation of problems or something you want to see again later.
Select the View Large, View Medium, and View Small button. These buttons are located in the upper-right corner of the screen (refer to Figure 11-7). Use them to examine and locate photos.
Select any photo to display it full size in the Photos app window, as shown in Figure 11-8.When looking at a single photo, you can scroll from photo to photo by selecting the Previous or Next button or by clicking or tapping the right edge or left edge of the screen. You can also press the PageDown key (forward) or PageUp key (back). Note that the Previous and Next buttons don’t appear until you hover or touch right or left sides of the window.
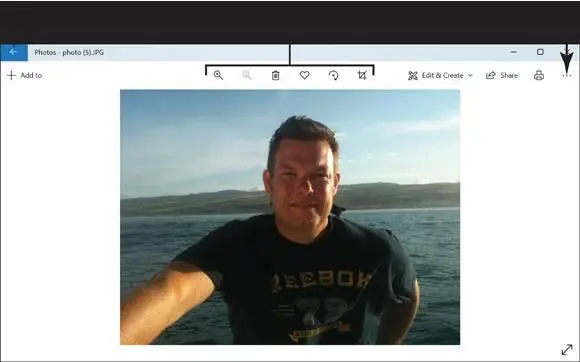
FIGURE 11-8
Select the See More button (the three dots on the right side of the toolbar; refer to Figure 11-8) and select Slideshow on the menu that appears. The photos appear in succession. Stop the slide show by clicking or tapping a photo.
Zoom in and out on a photo using one of these methods (repeat to zoom in or out more):
Mouse:Click the Zoom In or Zoom Out buttons on the toolbar to zoom in or out on your photo.
Touchscreen:Touch two fingers on the screen. Move your fingers apart to zoom in. Pinch your fingers closer together to zoom out.
Keyboard:Press Ctrl+plus sign (actually, press the equal sign — no need to press the Shift key) to zoom in. Press Ctrl+minus sign to zoom out.
Zoom in to see part of a photo made larger.
Use the Delete button in the toolbar to delete a photo. (See Chapter 15 for information on undeleting files.)
Select the arrow on the left side of the toolbar to return to your photo collection. In this view, you can see more than one photo.
The Photos app offers many options for editing photos. See “Edit Photos Using the Photos App,” later in this chapter.
Organizing Photos Using the Photos App
In the Photos app, photos are organized by date in the Collection window (refer to Figure 11-7), but you can organize photos other ways as well, starting in the Albums, People, or Folders window. Organize photos so that you can find and view them easily. Select the Albums tab to open the Albums window. If you’ve already spent some time with the Photos app, the app may have created albums for you (each album comprises photos taken on the same day). If you asked for some photos to be “favorites” (you learn how to shortly), the Photos app creates a Favorites album so that you can view these photos. If you’ve never used the Photos app, you won’t see anything in the Albums window except the option to create a new album.
Select New Album to create a new album for storing photos. The Create New Album window opens (see Figure 11-9). Scroll through and select photos you want for your album by selecting the check boxes on photos. Then select the Create button. The Album window opens, and you see a slide-show presentation of the photos you selected for the album. Select the Back button to return to the Albums window.
To remove an album from the Albums window, click or tap to select it. Then select the Remove button. To change an album’s cover photo, right-click or tap and hold the album, choose Change Your Photo on the pop-up menu, select a photo in the Choose a Cover Photo window, and select the Done button.
Select the People tab to open the People window, as shown in Figure 11-10.It may interest you to know that Windows 11 facial recognition software is capable of recognizing faces in photos. If you store a number of photos in the Photos app, the People window shows the faces of people that Windows 11 recognizes. By attaching names to the faces that are recognized, you can identify photo subjects by name and in so doing search for photos of people in the Photos app. To attach a name to photos that Windows 11 recognizes, select Add Name below a face (refer to Figure 11-10). Then type a name or choose one from the Contacts list that appears, and press Enter.
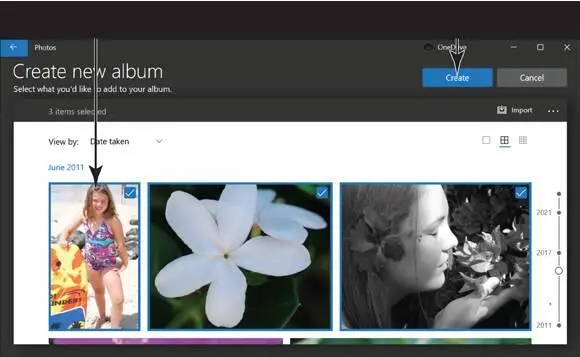
FIGURE 11-9
To find photos of someone who is recognized, click or tap in the Search box. A drop-down menu with names appears (refer to Figure 11-10). Select a name to see all the person’s photos.
If you object to Windows 11 butting into your private life with its facial recognition software, select the See More button in the upper-right corner of the screen and choose Settings on the drop-down menu. Then, in the Settings window, scroll to the People setting and turn the People setting off.
Locate and select a photo you particularly like to display it full size. Then select the Add to Favorites button (the heart-shaped button along the top of the screen). Selecting Add to Favorites places a link to the photo in the Favorites album. Select the Back button, visit the Albums tab, and select the Favorites album. You see photos you deemed “favorites.” Add a photo to the Favorites folder so that you can find it quickly.
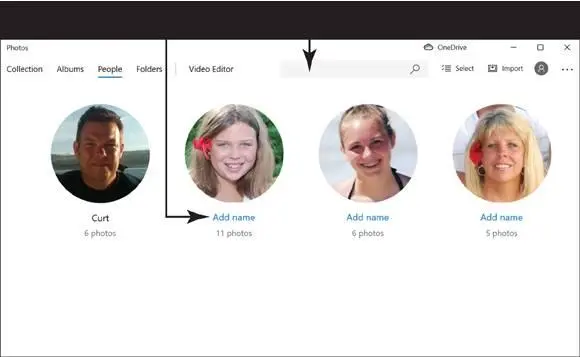
FIGURE 11-10
Читать дальшеИнтервал:
Закладка:
Похожие книги на «Windows 11 For Seniors For Dummies»
Представляем Вашему вниманию похожие книги на «Windows 11 For Seniors For Dummies» списком для выбора. Мы отобрали схожую по названию и смыслу литературу в надежде предоставить читателям больше вариантов отыскать новые, интересные, ещё непрочитанные произведения.


Обсуждение, отзывы о книге «Windows 11 For Seniors For Dummies» и просто собственные мнения читателей. Оставьте ваши комментарии, напишите, что Вы думаете о произведении, его смысле или главных героях. Укажите что конкретно понравилось, а что нет, и почему Вы так считаете.