Curt Simmons - Windows 11 For Seniors For Dummies
Здесь есть возможность читать онлайн «Curt Simmons - Windows 11 For Seniors For Dummies» — ознакомительный отрывок электронной книги совершенно бесплатно, а после прочтения отрывка купить полную версию. В некоторых случаях можно слушать аудио, скачать через торрент в формате fb2 и присутствует краткое содержание. Год выпуска: 2022, ISBN: 2022, Издательство: Wiley, Жанр: ОС и Сети, tbg_computers, на английском языке. Описание произведения, (предисловие) а так же отзывы посетителей доступны на портале библиотеки ЛибКат.
- Название:Windows 11 For Seniors For Dummies
- Автор:
- Издательство:Wiley
- Жанр:
- Год:2022
- ISBN:978-1-119-84652-9
- Рейтинг книги:4 / 5. Голосов: 1
-
Избранное:Добавить в избранное
- Отзывы:
-
Ваша оценка:
Windows 11 For Seniors For Dummies: краткое содержание, описание и аннотация
Предлагаем к чтению аннотацию, описание, краткое содержание или предисловие (зависит от того, что написал сам автор книги «Windows 11 For Seniors For Dummies»). Если вы не нашли необходимую информацию о книге — напишите в комментариях, мы постараемся отыскать её.
What do you want to do with your Windows computer? Sign up for Facebook to keep up with your friends? Watch a video taken during the latest family trip? Find your latest email messages with a single click of the mouse? Look no further than Windows 11 For Seniors For Dummies to discover how to do these tasks and others that you depend on a daily basis. With this guide to the popular operating system, you find the clear and easy instructions to checking tech tasks off your to-do list.
Windows 11 For Seniors For Dummies — читать онлайн ознакомительный отрывок
Ниже представлен текст книги, разбитый по страницам. Система сохранения места последней прочитанной страницы, позволяет с удобством читать онлайн бесплатно книгу «Windows 11 For Seniors For Dummies», без необходимости каждый раз заново искать на чём Вы остановились. Поставьте закладку, и сможете в любой момент перейти на страницу, на которой закончили чтение.
Интервал:
Закладка:
 Enjoying videos
Recording a voice narration
The term media on computers refers to something other than text. Audio and video are examples of media. Audio is a catchall term for music and other sound files, such as books on CD. Video includes files that you can shoot with your digital camera as well as Hollywood blockbusters.
The delivery of music has come a long way from Edison's wax cylinder or even vinyl LPs. Nowadays, music is almost entirely digital (although vinyl has been making a comeback in some circles). The Groove Music app lets you play your music collection and makes it easy to explore new music. Use Windows Media Player to play audio CDs, to copy audio files to your computer, and to burn songs onto a CD.
The Movies & TV app is similar to the Groove Music app, but it's for video instead of music. You can use it to play your homemade videos.
In this chapter, you play a music CD, copy CDs to your computer for easier access, and burn a CD. You also explore the Groove Music and Movies & TV apps. Finally, you discover how to make a voice recording.
 You’ll need a different app to play DVDs. Search Microsoft Store for Media Center or for a DVD player app. See Chapter 9 for more information on Microsoft Store.
Popular alternatives for music or videos include Hulu, iTunes, Netflix, Amazon, and YouTube. All of these are accessible through the web browser. Search Microsoft Store for related apps.
Play and Copy Music from a CD
If you have a CD or DVD disc drive or slot on your computer, insert a music CD, label side up for horizontal drives. (Vertical drives are less predictable.)
Windows 11 detects your CD and may briefly display this notification: Choose what to do with audio CDs. Windows 11 displays your choices, as shown in Figure 12-1.Select Windows Media Player and then skip to Step 5.
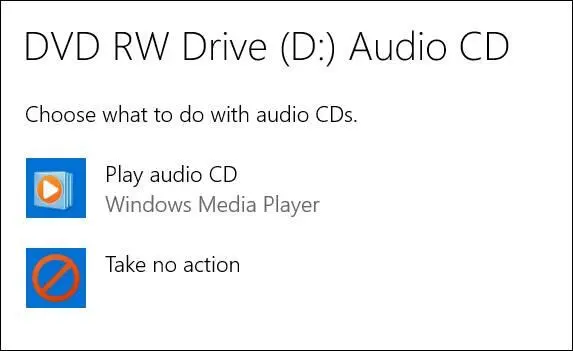
FIGURE 12-1
If you see the Welcome to Windows Media Player screen, select Recommended Settings and then select Finish. The Windows Media Player plays your music.
For access to more options, select Switch to Library, the small button under the X in Windows Media Player, as shown in Figure 12-2.
Note the following controls at the bottom of the Windows Media Player, as shown in Figure 12-3:
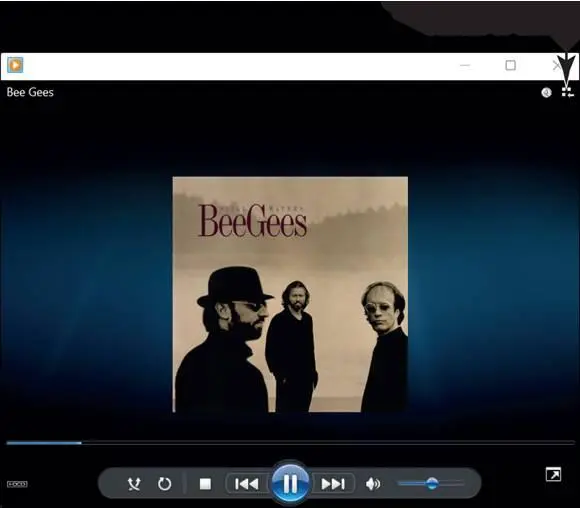
FIGURE 12-2
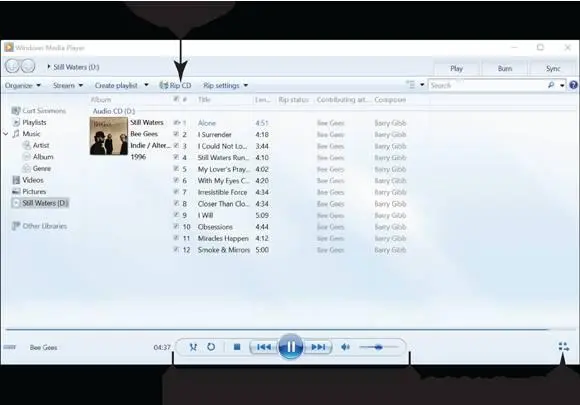
FIGURE 12-3
Shuffle:Select this button to turn on shuffle, which randomly mixes the tracks you play. Select again to turn off shuffle, and the tracks play in the order in which they appear onscreen.
Repeat:Select this button to play all the tracks again after all have played. Select again to turn off the repeat function.
Stop:Select to stop playing.
Previous:Select this button to skip to the previous track. Select and hold to rewind to an earlier point in the track.
Play/Pause:Select the button with two vertical lines to pause play mid-track. Select the same button (now with a triangle pointing to the right) to resume playing from the point you paused.
Next:Select this button to skip to the next track. Select and hold to fast-forward through the track.
Mute/Unmute:Select this button to silence the player. Although the track continues to play, you won't hear it. When Mute is on, a red circle with a slash appears next to the speaker icon. Select the button again to hear the track.
Volume:Drag the slider to the left to decrease or to the right to increase the volume of the track. Your speakers may also have a manual volume control. Windows 11 has a separate volume control in the taskbar, as well.
Switch to Now Playing:You select this button, which is located in the lower-right corner of the window, to reduce the player to a small size (refer to Figure 12-2).
To copy the CD tracks to your Music library, select Rip CD. This button is located on the toolbar along the top of the screen, as shown in Figure 12-3.Ripping a song on a CD takes about a minute. As each song is ripped, the words Ripped to Library appear in the Rip Status column of the Windows Media Player.
If you plan to rip a lot of CDs, select Rip Settings ⇒ Rip CD Automatically and Rip Settings ⇒ Eject CD After Ripping. Just inserting the CD will copy files to your Music library as it plays the CD. Audiophiles should choose Rip Settings ⇒ Audio Quality ⇒ 320 Kbps (Best Quality). As well, audiophiles may consider choosing Format ⇒ WAV, ALAC, or FLAC. These lossless formats are superior to the MP3 format, although fewer devices play files in lossless formats.
When the copying process finishes, remove your CD. To play this music in the future, start Windows Media Player, choose Artist, Album, or Genre under Music, select the CD you ripped, select a song title, and select the Play button.
Songs you rip from a CD are kept on your computer in a subfolder of the Music folder. To copy or move music that you ripped from a CD, open the Music folder, open the subfolder named after the CD you ripped, and copy or move the files.
You can play anything in the Music library by using the Groove Music app. See the next section, “Listen to the Groove Music App.”
Pin the Windows Media Player to the taskbar for easy access: Click the right mouse button over the icon in the taskbar, or tap and hold until a box appears, and then release. On the menu that pops up, select Pin to Taskbar. You can also search for Windows Media Player using the Search icon on the taskbar. See Chapter 2 for information on pinning apps.
If your music CD doesn’t play automatically the next time you insert one, you can tell Windows 11 how to handle audio CDs. On the taskbar, select the Search icon and then type autoplayin the Search box. In the search results, select AutoPlay Settings. The Settings screen opens to the AutoPlay settings. Turn on the Use AutoPlay for All Media and Devices option to make CDs play automatically.
Listen to the Groove Music App
Читать дальшеИнтервал:
Закладка:
Похожие книги на «Windows 11 For Seniors For Dummies»
Представляем Вашему вниманию похожие книги на «Windows 11 For Seniors For Dummies» списком для выбора. Мы отобрали схожую по названию и смыслу литературу в надежде предоставить читателям больше вариантов отыскать новые, интересные, ещё непрочитанные произведения.


Обсуждение, отзывы о книге «Windows 11 For Seniors For Dummies» и просто собственные мнения читателей. Оставьте ваши комментарии, напишите, что Вы думаете о произведении, его смысле или главных героях. Укажите что конкретно понравилось, а что нет, и почему Вы так считаете.