Curt Simmons - Windows 11 For Seniors For Dummies
Здесь есть возможность читать онлайн «Curt Simmons - Windows 11 For Seniors For Dummies» — ознакомительный отрывок электронной книги совершенно бесплатно, а после прочтения отрывка купить полную версию. В некоторых случаях можно слушать аудио, скачать через торрент в формате fb2 и присутствует краткое содержание. Год выпуска: 2022, ISBN: 2022, Издательство: Wiley, Жанр: ОС и Сети, tbg_computers, на английском языке. Описание произведения, (предисловие) а так же отзывы посетителей доступны на портале библиотеки ЛибКат.
- Название:Windows 11 For Seniors For Dummies
- Автор:
- Издательство:Wiley
- Жанр:
- Год:2022
- ISBN:978-1-119-84652-9
- Рейтинг книги:4 / 5. Голосов: 1
-
Избранное:Добавить в избранное
- Отзывы:
-
Ваша оценка:
Windows 11 For Seniors For Dummies: краткое содержание, описание и аннотация
Предлагаем к чтению аннотацию, описание, краткое содержание или предисловие (зависит от того, что написал сам автор книги «Windows 11 For Seniors For Dummies»). Если вы не нашли необходимую информацию о книге — напишите в комментариях, мы постараемся отыскать её.
What do you want to do with your Windows computer? Sign up for Facebook to keep up with your friends? Watch a video taken during the latest family trip? Find your latest email messages with a single click of the mouse? Look no further than Windows 11 For Seniors For Dummies to discover how to do these tasks and others that you depend on a daily basis. With this guide to the popular operating system, you find the clear and easy instructions to checking tech tasks off your to-do list.
Windows 11 For Seniors For Dummies — читать онлайн ознакомительный отрывок
Ниже представлен текст книги, разбитый по страницам. Система сохранения места последней прочитанной страницы, позволяет с удобством читать онлайн бесплатно книгу «Windows 11 For Seniors For Dummies», без необходимости каждый раз заново искать на чём Вы остановились. Поставьте закладку, и сможете в любой момент перейти на страницу, на которой закончили чтение.
Интервал:
Закладка:
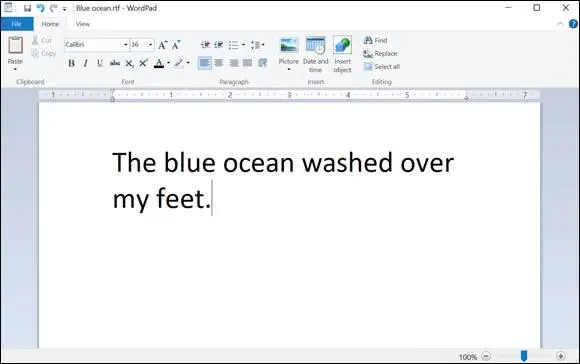
FIGURE 9-15
Type a few words and then select the words by dragging over them. You can tell when words are selected because they are highlighted. After you select words, you can reformat them. Open the Font Family menu on the toolbar and choose your favorite font. Then open the Font Size menu and choose a font size. By changing fonts and font sizes, you can change the words’ appearance.
Click or tap the Bold button (the B) on the Home tab (or press Ctrl+B). The words are boldfaced. Boldfacing, italicizing (select the Italic button), and underlining (select the Underline button) are other ways to change the appearance of words.
Select the Linespace button and choose an option — 1.0, 1.15, 1.5, or 2 — on the drop-down list that appears. In this way, you can change the amount of space between lines. For example, choosing 2 double-spaces the text you selected.
 You can choose formatting commands before you start typing. The commands you choose are applied to the words you write next. It isn’t necessary to write the words first and then select them to make formatting changes.
Drag the Zoom slider in the lower-right corner of the screen to the right (or click or tap the Zoom In button on the right side of the slider). Zooming in increases the size of text on the screen so that you can see it better. Drag the slider to the left (or click or tap the Zoom Out button) to make the text look smaller.
Press Ctrl+S or select the Save button (located in the upper-left corner of the screen) to save your document. You see the Save As dialog box. WordPad documents are saved in the RTF format (RTF stands for rich text format ). As we mention earlier, Microsoft Word can read and display RTF files. Enter a name for your document and select the Save button.
Chapter 15 explains how to open, save, and otherwise manage files.
Write a Sticky Note to Yourself
Use the Search icon and search for Sticky Notes. Select the app in the search results to open it. A sticky note — like the ones in Figure 9-16— appears on the screen. Sticky notes are the digital equivalents of the yellow stick-’em tabs that people attach to their computers and desks. Use sticky notes to remind yourself to do something or be somewhere.
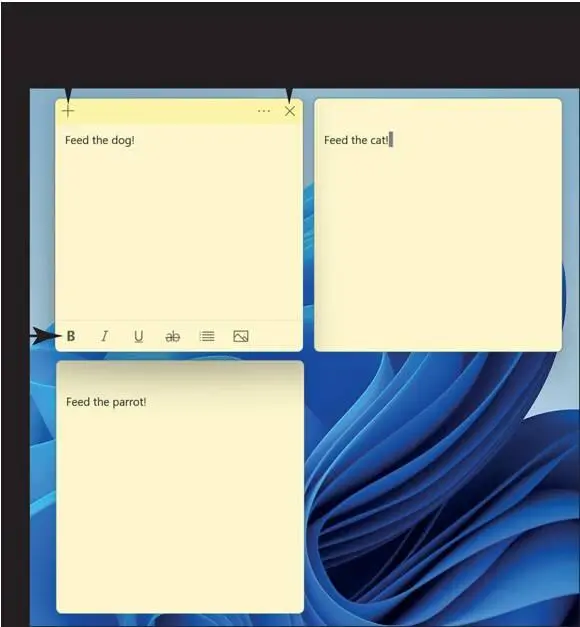
FIGURE 9-16
Type the note. Then move the pointer over the stripe at the top of the note and drag the note to a corner of the screen.
You can change the size of a sticky note. Move the pointer over the lower-right corner of the note. When the pointer changes to double arrows, start dragging.
Click or tap the New Note button (refer to Figure 9-16). Another sticky note appears. Write a second note and drag it to a corner of the screen.
Click or tap the Delete Note button on one of your notes when you no longer need it. You can also format the note text or even add an image (refer to Figure 9-16).
Chat Face-to-Face with Skype
Select the Search icon on the taskbar and type skypein the Search box; then select the Skype app in the search results. You can use this app to video chat with others. (You can also use the Microsoft Teams app to video chat; see Chapter 8 for more information.) To use Skype, your computer must have audio and video capability. You can also use Skype if a webcam is connected to your computer.
You need to sign in to your Microsoft Account before you use Skype. See Chapter 4 for information about creating a Microsoft Account.
The first time you use the Skype app, the screen asks you to sign in with your Microsoft Account as well as add a photo (if you like), and then it asks you to test your microphone and webcam. Just follow the instructions to check everything.
The Skype screen lists the names of people on your Contacts list and people you have called before using Skype. You can select one of these people to call them now. If the person you want to call isn’t listed, enter their name in the Search Skype box and select the Search button (which looks like a magnifying glass). The Skype directory opens, as shown in Figure 9-17.Scroll to find the person you want to call, using the person’s photo ID and geographical information as your guide.
When you see the name of the person you want to call, select the name. Then, on the call screen, select the Video Call button. You hear a ring tone as the call is made, and you see the person’s face if they answer. Your face appears in the lower-right corner of the screen so that you can see what your face looks like to the caller. (You can drag this screen from place to place.) Start talking. Smile. Trade the latest news. Have a ball.
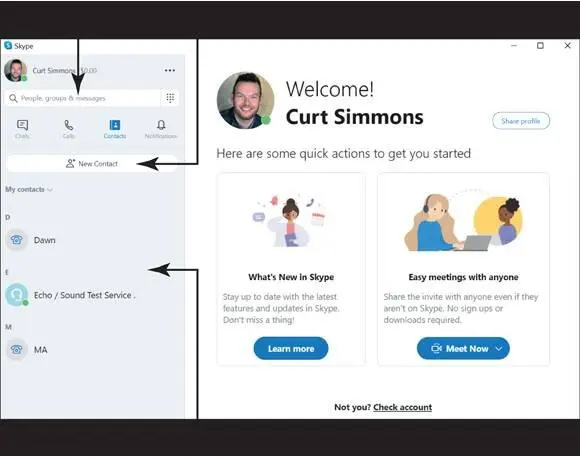
FIGURE 9-17
Select the Video and Microphone buttons when you need a little privacy. Select the Video button to turn off your video (the other caller can’t see you); select the Microphone button to turn off your audio (the other caller can’t hear you).
Select the Open Conversation button (in the upper-right corner of the screen) to send an instant message to the other caller. The message panel appears. In the bottom of the message panel, type your message and press Enter. Sending text messages is a useful way to communicate when you have technical difficulties or the other caller isn’t answering. Select the Close Conversation button (at the top of the Chat window) to close the message panel.
Select the red End Call button to complete your call.
When someone calls you, the Incoming Call panel appears. Select Turn Video On (at the bottom of the panel) to initiate the call.
Ask Questions of Cortana
Select the Search icon on the taskbar and type cortanain the Search box; then select the Cortana app in the search results. The first time you use Cortana, the app asks you to sign in with your Microsoft Account. Click or tap the Speak to Cortana button (it looks like a microphone) on the lower-right side of the app window. Cortana can respond to questions you ask with your voice.
To use Cortana, your computer’s microphone must be up and running. Turn to Chapter 14 if the microphone on your computer isn’t connected or working properly.
Say aloud, “Tell me a joke.” As you say these words, they appear in the text box, and if all goes right, Cortana recites a joke. As well, the words of the joke appear on the screen, as shown in Figure 9-18.
Читать дальшеИнтервал:
Закладка:
Похожие книги на «Windows 11 For Seniors For Dummies»
Представляем Вашему вниманию похожие книги на «Windows 11 For Seniors For Dummies» списком для выбора. Мы отобрали схожую по названию и смыслу литературу в надежде предоставить читателям больше вариантов отыскать новые, интересные, ещё непрочитанные произведения.


Обсуждение, отзывы о книге «Windows 11 For Seniors For Dummies» и просто собственные мнения читателей. Оставьте ваши комментарии, напишите, что Вы думаете о произведении, его смысле или главных героях. Укажите что конкретно понравилось, а что нет, и почему Вы так считаете.