Curt Simmons - Windows 11 For Seniors For Dummies
Здесь есть возможность читать онлайн «Curt Simmons - Windows 11 For Seniors For Dummies» — ознакомительный отрывок электронной книги совершенно бесплатно, а после прочтения отрывка купить полную версию. В некоторых случаях можно слушать аудио, скачать через торрент в формате fb2 и присутствует краткое содержание. Год выпуска: 2022, ISBN: 2022, Издательство: Wiley, Жанр: ОС и Сети, tbg_computers, на английском языке. Описание произведения, (предисловие) а так же отзывы посетителей доступны на портале библиотеки ЛибКат.
- Название:Windows 11 For Seniors For Dummies
- Автор:
- Издательство:Wiley
- Жанр:
- Год:2022
- ISBN:978-1-119-84652-9
- Рейтинг книги:4 / 5. Голосов: 1
-
Избранное:Добавить в избранное
- Отзывы:
-
Ваша оценка:
Windows 11 For Seniors For Dummies: краткое содержание, описание и аннотация
Предлагаем к чтению аннотацию, описание, краткое содержание или предисловие (зависит от того, что написал сам автор книги «Windows 11 For Seniors For Dummies»). Если вы не нашли необходимую информацию о книге — напишите в комментариях, мы постараемся отыскать её.
What do you want to do with your Windows computer? Sign up for Facebook to keep up with your friends? Watch a video taken during the latest family trip? Find your latest email messages with a single click of the mouse? Look no further than Windows 11 For Seniors For Dummies to discover how to do these tasks and others that you depend on a daily basis. With this guide to the popular operating system, you find the clear and easy instructions to checking tech tasks off your to-do list.
Windows 11 For Seniors For Dummies — читать онлайн ознакомительный отрывок
Ниже представлен текст книги, разбитый по страницам. Система сохранения места последней прочитанной страницы, позволяет с удобством читать онлайн бесплатно книгу «Windows 11 For Seniors For Dummies», без необходимости каждый раз заново искать на чём Вы остановились. Поставьте закладку, и сможете в любой момент перейти на страницу, на которой закончили чтение.
Интервал:
Закладка:
Show As:Choose an option on this menu if you share your calendar with someone, such as a receptionist, who may schedule you for other events. You can declare yourself free, tentative, busy, or out of the office.
Reminder:How far in advance of the event do you want Calendar to display a notification? Choose None, 5 Minutes, 15 Minutes, 30 Minutes, 1 Hour, 12 Hours, 1 Day, or 1 Week.
Private:Select this option (look for the lock symbol) to prevent this event from appearing on a shared or public calendar. The event remains visible on your own screen.
When you’re done, select the Save button. (Select the Delete button if you don’t want to create an event.)
On the calendar, your event appears on the specified date and time.
To edit an event, select it on the calendar. A pop-up screen appears with details about the event. Select the event’s name in the pop-up screen to open the Details screen, where you can add or change any detail.
 To delete an event, open it in the Details screen and select the Delete button (a trash can).
If your Microsoft Account is connected to a third-party service such as Gmail, events from that service appear on your calendar. To load third-party service information into the Calendar app, select the Settings button (in the lower-left corner of the screen) and select Manage Accounts in the Settings panel. You see a list of accounts. Select the account, and in the Account Settings screen, select Change Mailbox Sync Settings. Then, on the Sync Settings screen, choose whether to sync the calendar on the third-party service with the calendar you see in the Calendar screen.
Search and Explore with the Maps App
Use the Search icon on the taskbar and search for Maps; then select the Maps app in the search results. Use this app to locate places and to get driving or walking directions.
Click or tap in the Search box. A drop-down list appears. It lists items you already searched for, if you searched already. You can select an item on the list to revisit it.
Type 1 california st, san francisco(you don’t need to enter capital letters) in the Search box. As you type, options appear in the Search panel. Select the address you entered, not the names of businesses located at the address. As shown in Figure 9-12,the Maps app shows you where the address is located; it also provides a photo. As well as typing addresses in the Search box, you can enter the names of places and landmarks.
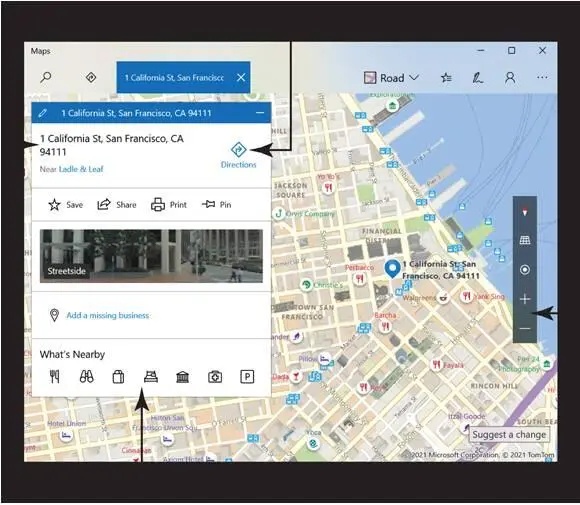
FIGURE 9-12
Select the Zoom Out button (or press Ctrl+minus sign) on the app bar in the map. Then select the Zoom In button (or press Ctrl+plus sign). The tools on the app bar can help you read the map better (refer to Figure 9-12).
Select the Directions button (refer to Figure 9-12), which is the button in the upper-right corner near the Search box. (Or you can press Ctrl+D.) Tools appear to help you get from place to place. Click or tap in the Starting Point box (Box A), and when the drop-down menu appears, choose 1 California St,the address you already entered. In the Destination box (Box B), enter 1501 haight stand choose the 1501 Haight St address in San Francisco in the drop-down menu that appears.
Select the Get Directionslink. As shown in Figure 9-13,the Maps app gives you several sets of driving directions between the two addresses and tells you how long each drive will take. Select a drive in the list to get specific instructions for driving between the two addresses. After you select a drive, you can click or tap the Print icon to print the instructions.
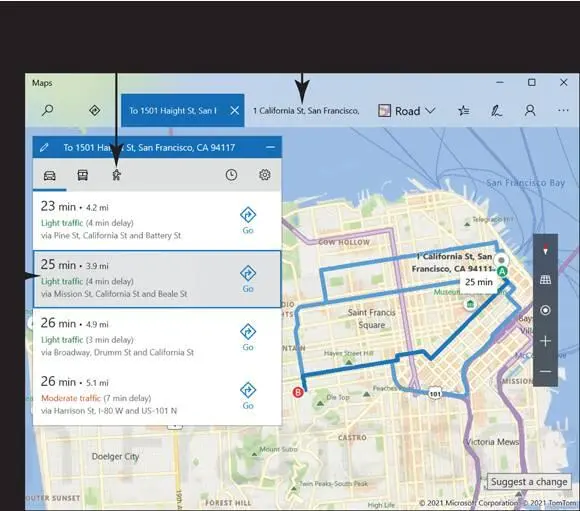
FIGURE 9-13
Are you walking, not driving? In that case, select the Walking icon at the top of the Search panel to get directions for walking between the two locations. You can also select the Transit icon to get directions for getting there by public transportation.
Select the Search button (the magnifying glass in the upper-left corner of the screen) and then select 1501 Haight St., San Franciscoin the drop-down menu. You get a detailed look at the streets surrounding this address. Select the Restaurants icon under What’s Nearby (refer to Figure 9-12) to see restaurants on the map. You can select the name of a restaurant to find out more about it. The What’s Nearby icons also provide the means to find attractions, parking, hotels, and other goodies.
The Maps app keeps tabs on your travels. Select a tab along the top of the screen to retrace your steps and revisit a map you saw earlier.
Stay on Time with the Clock App
For the most part, the Clock app is a simple tool that gives you a few different options to set timers. Open the Clock app by searching for Clock, using the Search icon on the taskbar. You see a navigation pane on the left side of the app where you can toggle between different options (see Figure 9-14). They are:
Focus Sessions:You can choose Start Focus Session to create a timer for something specific. For example, if you’re exercising on a treadmill and you want to walk for a specific time, you can create daily focus sessions and track your progress over time (refer to Figure 9-14).
Timer:You can activate some present timers (1 minute, 3 minutes, 5 minutes, and 10 minutes). You can also click the + icon to create a new timer. When you start a timer, a chime will sound when the timer is complete.
Alarm:You can set a daily alarm (or choose which days you want the alarm to sound). For example, you could set a daily wake-up alarm, a daily exercise alarm, and so forth.
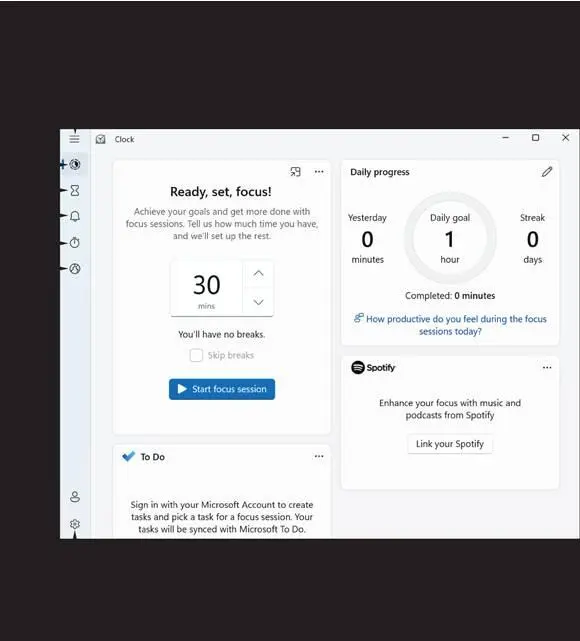
FIGURE 9-14
Timer:Here you find a simple timer you can use. You can also select the Lap/Split button while you’re using the timer to mark laps and such. This feature is helpful if you’re exercising and want to flag the time a lap took to complete.
World Clock:This lets you view the local time, but you can also select the + button to see the time and date in any city in the world.
You can select the Settings option (refer to Figure 9-14) to make some adjustments to the Clock app. For example you can turn on or off end-of-session or break sounds (and adjust the sounds as well). You can also adjust the app theme if you like.
Write Documents with WordPad
Windows 11 comes with a word processing app called WordPad. Word processors are applications that you can use to write letters, reports, and other documents. WordPad isn’t as sophisticated as its cousin Microsoft Word, the world’s most famous word processor, but it’s pretty darn good. And it doesn’t cost anything. Moreover, you can open documents created in Word in WordPad (though the document may not display all of Word’s formatting correctly). Word can read WordPad documents, too. To start WordPad, type WordPadusing the Search icon on the taskbar and then select WordPad in the search results. WordPad opens, as shown in Figure 9-15.
Читать дальшеИнтервал:
Закладка:
Похожие книги на «Windows 11 For Seniors For Dummies»
Представляем Вашему вниманию похожие книги на «Windows 11 For Seniors For Dummies» списком для выбора. Мы отобрали схожую по названию и смыслу литературу в надежде предоставить читателям больше вариантов отыскать новые, интересные, ещё непрочитанные произведения.


Обсуждение, отзывы о книге «Windows 11 For Seniors For Dummies» и просто собственные мнения читателей. Оставьте ваши комментарии, напишите, что Вы думаете о произведении, его смысле или главных героях. Укажите что конкретно понравилось, а что нет, и почему Вы так считаете.