Respond to Activity
In Teams, select Activity on the toolbar. The Activity section shows you specific mentions (Teams calls them @mentions) of you. For example, you may be chatting with five people in a group. When someone specifically mentions you, that mention appears in Activity, as shown in Figure 8-8.This feature helps make sure you don’t miss anything specific to you.
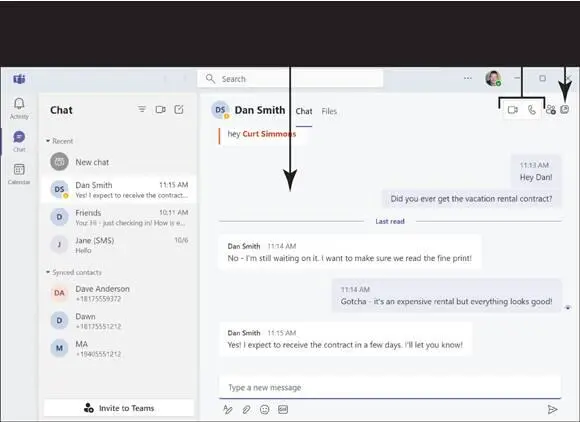
FIGURE 8-7
 When someone mentions you, or you mention someone, you type @ username . For example, if you have a contact named Sue Williams and you want to mention Sue, you type @Sue Williams. Your mention then shows up in Sue’s Activity in Teams. Note that a mention has an @ symbol with it and is pronounced “at mention.”
With Activity selected on the toolbar, click the @mention you want to see in the Feed (navigation pane). Then you can respond to the @mention on the content pane (see Figure 8-8).
@mentions appear in the Feed as bold type, meaning that you haven’t read them yet. You can mark an @mention as read after you read it or if you don’t want to read it. Just point to the @mention and select More Options to the right. You see the option to mark the @mention as read, shown in Figure 8-9.
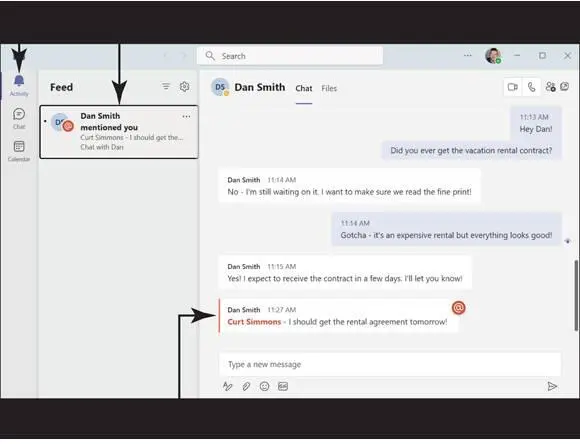
FIGURE 8-8
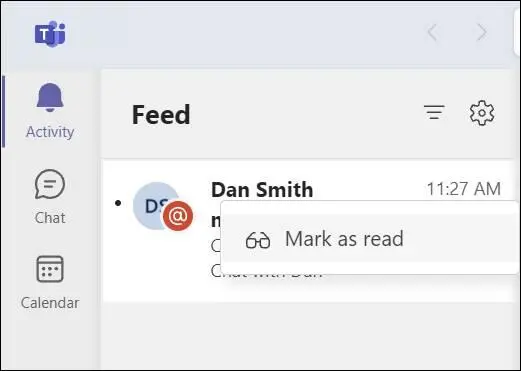
FIGURE 8-9
Manage Chats
In Teams, select Chat on the toolbar.
Choose a chat conversation in the navigation pane and select More Options (point your mouse to the chat to see the More Options button appear; it’s the three dots).
The More Options menu gives you a few different ways to manage chat conversations, as shown in Figure 8-10:
Pop-Out Chat:This option opens the chat in a new, pop-out window.
Mark as Read / Unread:You can mark a chat as either read or unread. If you’ve read the chat, it will default to “read,” but you can change it back to unread if you want (which is a good way to remind yourself to respond to chat later).
Pin:This option pins the chat conversation to the top of your Chat list in the navigation pane. Doing so makes it easy to return to conversations you’re actively engaged in.
Mute:Say you’re chatting with a group of friends, but the conversation spirals into details that don’t pertain to you. You can mute the conversation so that you don’t get updates as people continue to chat.
Block:This option blocks a chat and the people chatting with you. Make sure you want to use this feature before you block someone from getting in touch.
Hide:This option hides the chat from the navigation pane so that you won’t see it any longer.
Delete:Finished with a chat? You can choose to delete it from the navigation pane. Be careful: After you delete a chat conversation, it’s gone forever!
You can also filter your chat conversations. For example, if you have a lot of conversations in the chat navigation pane, it can be difficult to find the one you want. You can select the Filter option on the navigation pane and see only the chats from a specific person, as shown in Figure 8-10.This will make finding specific chat conversations easier.
 You can invite your friends and family to join Teams so that you can more easily connect with them. At the bottom of the navigation pane, select the Invite to Teams button. A window appears with a link, as shown in Figure 8-11.Click Copy. You can then paste this link into email messages, text messages, and so forth. The link gives your friends and family a quick way to download the Teams software and get connected with you. A Microsoft Account is required for anyone using Teams.
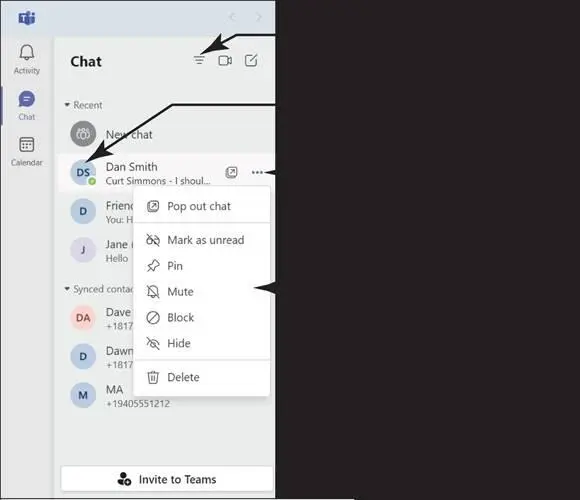
FIGURE 8-10

FIGURE 8-11
Start a Meeting
In Teams, a meeting is a live video call. To start a meeting, select Chat on the toolbar and select the Meet Now button, shown in Figure 8-12.
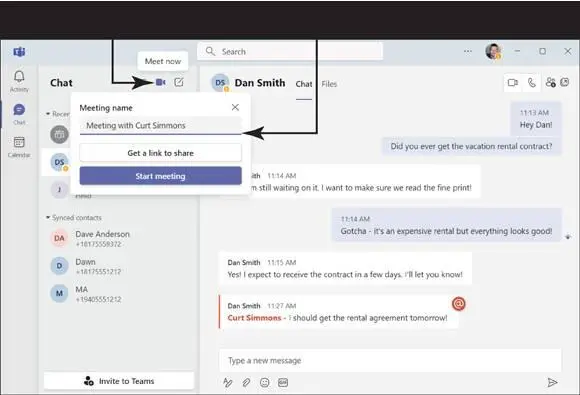
FIGURE 8-12
In the dialog box that appears, give the meeting a name (you can accept the default name). You can then get a link for the meeting, which you can send to others whom you want to attend, or you can start the meeting. Click Start Meeting.
The Teams interface changes to a video meeting window, shown in Figure 8-13.Before you join the meeting, there are a few important settings you can set up here:
Turn on Audio:This setting is on by default; otherwise, your microphone will not work during the meeting.
Turn on Video:This setting is on by default; otherwise, your webcam will not work during the meeting.
Background Filter:This option, shown in Figure 8-14,blurs the background of your video. This option is helpful to reduce clutter and increase visibility in your video. It also helps provide some level of privacy (unless you want everyone to see the unfolded laundry behind you!).
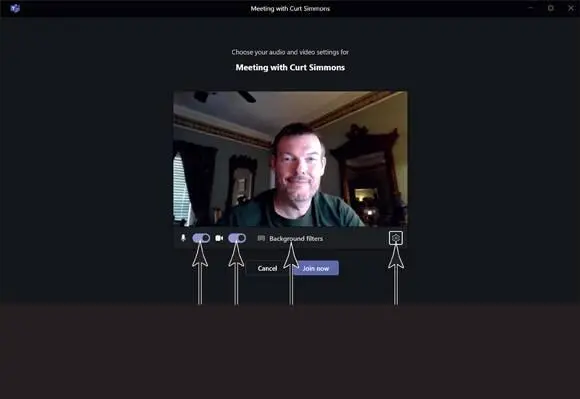
FIGURE 8-13
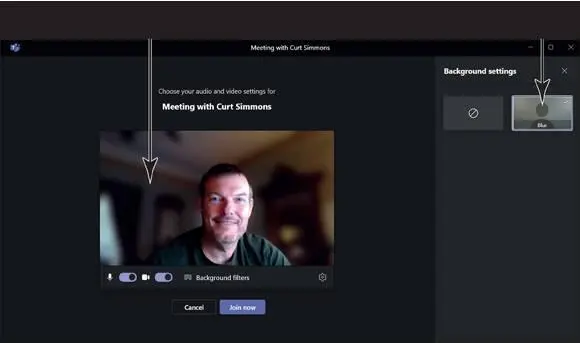
FIGURE 8-14
Device Settings:This feature opens a panel where you can select the speakers, microphone, and camera you want to use for the video call, shown in Figure 8-15.This feature is really only helpful if you have multiple microphones or webcams connected to your computer. This way, you can choose the ones you want to use.
Select Join Now. The Video window opens. You see yourself as well as any other participants as they join the meeting. Now you can visit virtually with your friends, family, and any other person or group you want to meet with.
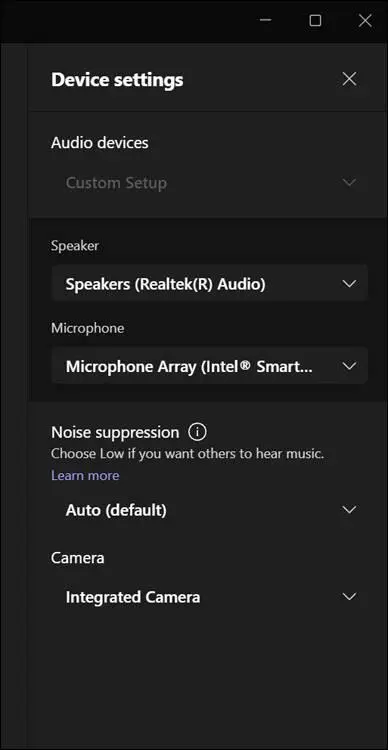
FIGURE 8-15
 When you’re finished meeting, just select the red Leave button in the upper-right corner of the screen.
Schedule a Meeting
In Teams, select Calendar on the toolbar and choose the New Meeting button, shown in Figure 8-16.The odds are good that you’ll want to schedule meetings with other people. When you schedule a meeting, you create a date and time and then send a meeting link to the people you want to invite so that you can all meet at the same time. This is a great way to schedule time with others.
Читать дальше
Конец ознакомительного отрывка
Купить книгу


 When someone mentions you, or you mention someone, you type @ username . For example, if you have a contact named Sue Williams and you want to mention Sue, you type @Sue Williams. Your mention then shows up in Sue’s Activity in Teams. Note that a mention has an @ symbol with it and is pronounced “at mention.”


