Curt Simmons - Windows 11 For Seniors For Dummies
Здесь есть возможность читать онлайн «Curt Simmons - Windows 11 For Seniors For Dummies» — ознакомительный отрывок электронной книги совершенно бесплатно, а после прочтения отрывка купить полную версию. В некоторых случаях можно слушать аудио, скачать через торрент в формате fb2 и присутствует краткое содержание. Год выпуска: 2022, ISBN: 2022, Издательство: Wiley, Жанр: ОС и Сети, tbg_computers, на английском языке. Описание произведения, (предисловие) а так же отзывы посетителей доступны на портале библиотеки ЛибКат.
- Название:Windows 11 For Seniors For Dummies
- Автор:
- Издательство:Wiley
- Жанр:
- Год:2022
- ISBN:978-1-119-84652-9
- Рейтинг книги:4 / 5. Голосов: 1
-
Избранное:Добавить в избранное
- Отзывы:
-
Ваша оценка:
Windows 11 For Seniors For Dummies: краткое содержание, описание и аннотация
Предлагаем к чтению аннотацию, описание, краткое содержание или предисловие (зависит от того, что написал сам автор книги «Windows 11 For Seniors For Dummies»). Если вы не нашли необходимую информацию о книге — напишите в комментариях, мы постараемся отыскать её.
What do you want to do with your Windows computer? Sign up for Facebook to keep up with your friends? Watch a video taken during the latest family trip? Find your latest email messages with a single click of the mouse? Look no further than Windows 11 For Seniors For Dummies to discover how to do these tasks and others that you depend on a daily basis. With this guide to the popular operating system, you find the clear and easy instructions to checking tech tasks off your to-do list.
Windows 11 For Seniors For Dummies — читать онлайн ознакомительный отрывок
Ниже представлен текст книги, разбитый по страницам. Система сохранения места последней прочитанной страницы, позволяет с удобством читать онлайн бесплатно книгу «Windows 11 For Seniors For Dummies», без необходимости каждый раз заново искать на чём Вы остановились. Поставьте закладку, и сможете в любой момент перейти на страницу, на которой закончили чтение.
Интервал:
Закладка:
 Email you compose but haven’t sent yet is kept in the Drafts folder. You can postpone writing a message and finish it later by going to the Drafts folder and opening your message there. To go the Drafts folder, select the Expand/Collapse button (if necessary) and then select Drafts in the All Folders panel.
If you select the Send button, your message is sent and you return to the folder you were in at the beginning of Step 1.
Repeat from Step 1 as needed.

FIGURE 7-2
Mail puts a signature at the bottom of email messages: “Sent from Mail for Windows 11.” If you don’t like this signature or want to put your own signature at the bottom of all the emails you send, select the Settings button on the bottom of the Folders panel. The Settings panel opens. Select Signature and either turn off signatures or enter a signature of your own.
Format Email
If you want to add bold, italics, or other formats to email, select the text you want to fancy up in the Compose window, as shown in Figure 7-3.If no text is selected, your formatting will apply to the word in which the cursor (the blinking vertical line in the content) is located.
Mouse:Click and drag the mouse pointer over the text you want to select.
Touchscreen:Tap and drag over the text you want to select.
Keyboard:With the cursor at the beginning of the text you want to select, hold down the Shift key as you press the right or down arrow to select text. Release the Shift key only after you have completed your selection.
To apply formatting to one word, double-click or double-tap that word to select it and display the app bar in one step.
The keyboard shortcut to select all text is Ctrl+A. No mouse or touchscreen method is quite so complete.
Using the commands on the Format tab, select from the following formatting options:
Bold:Bold is used for emphasis to make text stand out.
Italic:Although italic can also be used for emphasis, it may be harder to read than normal or bold text.
Underline:Because links are usually underlined automatically, you may want to avoid underlining text that isn’t a link.
Bulleted list:Select the Bullets button and enter items for the list. As you enter items, Mail attaches a bullet point to the start of each line.
Numbered list:Select the Numbering button and type the list. As you type, Mail assigns a number to each line.
Styles:Choose a style from the drop-down menu. A style applies many formats simultaneously. Heading 1, for example, enlarges the text and turns it blue.
See Chapter 1 for information on using the virtual keyboard’s emoticons.
To create a hyperlink, go to the Insert tab and select the Link button. Then enter the address destination of the hyperlink in the address bar that appears. See Chapter 6 for more information about hyperlinks.
When you finish formatting the text, select the Send button.
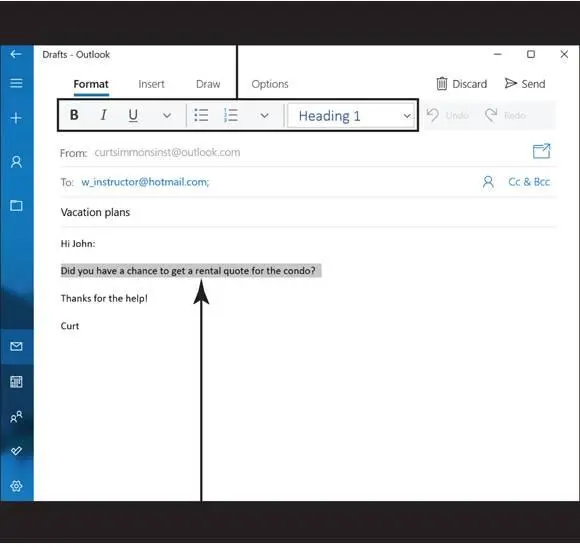
FIGURE 7-3
Send Files and Pictures
To send a file or picture with your email message, go to the Insert tab. As shown in Figure 7-4,the Insert tab offers tools for sending files and pictures.
Select the Files button to send a file. The Open dialog box appears. Locate and select the file you want to send and then select the Open button in the dialog box. You can send more than one file with an email message. In the Compose window, files you want to send appear as thumbnails under the heading “Attachments” (see Figure 7-4). Click the X button on a file if you change your mind about sending it.
To send a picture with an email message, place the cursor where you want the picture to be. Then select the Pictures button on the Insert tab. The Open dialog box appears. Select the picture and then click or tap the Insert button.
You can format pictures before sending them. Click or tap a picture to select it in the Compose window. The Picture tab appears. Using the tools on this tab, you can rotate, crop, and resize pictures.
When you have finished attaching your files and pictures, select the Send button to send them on their merry way.
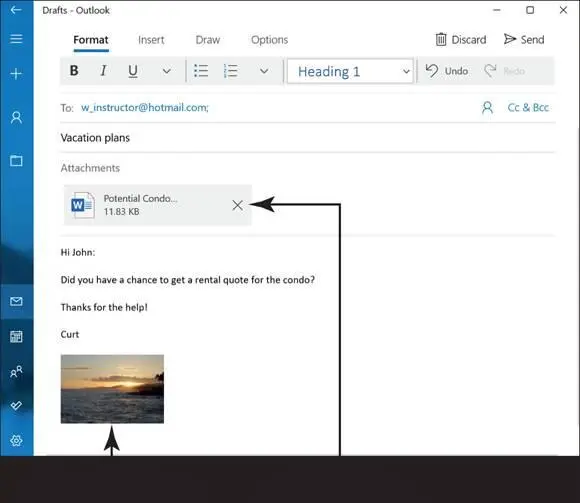
FIGURE 7-4
Chapter 11 explains how you can use the Photos app to scan photos to send them to others.
Read and Respond to Incoming Email
On the Start screen, select the Mail tile. The Mail app opens to the Inbox folder.
Select a message under the Inbox heading. The Inbox view changes to the message view, as shown in Figure 7-5.
In email terminology, bouncing messages back and forth with someone about the same subject is called a conversation. When you select an email message that is part of a conversation, the other messages in the conversation appear as well so that you can select and reread them. You can also find these conversations in the Conversation History folder.
After you read the message, you can respond to or forward it if you want. Select the Reply or Reply All button to reply; select the Forward button to forward the message. Selecting any of these buttons starts a new message (refer to Figure 7-2) that includes the text of the original message. The subject line is automatically RE: [the original subject] (in the case of replies) or FW: [the original subject] (in the case of forwarded messages). Complete your message and select the Send button.
Reply All sends your response to all the other recipients, if a message is addressed to more than one person. The Reply option sends your response only to the sender. Select Forward to send the selected message to someone else. You can add your own text or remove portions of the forwarded message in the process.
See the sections “Write an Email Message” and “Format Email,” earlier in this chapter, for more information on composing an email message.
Интервал:
Закладка:
Похожие книги на «Windows 11 For Seniors For Dummies»
Представляем Вашему вниманию похожие книги на «Windows 11 For Seniors For Dummies» списком для выбора. Мы отобрали схожую по названию и смыслу литературу в надежде предоставить читателям больше вариантов отыскать новые, интересные, ещё непрочитанные произведения.


Обсуждение, отзывы о книге «Windows 11 For Seniors For Dummies» и просто собственные мнения читателей. Оставьте ваши комментарии, напишите, что Вы думаете о произведении, его смысле или главных героях. Укажите что конкретно понравилось, а что нет, и почему Вы так считаете.