Curt Simmons - Windows 11 For Seniors For Dummies
Здесь есть возможность читать онлайн «Curt Simmons - Windows 11 For Seniors For Dummies» — ознакомительный отрывок электронной книги совершенно бесплатно, а после прочтения отрывка купить полную версию. В некоторых случаях можно слушать аудио, скачать через торрент в формате fb2 и присутствует краткое содержание. Год выпуска: 2022, ISBN: 2022, Издательство: Wiley, Жанр: ОС и Сети, tbg_computers, на английском языке. Описание произведения, (предисловие) а так же отзывы посетителей доступны на портале библиотеки ЛибКат.
- Название:Windows 11 For Seniors For Dummies
- Автор:
- Издательство:Wiley
- Жанр:
- Год:2022
- ISBN:978-1-119-84652-9
- Рейтинг книги:4 / 5. Голосов: 1
-
Избранное:Добавить в избранное
- Отзывы:
-
Ваша оценка:
Windows 11 For Seniors For Dummies: краткое содержание, описание и аннотация
Предлагаем к чтению аннотацию, описание, краткое содержание или предисловие (зависит от того, что написал сам автор книги «Windows 11 For Seniors For Dummies»). Если вы не нашли необходимую информацию о книге — напишите в комментариях, мы постараемся отыскать её.
What do you want to do with your Windows computer? Sign up for Facebook to keep up with your friends? Watch a video taken during the latest family trip? Find your latest email messages with a single click of the mouse? Look no further than Windows 11 For Seniors For Dummies to discover how to do these tasks and others that you depend on a daily basis. With this guide to the popular operating system, you find the clear and easy instructions to checking tech tasks off your to-do list.
Windows 11 For Seniors For Dummies — читать онлайн ознакомительный отрывок
Ниже представлен текст книги, разбитый по страницам. Система сохранения места последней прочитанной страницы, позволяет с удобством читать онлайн бесплатно книгу «Windows 11 For Seniors For Dummies», без необходимости каждый раз заново искать на чём Вы остановились. Поставьте закладку, и сможете в любой момент перейти на страницу, на которой закончили чтение.
Интервал:
Закладка:
The Mail app gives you access to email using your Microsoft Account. Your Microsoft Account can be associated with an email address from any email service provider, including Microsoft’s own Hotmail (www.hotmail.com), Live (www.live.com), Outlook (www.outlook.com), or Xbox (www.xbox.com). You can also use email services such as Yahoo! (www.yahoo.com) and Gmail (www.gmail.com) without having a Microsoft Account. You can easily set up these email services to work in the Windows 11 Mail app, too, and this chapter shows you how.
In this chapter, you use the Mail app for email. You compose, format, and send email, files, and pictures. You discover how to respond to incoming email. You also configure email accounts, and create and use email folders.
 If you don’t have a physical keyboard, see Chapter 1 for information on using the virtual keyboard.
Use the Mail App
For email on Windows 11, select the Mail icon on the taskbar. If you don’t see the Mail app on the taskbar, select the Search icon on the taskbar and type mailin the Search box . Select the Mail app from the search results. Either way, the Mail app opens. If you’re currently signed in to your Microsoft Account, the Mail app knows your email address. (You gave it to Microsoft when you created the account.) This address is listed on the Mail screen, and you’re ready to go. If you’re not currently signed in using a Microsoft Account, enter your email address and password on the Sign In screen that appears and then select Sign In. (See Chapter 4 for information on creating a Microsoft Account.)
The first time you use the Mail app, you are invited to “add an account.” In other words, Windows 11 offers its help linking an email account you have to the Mail app. Select the Add Account button and follow the onscreen instructions for making an email account available to the Mail app. See “Add an Email Account to Mail,” later in this chapter, for more information.
When you start the Mail app, you land in the Inbox folder. If you haven’t used your Microsoft Account for email, you probably don’t have any messages in your Inbox folder. Who would have written you already? You may, however, see a message or two from Microsoft.
On the Inbox screen, select the Expand/Collapse button, as shown in Figure 7-1.The Folders panel expands, and you can see the names of all your folders in the Folders panel. In the Mail app, email is kept in folders.
The number beside each folder name tells you how many unread email messages are in each folder.
Select any of the following folders in the Folders panel and then select the Expand/Collapse button to return to the Mail panel (you have to select More in the Folders panel to see some of these folders):
Outbox:Email you have sent or is in the process of being sent.
Inbox:Email you have received but not moved elsewhere appears here, including both read and unread email.
Archive:The Mail app provides this folder for email that you want to keep on hand for archival purposes.
Drafts:As you compose email (see next section), you can save your message as a draft until you are ready to send it.
Sent:Copies of the email you send are stored here, appropriately enough.
Deleted:Messages you have deleted from your Inbox. You can move messages out of the Deleted folder if you change your mind.
Conversation History:Conversations you have had with people through email. For example, if you and a friend email each other back and forth, the Conversation History folder will keep track of the entire conversation, which is much easier than keeping track of individual emails.
Junk:Messages are moved here — either automatically or by you — instead of the Inbox, if they are suspected of being, well, junk. The more common term for unwanted email is spam. (It’s a long story.) You may want to check this folder occasionally to see whether a message was misfiled here.
You may see other folders in the Folders panel besides the folders described here. If you linked the Mail app to an email account with other folders, those folders are also listed in the Folders panel.
Proceed to the next section, “Write an Email Message.”
To search for stray email messages, go to the Search box and enter the content you’re searching for. For example, enter a subject, sender, or something in the message.
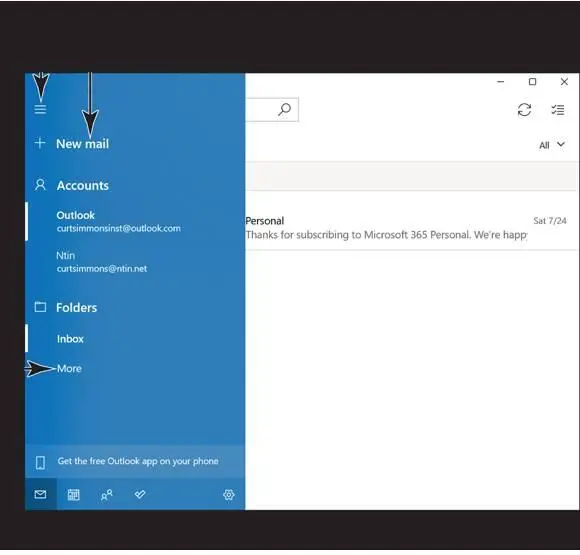
FIGURE 7-1
Write an Email Message
To compose an email message in the Mail app, select the New Mail button (it looks like a plus sign) in the upper-left corner of the screen (refer to Figure 7-1). (It doesn’t matter which folder you’re in when you select this button.) The Compose screen appears, as shown in Figure 7-2.
In the To box, type an email address. If the Mail app recognizes the address because you’ve sent email to or received email from the person to whom you’re addressing your message, a pop-up box appears so that you can select the person’s address without having to type it. Press the Tab key, touch the screen, or use the mouse to move to the next option.
To send email to more than one person at one time, select the Cc & Bcc button (located to the right of the address line). Then type a recipient’s address in the Cc box (and the Bcc box as well, if you want to send a blind copy without revealing you’ve done so). (Once upon a time, CC stood for carbon copy, and then it became courtesy copy. ) Technically, it makes no difference whether you use additional To addresses or the CC.
Enter a few words in the Subject box describing your message’s content or purpose.
Select below the Subject line. Type your message. Avoid all caps; purists consider caps to be SHOUTING! No need to press Enter as you approach the end of the line — this isn’t a typewriter.
Some people start a message with a salutation, such as Hi Peter, but many people do not. Some people sign email using their initials. Email can be as formal or casual as you choose to make it.
Words underlined with a red squiggle aren’t recognized by Windows 11 and may be misspelled. Right-click or tap and hold to see a pop-up menu, and choose Proofing on the menu. You see a list of suggested spellings. Choose the correct spelling if it is on the list. You can also go to the Options tab and select the Spelling button there.
When you’re ready to send the message, select the Send button (you’ll find it in the upper-right corner of the Compose window; refer to Figure 7-2). If you decide not to send the message, select the Discard button.
Читать дальшеИнтервал:
Закладка:
Похожие книги на «Windows 11 For Seniors For Dummies»
Представляем Вашему вниманию похожие книги на «Windows 11 For Seniors For Dummies» списком для выбора. Мы отобрали схожую по названию и смыслу литературу в надежде предоставить читателям больше вариантов отыскать новые, интересные, ещё непрочитанные произведения.


Обсуждение, отзывы о книге «Windows 11 For Seniors For Dummies» и просто собственные мнения читателей. Оставьте ваши комментарии, напишите, что Вы думаете о произведении, его смысле или главных героях. Укажите что конкретно понравилось, а что нет, и почему Вы так считаете.