Curt Simmons - Windows 11 For Seniors For Dummies
Здесь есть возможность читать онлайн «Curt Simmons - Windows 11 For Seniors For Dummies» — ознакомительный отрывок электронной книги совершенно бесплатно, а после прочтения отрывка купить полную версию. В некоторых случаях можно слушать аудио, скачать через торрент в формате fb2 и присутствует краткое содержание. Год выпуска: 2022, ISBN: 2022, Издательство: Wiley, Жанр: ОС и Сети, tbg_computers, на английском языке. Описание произведения, (предисловие) а так же отзывы посетителей доступны на портале библиотеки ЛибКат.
- Название:Windows 11 For Seniors For Dummies
- Автор:
- Издательство:Wiley
- Жанр:
- Год:2022
- ISBN:978-1-119-84652-9
- Рейтинг книги:4 / 5. Голосов: 1
-
Избранное:Добавить в избранное
- Отзывы:
-
Ваша оценка:
Windows 11 For Seniors For Dummies: краткое содержание, описание и аннотация
Предлагаем к чтению аннотацию, описание, краткое содержание или предисловие (зависит от того, что написал сам автор книги «Windows 11 For Seniors For Dummies»). Если вы не нашли необходимую информацию о книге — напишите в комментариях, мы постараемся отыскать её.
What do you want to do with your Windows computer? Sign up for Facebook to keep up with your friends? Watch a video taken during the latest family trip? Find your latest email messages with a single click of the mouse? Look no further than Windows 11 For Seniors For Dummies to discover how to do these tasks and others that you depend on a daily basis. With this guide to the popular operating system, you find the clear and easy instructions to checking tech tasks off your to-do list.
Windows 11 For Seniors For Dummies — читать онлайн ознакомительный отрывок
Ниже представлен текст книги, разбитый по страницам. Система сохранения места последней прочитанной страницы, позволяет с удобством читать онлайн бесплатно книгу «Windows 11 For Seniors For Dummies», без необходимости каждый раз заново искать на чём Вы остановились. Поставьте закладку, и сможете в любой момент перейти на страницу, на которой закончили чтение.
Интервал:
Закладка:
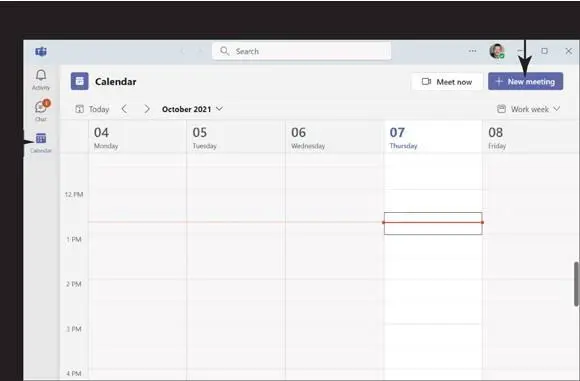
FIGURE 8-16
In the New Meeting window, make sure that your time zone is correct, and then enter the details of the meeting, as shown in Figure 8-17.When you’re done, select Save.
Teams creates the meeting and gives you a dialog box from which you can copy the meeting link and even add it to Google Calendar. Either way, you want to share the meeting with the link or calendar with the people you want to attend.
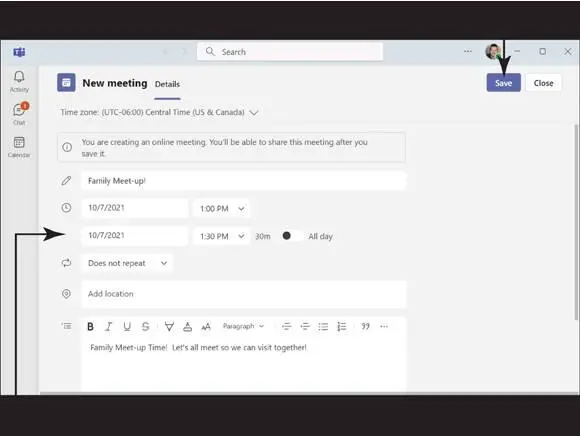
FIGURE 8-17
 When you send a meeting link, all the participant has to do is click the link to open the meeting in Microsoft Teams.
Need to cancel a meeting? No problem — select Calendar on the toolbar and locate your meeting on the calendar. Right-click the meeting and select Cancel. You can also right-click the meeting and choose Edit to change the date, time, and other details.
Manage Teams Settings
In Teams, select Settings and More and choose Settings from the menu, as shown in Figure 8-18.
In the Settings pane, choose Notifications. Teams will notify you if someone is trying to connect with you through notifications and sounds. You can manage the notifications and sounds by clicking Open Windows Notifications Settings. Here, you can determine what notifications you receive. For more information about Windows 11 notifications, see Chapter 3.
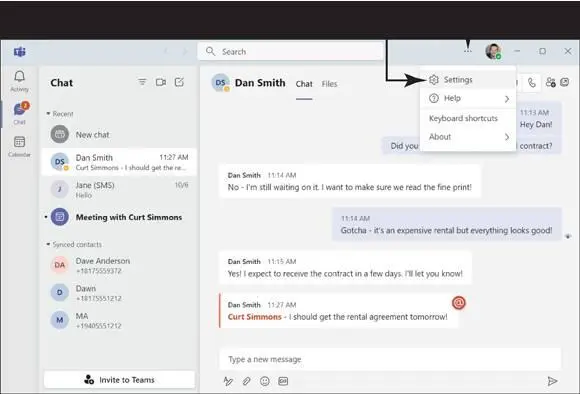
FIGURE 8-18
Select Appearance and accessibility in the Settings panel. Here, you can choose a theme for Teams. By default, Light is selected, but you can choose Dark or High Contrast if you like, as shown in Figure 8-19.
Select Privacy in the Settings panel. The default settings here are all you need, but there is one setting you should note. By default, when you read a chat or anything else in Teams, the sender can see that you’ve read it (called a read receipt). You can turn this feature off with the toggle button if you don’t want others knowing whether you’ve read their messages.
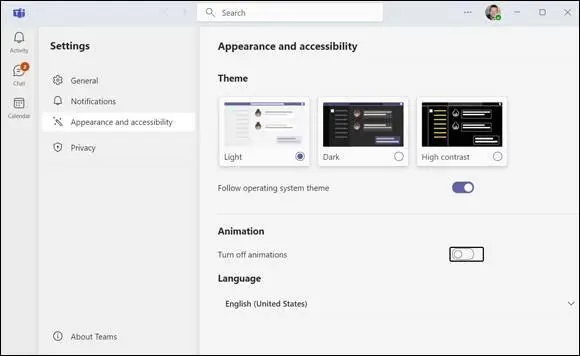
FIGURE 8-19
Chapter 9
Exploring Apps for Your Daily Life
IN THIS CHAPTER
 Managing Life with the To Do app
Scheduling with the Calendar app
Video-chatting with Skype
Talking to Cortana
This chapter describes a handful of apps that the average Joe or Jane might use every day. It shows how to manage tasks and lists to keep track of your life with the To Do app. You also use the Calendar app to keep track of birthdays, anniversaries, appointments, and other events.
This chapter delves into the Maps app, showing you how to use it to get directions and to look up hotels and restaurants when you’re on the go. You see how two Windows 11 apps, Sticky Notes and Alarms & Clock, can help you complete tasks on time, and how WordPad can help you with your word processing chores.
Finally, this chapter demonstrates how to make the Lock screen indicate whether you’ve received email, how to chat face-to-face with family and friends over the Internet with Skype, and how to ask questions of Cortana.
Add a Task with Microsoft To Do
Select the Search icon on the taskbar and search for To Do. Select the To Do app that appears in the search results. The To Do app opens and likely opens with the Getting Started option selected in the left pane. If not, select Getting Started, shown in Figure 9-1.
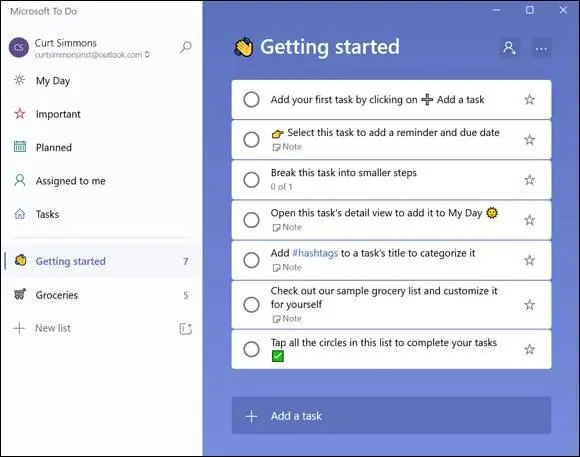
FIGURE 9-1
Select Add a Task in the right pane. Type the name of the task. For example, you could type Pay phone bill, as shown in Figure 9-2.
After you type a name, three options appear in the name field: Add a Due Date, Remind Me, and Repeat (refer to Figure 9-2). Select Add a Due Date, shown in Figure 9-3,and select one of the options, or choose pick a date to choose a date from a calendar.
To set a reminder, select the Remind Me option and choose a default reminder time to appear, or you can pick a date and time. When you select a reminder, Windows 11 displays a reminder on your computer on the designated date and time.
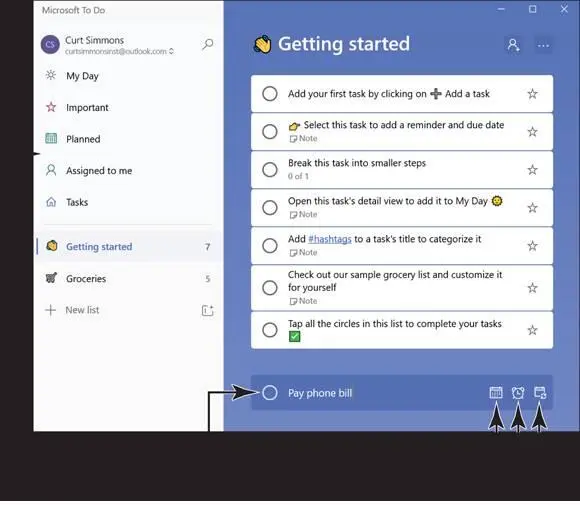
FIGURE 9-2
If you want to want to make the task recurring, select the Repeat option. This feature is handy for tasks you do every week or month, such as paying a bill. The task will automatically recur, and if you set up a reminder, you’ll also get an automatic reminder as well. When you select Repeat, just choose how often you want to repeat the task (daily, weekly, and so on), or you can create a custom repeat schedule.
When you’re done, click the plus sign (+) that appears next to the task to save it (see Figure 9-4).
Tasks that have a due date appear in the Planned section in the left pane of the app. If you select Planned, you see a lists of tasks that you’ve created and when they’re due, as shown in Figure 9-5.
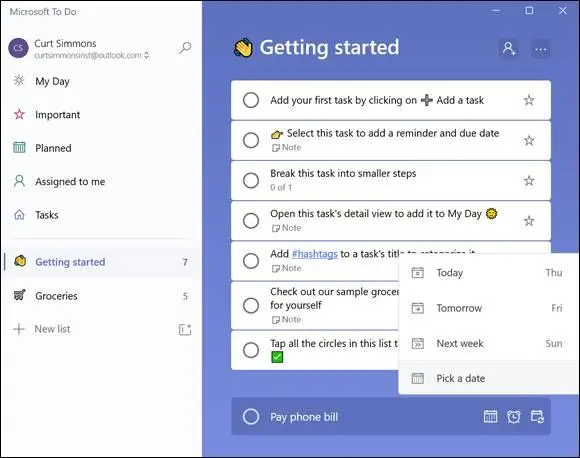
FIGURE 9-3

FIGURE 9-4
When you finish a task (or decide you don’t want it any longer), just select the circle next to the task’s name. This will make the task show as completed.
Edit a Task
Sometimes thing change and you need to edit a task as well. For example, say you have an appointment that gets moved to a different day or time. You don’t need to create a new task — you can just edit the existing one quickly and easily. Open the To Do app and locate the task you want to edit (you may find it by selecting Planned or Tasks in the left pane).
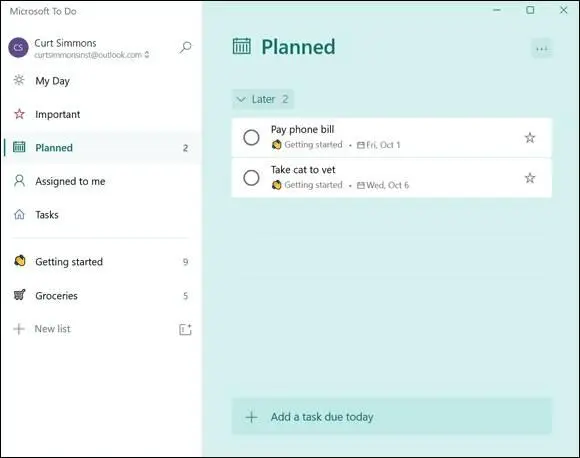
FIGURE 9-5
Читать дальшеИнтервал:
Закладка:
Похожие книги на «Windows 11 For Seniors For Dummies»
Представляем Вашему вниманию похожие книги на «Windows 11 For Seniors For Dummies» списком для выбора. Мы отобрали схожую по названию и смыслу литературу в надежде предоставить читателям больше вариантов отыскать новые, интересные, ещё непрочитанные произведения.


Обсуждение, отзывы о книге «Windows 11 For Seniors For Dummies» и просто собственные мнения читателей. Оставьте ваши комментарии, напишите, что Вы думаете о произведении, его смысле или главных героях. Укажите что конкретно понравилось, а что нет, и почему Вы так считаете.