Touchscreen:Drag the right edge of the window.
 Drag left to shrink the window and right to expand it.
Resize the window's width and height at the same time by dragging a corner of the window. If you want a challenge, try resizing the top-right corner without accidentally selecting the Close button.
Resize the window's width or height by dragging any of the four sides.
 You may want to resize a window to show only what you need to see, nothing more. Practice resizing from any side or corner.
Leave the window open as you go on to the next task.
Arrange Some Windows
On the desktop, select and open the Recycle Bin by double-clicking or double-tapping its icon. The Recycle Bin contains deleted files and folders. It appears in another File Explorer window. See Figure 5-7.
 Double-click by clicking the left mouse button twice, without a pause. Double-tap by tapping twice in quick succession.
If File Explorer isn’t still open from the preceding section, open it by selecting the folder icon on the taskbar. You now see two overlapping windows on the desktop (refer to Figure 5-7), one titled This PC and the other titled Recycle Bin.
 The window in front of the others is called the active window. All other windows are inactive. Selecting anywhere in an inactive window makes it active and moves it to the front of the others.
Drag the Recycle Bin title bar (avoiding the buttons on the left and right ends) to move that window a little.
Drag the This PC title bar (again, avoiding the buttons on both ends). The This PC window moves in front of the Recycle Bin as you move it. Move both windows so that you can see a little of each (refer to Figure 5-7).
Practice moving both windows. Arranging windows helps you see and do more than one thing at a time. Use the techniques from the preceding section, “Resize a Window,” to see as much as you can of both windows at one time.
 If you can’t see the title bar of the window you want to move, move the other window to uncover the hidden title bar.
Leave both windows open for the following task.
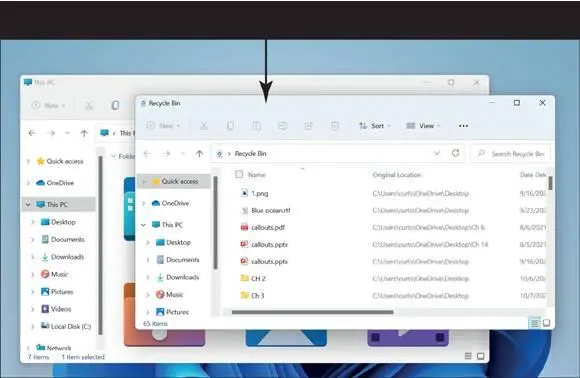
FIGURE 5-7
Use Snap Layouts
With the File Explorer window and Recycle Bin open, also open the Edge browser and the Windows Store (both are available as icons on the taskbar).
Now you have four different windows open on your desktop. That’s a lot of windows to manage. What if you’re trying to work with all of them at the same time? You would have to toggle back and forth between those windows, which would be time consuming and confusing. Windows 11 provides an easy and fun way to work with several windows at the same time on the desktop, called Snap Layouts. Point your mouse to the Maximize button on one of the windows (it doesn’t matter which one) and you see a pop-up menu appear, as shown in Figure 5-8.
Each snap layout group represents an area of the desktop where you can snap the selected window to. For example, choose the left block in the first snap group and then choose the right block in the first snap group for a second window. This snaps both windows in place so that you can easily work with them at the same time, as shown in Figure 5-9.
What if you have four open windows? In that case, just choose the four-window snap layout and snap each open window to the desired location. For example in Figure 5-10,File Explorer, Recycle Bin, Edge, and the Windows Store are snapped into a four-grid layout.
In the snap view, you can work with each window without minimizing the others. To move a window out of a snap view, just drag its title bar or select the Maximize button. Then you can move the window around, resize, or close it as you normally would.
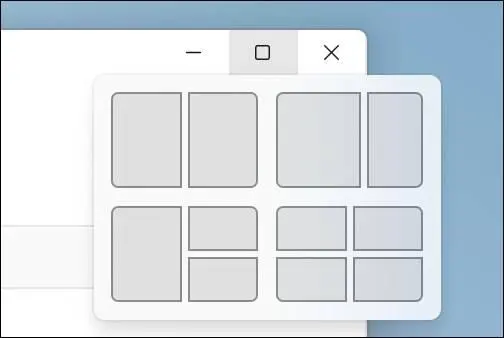
FIGURE 5-8
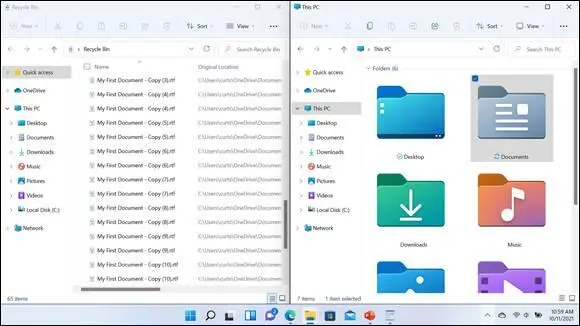
FIGURE 5-9
 You can maximize a single window by dragging it to the top edge of the screen. Dragging a window to the top is the equivalent of selecting the Maximize button (see the section “Explore the Parts of a Window,” earlier in this chapter).
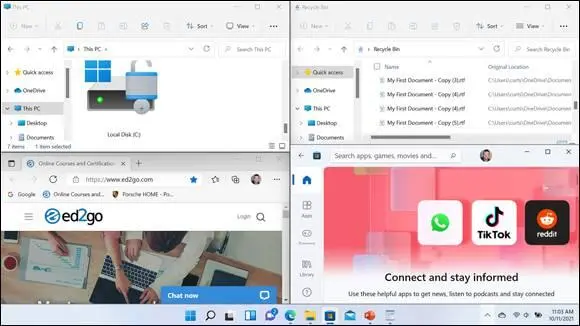
FIGURE 5-10
Open a Second Desktop
If File Explorer and Recycle Bin aren’t open on your desktop (because you didn’t follow the previous exercise in this chapter), open those programs now.
Select the Virtual Desktop button on the taskbar. After you select the Virtual Desktop button, a thumbnail version of an open desktop appears and you see an option to select New Desktop, as shown in Figure 5-11.
Select New Desktop. You see a brand-new, pristine desktop, labeled Desktop 2, as shown in Figure 5-12.Congratulations; you are now in Desktop 2. Create a second (or third or fourth) desktop when you want to keep the first desktop from getting crowded with too many applications or to better organize your work. For example, if you’re using applications for your work and using other applications for leisure purposes, put the work applications on one desktop and the leisure applications on another. This will help you find the application you want to work with.
While you are on Desktop 2, open the Photos app. Having just one application on the desktop makes working with that application a little easier.
Move the pointer or your finger onto the Desktop 2 tile, and when the Close button appears, click or tap the Close button to close Desktop 2. The Photos app that you opened on Desktop 2 now appears on Desktop 1, the only open desktop. When you close a desktop, all its open applications move to the desktop that is still open.

FIGURE 5-11

FIGURE 5-12
Choose a Desktop Background
Select the Search icon on the taskbar and search for Settings. Choose the Settings app in the search results.
Select Personalization. Then, in the Personalization window, select Background. The Background screen, shown in Figure 5-13,is the place to go to choose a background for the Windows desktop.
Читать дальше
Конец ознакомительного отрывка
Купить книгу
 Drag left to shrink the window and right to expand it.


