Curt Simmons - Windows 11 For Seniors For Dummies
Здесь есть возможность читать онлайн «Curt Simmons - Windows 11 For Seniors For Dummies» — ознакомительный отрывок электронной книги совершенно бесплатно, а после прочтения отрывка купить полную версию. В некоторых случаях можно слушать аудио, скачать через торрент в формате fb2 и присутствует краткое содержание. Год выпуска: 2022, ISBN: 2022, Издательство: Wiley, Жанр: ОС и Сети, tbg_computers, на английском языке. Описание произведения, (предисловие) а так же отзывы посетителей доступны на портале библиотеки ЛибКат.
- Название:Windows 11 For Seniors For Dummies
- Автор:
- Издательство:Wiley
- Жанр:
- Год:2022
- ISBN:978-1-119-84652-9
- Рейтинг книги:4 / 5. Голосов: 1
-
Избранное:Добавить в избранное
- Отзывы:
-
Ваша оценка:
Windows 11 For Seniors For Dummies: краткое содержание, описание и аннотация
Предлагаем к чтению аннотацию, описание, краткое содержание или предисловие (зависит от того, что написал сам автор книги «Windows 11 For Seniors For Dummies»). Если вы не нашли необходимую информацию о книге — напишите в комментариях, мы постараемся отыскать её.
What do you want to do with your Windows computer? Sign up for Facebook to keep up with your friends? Watch a video taken during the latest family trip? Find your latest email messages with a single click of the mouse? Look no further than Windows 11 For Seniors For Dummies to discover how to do these tasks and others that you depend on a daily basis. With this guide to the popular operating system, you find the clear and easy instructions to checking tech tasks off your to-do list.
Windows 11 For Seniors For Dummies — читать онлайн ознакомительный отрывок
Ниже представлен текст книги, разбитый по страницам. Система сохранения места последней прочитанной страницы, позволяет с удобством читать онлайн бесплатно книгу «Windows 11 For Seniors For Dummies», без необходимости каждый раз заново искать на чём Вы остановились. Поставьте закладку, и сможете в любой момент перейти на страницу, на которой закончили чтение.
Интервал:
Закладка:
Select the Change button.
 If you don’t have a password but want one, see the preceding “Create a Password for a Local Account” section.
On the Change Your Password screen, enter your current password and then select the Next button.
On the next Change Your Password screen enter the new password. (If you don’t care to have a password, select Next and skip to Step 8.)
To remove your current password and use no password, leave all boxes blank. However, especially if you have a laptop that you carry with you, going without a password isn’t recommended. Without a password to safeguard it, anyone can get into your laptop.
In the Reenter Password box, enter the password again.
Enter a hint to remind yourself — and no one else — about your password. Then select Next. If any error messages appear, correct the entries and select Next again.
The final screen indicates that you must use your new password the next time you sign in. (This message appears even if you left the password blank, in which case you won’t need any password.) Select Finish.
Delete a Local Account
Before you delete a local account, make sure that the user of that account is signed out. Moreover, you must be signed in to a Microsoft Account to delete a local account.
Select your name on the Start screen and choose Change Account Settings. You land on the Your Info page of the Settings screen. Does it say “administrator” under your name? We hope so, because you must be your computer’s administrator to delete a local account. On the Accounts screen, select Family & Other Users.
Select the account you want to delete and then select the Remove button, as shown in Figure 4-18.
In the Delete Account and Data window, select the Delete Account and Data button.
Take heed of the onscreen warning. Deleting a user account removes the user’s data, including all documents, music, and other files. If you're not sure which option is best, choose Cancel.
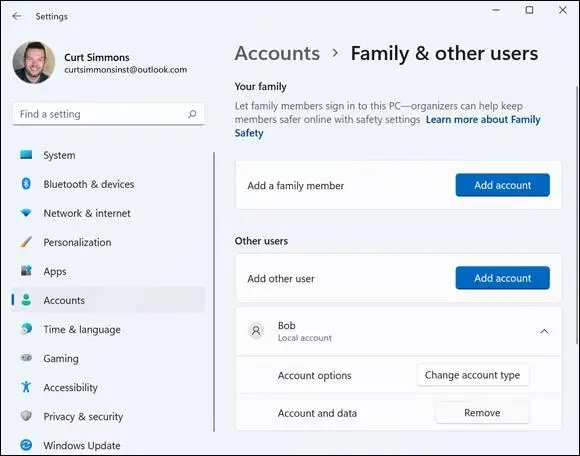
FIGURE 4-18
Chapter 5
Getting Comfortable with the Desktop
IN THIS CHAPTER
 Exploring the desktop
Moving, resizing, and rearranging windows
Working on a second desktop
Putting app icons on the taskbar
The desktop is Grand Central Station as far as Windows 11 is concerned. Sure, you can open applications from the Start screen (Chapter 2 explains how), but with a few simple modifications, you can open applications from the desktop as well. When you’re running more than one application, you can go to the desktop and quickly switch from one application to another. In fact, in Windows 11, you can create a second “virtual” desktop for one set of open applications (applications that pertain to leisure, let’s say), and when the boss isn’t looking, you can switch to the second desktop to play games or chat with friends.
One key feature of the desktop is the taskbar, a strip along the bottom of the screen that shows icons for desktop programs. The taskbar can be used to run and switch between desktop programs.
In this chapter, you get acquainted with the desktop, the taskbar, and apps. You change the date, time, and time zone, as needed. You resize and reposition windowed apps, and discover how to “add a desktop” for a second set of open applications. You select a background for the desktop and make some desktop apps more convenient to use by pinning them to the taskbar. Finally, you work with the Task Manager, which lets you end any app that is misbehaving.
The desktop originated when using the mouse was the most common method for selecting objects (touchscreens were nonexistent). Therefore, on the desktop, a few tasks are easier to do with the mouse than with touch or a keyboard.
This chapter is an introduction to the desktop. See Part 4 to dive a little deeper into desktop functions, such as organizing documents.
Check Out the Desktop
Go to the desktop (if you aren’t already there) by using one of these techniques:
Press  +D.
+D.
Right-click the Windows button and choose Desktop on the pop-up menu that appears.
Your desktop has a picture in the background. Examine your desktop for icons — small pictures that represent either programs, which perform functions, or documents, such as letters and photos. You select an icon to run a program or open a document. The Windows 11 desktop displays an icon for the Recycle Bin, where deleted documents go. The Recycle Bin may be the only icon on your desktop, or you may see others. See Chapter 15 for information on using the Recycle Bin.
The area at the bottom of the screen is the taskbar, shown in Figure 5-1.From left to right, the taskbar offers these features:
Start button:Selecting this button opens the Start screen. (Click or tap the button a second time to close the Start screen.)
Search button:You can select Search to open the Search screen and enter a search term here to look for Windows settings, applications, files on your computer, and information on the Internet.
Virtual Desktop:Select this button to create an additional virtual desktops (see “Open a Second Desktop,” later in this chapter, for more information).
Icons:Some icons appear on the taskbar automatically. Very likely, your taskbar has icons for File Explorer and Edge. You can select these icons to open File Explorer and Edge. When you open an application, Windows 11 places its icon on the taskbar.
System tray:The system tray displays icons for programs that run automatically when your computer starts. The date and time are to the right of the icon tray. On the right side of the icon tray is the Notification icon.
You can use the taskbar to switch among programs by selecting the icon for the program you want to use.
Select an icon on the taskbar to open the associated program. (Refer to Figure 5-1if you aren’t sure where the taskbar is located.)
You select items on the desktop or in the taskbar by clicking with the mouse or tapping the touchscreen. To some extent, you can use the Tab and arrow keys, but that’s an awkward method.
Интервал:
Закладка:
Похожие книги на «Windows 11 For Seniors For Dummies»
Представляем Вашему вниманию похожие книги на «Windows 11 For Seniors For Dummies» списком для выбора. Мы отобрали схожую по названию и смыслу литературу в надежде предоставить читателям больше вариантов отыскать новые, интересные, ещё непрочитанные произведения.


Обсуждение, отзывы о книге «Windows 11 For Seniors For Dummies» и просто собственные мнения читателей. Оставьте ваши комментарии, напишите, что Вы думаете о произведении, его смысле или главных героях. Укажите что конкретно понравилось, а что нет, и почему Вы так считаете.