Curt Simmons - Windows 11 For Seniors For Dummies
Здесь есть возможность читать онлайн «Curt Simmons - Windows 11 For Seniors For Dummies» — ознакомительный отрывок электронной книги совершенно бесплатно, а после прочтения отрывка купить полную версию. В некоторых случаях можно слушать аудио, скачать через торрент в формате fb2 и присутствует краткое содержание. Год выпуска: 2022, ISBN: 2022, Издательство: Wiley, Жанр: ОС и Сети, tbg_computers, на английском языке. Описание произведения, (предисловие) а так же отзывы посетителей доступны на портале библиотеки ЛибКат.
- Название:Windows 11 For Seniors For Dummies
- Автор:
- Издательство:Wiley
- Жанр:
- Год:2022
- ISBN:978-1-119-84652-9
- Рейтинг книги:4 / 5. Голосов: 1
-
Избранное:Добавить в избранное
- Отзывы:
-
Ваша оценка:
Windows 11 For Seniors For Dummies: краткое содержание, описание и аннотация
Предлагаем к чтению аннотацию, описание, краткое содержание или предисловие (зависит от того, что написал сам автор книги «Windows 11 For Seniors For Dummies»). Если вы не нашли необходимую информацию о книге — напишите в комментариях, мы постараемся отыскать её.
What do you want to do with your Windows computer? Sign up for Facebook to keep up with your friends? Watch a video taken during the latest family trip? Find your latest email messages with a single click of the mouse? Look no further than Windows 11 For Seniors For Dummies to discover how to do these tasks and others that you depend on a daily basis. With this guide to the popular operating system, you find the clear and easy instructions to checking tech tasks off your to-do list.
Windows 11 For Seniors For Dummies — читать онлайн ознакомительный отрывок
Ниже представлен текст книги, разбитый по страницам. Система сохранения места последней прочитанной страницы, позволяет с удобством читать онлайн бесплатно книгу «Windows 11 For Seniors For Dummies», без необходимости каждый раз заново искать на чём Вы остановились. Поставьте закладку, и сможете в любой момент перейти на страницу, на которой закончили чтение.
Интервал:
Закладка:
On the Create Account screen, create the account with an email address or a phone number. Messages about your Microsoft Account will be sent to the email address or phone number you enter.
Email address:Type the email address you want to use for this account in the Email Address box and select Next.
Phone Number:Select the Use a Phone Number Instead link. Then enter your phone number and select Next.
In the Create a Password box, type a password. Dots appear instead of what you type. Use at least eight characters, including at least two uppercase letters, two lowercase letters, two numbers, or two symbols. No spaces are allowed.
 Your password should be easy enough for you to remember and type, but not easy for someone else to guess. Don't use the names of any family members (including pets). A good password can be difficult to create, so try this trick: Think of a memorable phrase or lyric. Next, use the first letter from each word, capitalizing some of those letters. Then substitute some letters with numbers (for example, 3 for the letter E or the number 0 for the letter O ). Don't put your password on a sticky note near your screen.
Enter your first and last name; then select Next.
In the What’s Your Birth Date? screen, enter your country or region if it is not already selected.
Select the month, day, and year of your birth. (You can lie, but be sure to remember your response.)
Review your entries and select the Next button.
On the Verify screen, enter the code Microsoft sent to the email address or phone number you entered in Step 3.
Select the Next button. The Sign In to This Device Using Your Microsoft Account screen appears. Enter the user name and password to your local account, if you had a password. Then click Next. Congratulations! You just created a Microsoft Account.
Depending on your computer, you may have other sign-in options called Windows Hello, such as facial recognition, fingerprint recognition, and PIN sign-in. These options may or may not be available depending on your computer’s hardware. However, you can check them out by accessing Accounts ⇒ Sign-in options.
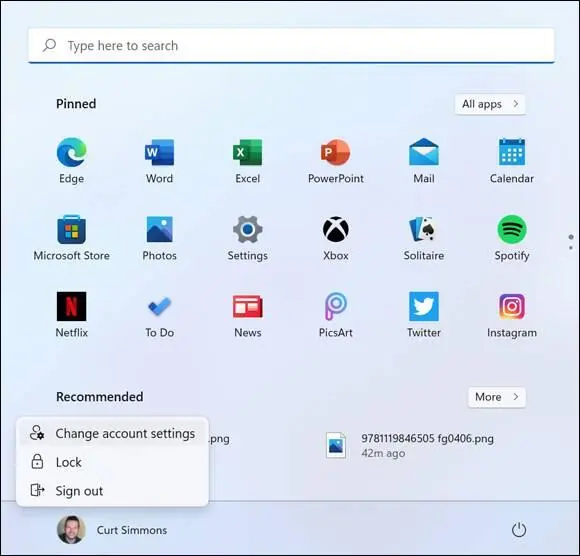
FIGURE 4-8
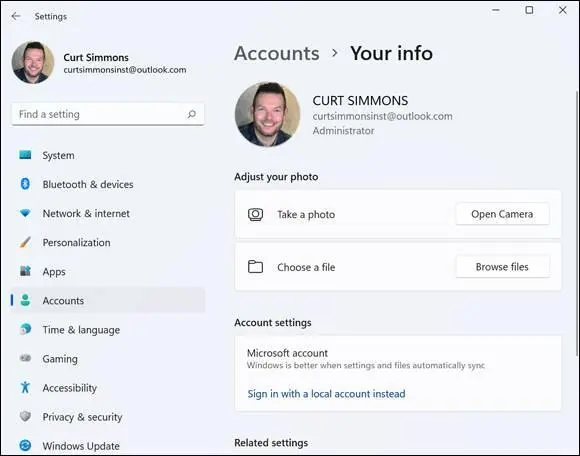
FIGURE 4-9
Create a Local Account
“Local account” is Microsoft’s name for your ability to start your computer without signing in to Microsoft. Before you create or sign in with a local account, save your work. Then select the Start button, select your picture on the Start menu, and in the pop-up menu that appears (refer to Figure 4-8), choose Sign in with a local account instead .
You can’t download and install apps from the Microsoft Store without signing in with a Microsoft Account. Nor can you upload files to OneDrive. So why have a local account? If you’re concerned about privacy and security, if you don’t want Microsoft to peer over your shoulder and track your every move when you use your computer, consider creating a local account. You can always switch to your Microsoft Account when you want to install apps from the Microsoft Store, use OneDrive, or use Skype (see “Switch from a Local to an Existing Microsoft Account,” later in this chapter).
To create a local account for someone else to use your computer, see “Create a Local Account for Someone in Your Household,” later in this chapter.
Choose the Sign In with a Local Account Instead link. You see the Switch to a Local Account screen, shown in Figure 4-10.Select the Skip This Step button and select Next on the following screen.
Enter the password of your Microsoft Account on the Making Sure It’s You screen, shown in Figure 4-11,and select OK.
In the next screen, shown in Figure 4-12,enter a user name, a password (twice), and a word or two to jar your memory if you forget your password; then select Next.
Passwords are case sensitive. In other words, your computer recognizes uppercase letters and lowercase letters when you create and enter a password. Remember which letters in your password are upper- and lowercase.
If you want to sign in to your local account without having to enter a password, leave the Password, Reenter Password, and Password Hint text boxes blank. Later in this chapter, the sections “Create a Password for a Local Account” and “Change or Remove a Local Account Password” explain the ins and outs of local account passwords.
Select the Sign Out and Finish button. Your Microsoft Account closes, Windows restarts, and you see the Windows 11 screen.
Enter the password you created in Step 3. When you start your computer, Windows 11 assumes that you want to sign in with the account you were using when you last shut down your computer. If you shut down when signed in with your local account, you are asked to provide the password for your local account the next time you start your computer.
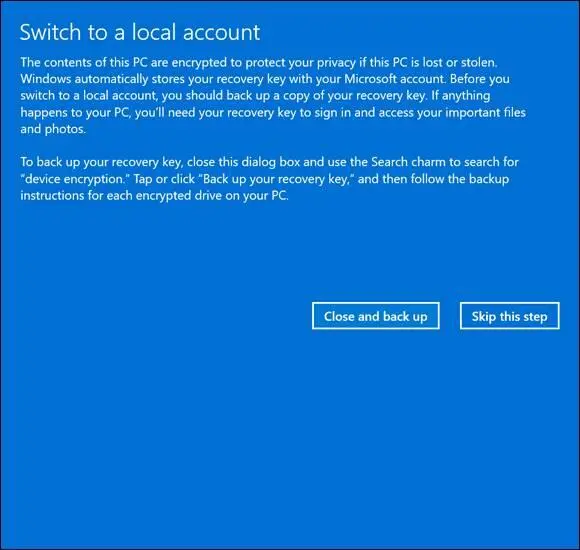
FIGURE 4-10
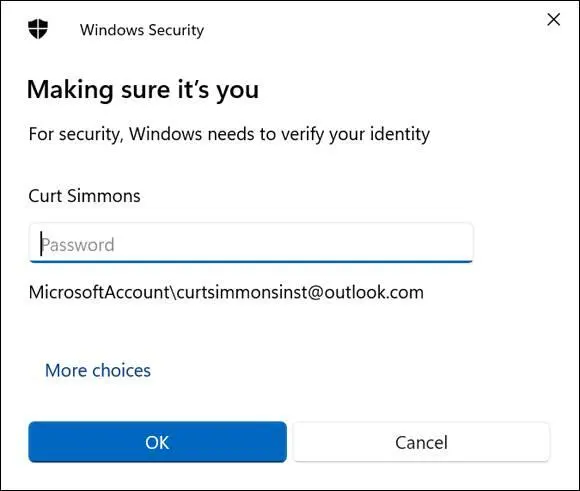
FIGURE 4-11
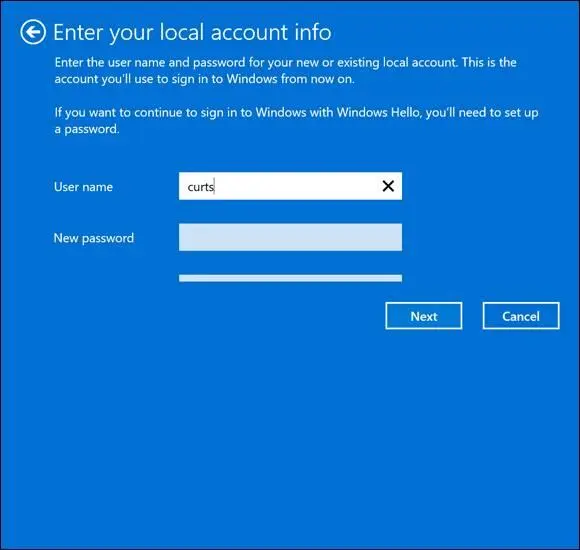
FIGURE 4-12
Switch from a Local to an Existing Microsoft Account
Follow these steps to sign in with your Microsoft Account when you are currently signed in with your local account. On the Start screen, select your name in the bottom-left corner of the screen and then choose Change Account Settings from the pop-up menu that appears (refer to Figure 4-8). The Accounts screen opens. Your account information appears with Local Account under your name, shown in Figure 4-13.
If you don’t have a Microsoft Account already, see “Create a New Microsoft Account,” earlier in this chapter.
If you don’t see Local Account under your user account name , you’re already signed in with your Microsoft Account.
Select the Sign In with a Microsoft Account Instead link. The screen shown in Figure 4-14appears. Type the email address or phone number of your Microsoft Account and select the Next button. Note that you must be connected to the Internet to sign in with a Microsoft account.
Читать дальшеИнтервал:
Закладка:
Похожие книги на «Windows 11 For Seniors For Dummies»
Представляем Вашему вниманию похожие книги на «Windows 11 For Seniors For Dummies» списком для выбора. Мы отобрали схожую по названию и смыслу литературу в надежде предоставить читателям больше вариантов отыскать новые, интересные, ещё непрочитанные произведения.


Обсуждение, отзывы о книге «Windows 11 For Seniors For Dummies» и просто собственные мнения читателей. Оставьте ваши комментарии, напишите, что Вы думаете о произведении, его смысле или главных героях. Укажите что конкретно понравилось, а что нет, и почему Вы так считаете.