Curt Simmons - Windows 11 For Seniors For Dummies
Здесь есть возможность читать онлайн «Curt Simmons - Windows 11 For Seniors For Dummies» — ознакомительный отрывок электронной книги совершенно бесплатно, а после прочтения отрывка купить полную версию. В некоторых случаях можно слушать аудио, скачать через торрент в формате fb2 и присутствует краткое содержание. Год выпуска: 2022, ISBN: 2022, Издательство: Wiley, Жанр: ОС и Сети, tbg_computers, на английском языке. Описание произведения, (предисловие) а так же отзывы посетителей доступны на портале библиотеки ЛибКат.
- Название:Windows 11 For Seniors For Dummies
- Автор:
- Издательство:Wiley
- Жанр:
- Год:2022
- ISBN:978-1-119-84652-9
- Рейтинг книги:4 / 5. Голосов: 1
-
Избранное:Добавить в избранное
- Отзывы:
-
Ваша оценка:
Windows 11 For Seniors For Dummies: краткое содержание, описание и аннотация
Предлагаем к чтению аннотацию, описание, краткое содержание или предисловие (зависит от того, что написал сам автор книги «Windows 11 For Seniors For Dummies»). Если вы не нашли необходимую информацию о книге — напишите в комментариях, мы постараемся отыскать её.
What do you want to do with your Windows computer? Sign up for Facebook to keep up with your friends? Watch a video taken during the latest family trip? Find your latest email messages with a single click of the mouse? Look no further than Windows 11 For Seniors For Dummies to discover how to do these tasks and others that you depend on a daily basis. With this guide to the popular operating system, you find the clear and easy instructions to checking tech tasks off your to-do list.
Windows 11 For Seniors For Dummies — читать онлайн ознакомительный отрывок
Ниже представлен текст книги, разбитый по страницам. Система сохранения места последней прочитанной страницы, позволяет с удобством читать онлайн бесплатно книгу «Windows 11 For Seniors For Dummies», без необходимости каждый раз заново искать на чём Вы остановились. Поставьте закладку, и сможете в любой момент перейти на страницу, на которой закончили чтение.
Интервал:
Закладка:
Also under Hearing, choose Captions settings to control how subtitles appear in audio and video presentations. Choose Font settings to describe what you want the text in the captions to look like. Choose Background and Window settings to describe what the box where the captions appear looks like. The Preview box shows what your choices mean in real terms.
Under Interaction, choose Speech settings to dictate text instead of typing it and control your computer and device with voice commands.
Also under Interaction, choose Keyboard settings to type without using a physical keyboard. This onscreen keyboard uses the layout of a conventional keyboard. However, most people find that the standard Windows 11 virtual keyboard is more flexible. See Chapter 1 for information on the virtual keyboard layouts.
Again under Interaction, choose Mouse settings if for some strange reason you want to control the mouse with the keys on the numeric keypad.
Finally, under Interaction, choose Eye control. This feature allows you to use an eye-tracking device to control the screen by using your eyes. You have to have a tracking device for this to work. You can select the link on this screen to get more information about setting up and using an eye-tracking device.
Customize the Start Menu
On the Settings screen, select Personalization. See “Access the Settings Screen,” earlier in this chapter, if you need help opening the Settings screen.
On the Personalization screen, select Start. The Personalization > Start screen opens, as shown in Figure 3-11.This screen offers a few ways to customize the Start screen.
You can turn the following items on or off (refer to Figure 3-11):
Show Recently Added Apps:Places the names of apps you recently acquired on the Start menu.
Show Most Used Apps:Places the names of programs you use most often on the Start menu. The names of these programs appear under the Recommended heading.
Show Recently Opened Items in Jump Lists on Start or the Taskbar and in File Explorer:Allows you to quickly open folders, files, and windows from the Start menu, taskbar, and File Explorer screen. When you move the pointer over an app or program on the Start menu, an arrow appears; select the arrow to see a menu of items you can open. When you move the pointer over an icon on the taskbar, thumbnail windows appear so that you can choose which window to open. In File Explorer, the items are listed in the Quick Access section of the navigation pane.
Folders:Allows you to place specific folders on the Start menu. These folders appear next to the Power button after you place them there. For example, you might want to add your Documents or Pictures folder to the Start menu for fast and easy access.
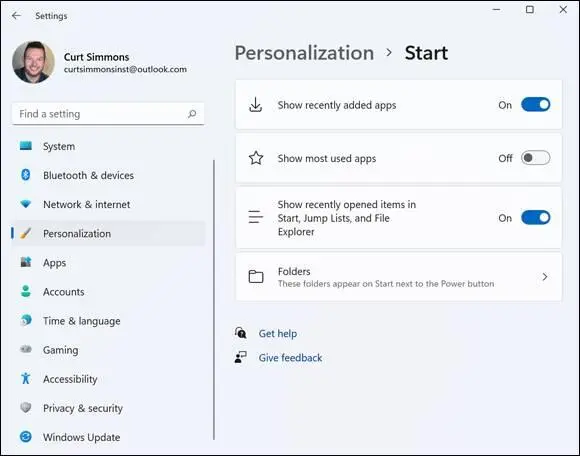
FIGURE 3-11
Handle Notifications
Notifications are the sometimes pesky little message boxes that appear in the lower-right corner of the screen when you least expect them. You can decide for yourself whether notifications appear and which notifications you want to see. On the Settings screen, select System. See “Access the Settings Screen,” earlier in this chapter, if you need help opening the Settings screen.
Select Notifications to see the screen shown in Figure 3-12.
Under Notifications in the Notifications from Apps and Other Senders list, turn options on or off to tell Windows whether you want notifications to appear on your screen.
Select the Close button (the X ) to close the Settings window.
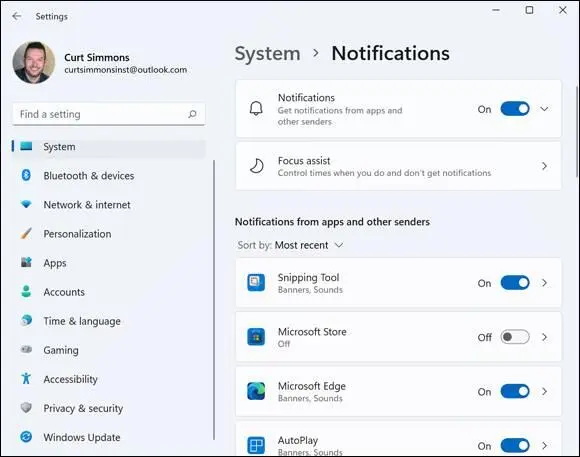
FIGURE 3-12
Chapter 4
Working with User Accounts
IN THIS CHAPTER
 Connecting to and disconnecting from the Internet
Creating local and Microsoft Accounts
Managing passwords
Deleting an account
Windows 11 seeks an Internet connection automatically from the moment you start it. More often than not, you connect to the Internet using a wireless or Wi-Fi connection. For this reason, if you start a laptop or tablet in a coffee shop or library, you may see a notification that one or more network connections are available. That's convenient.
A computer without an Internet connection is an island, if not a paperweight. Connecting to a network, however, opens a door to your computer — and malefactors try to push through that door to access your computer. Windows 11 has a firewall that monitors and restricts traffic in and out. Don't be afraid of connecting to the Internet, but be aware of the risks and be careful to connect to a network that seems trustworthy. In Chapter 1, you create a local user account. You need a Microsoft Account to take full advantage of Windows 11 features such as the Microsoft Store for apps (see Chapter 10), OneDrive for online storage (see Chapter 16), and synchronized settings between computers. In this chapter, you create a Microsoft Account and choose a secure method for logging in to your account. You also discover how to switch to Airplane mode, create a local account, and switch from a local account to a Microsoft Account. To control access to your computer, you find out how to use a password to unlock your computer.
 If other people use your computer, you may want to create more than one local account. When each person who uses your computer has a separate account, you can keep data, apps, and settings tidy and private. We recommend having only one administrator account for each computer.
Even if you're the only one using your computer, you may want more than one account. For example, if you create a local account, you can experiment with the new account — changing the look and function of Windows 11 — without affecting your first account.
Many of the steps in this chapter involve entering text, such as your name. If you don’t have a physical keyboard, use the virtual keyboard, which is covered in Chapter 1.
Connect to the Internet
On the Windows desktop, look to the Network icon to see whether your computer is connected to the Internet. This icon is located to the left of the time and date readings in the lower-right corner of the screen on the taskbar, as shown in Figure 4-1.
Select or choose options by moving the mouse pointer and left-clicking or by tapping a touchscreen with your finger.
Select the Network icon. A network panel appears on the right side of your screen, as shown in Figure 4-2,and shows what network you are connected to. Select the Wi-Fi button to see available networks, as shown in Figure 4-3.
Читать дальшеИнтервал:
Закладка:
Похожие книги на «Windows 11 For Seniors For Dummies»
Представляем Вашему вниманию похожие книги на «Windows 11 For Seniors For Dummies» списком для выбора. Мы отобрали схожую по названию и смыслу литературу в надежде предоставить читателям больше вариантов отыскать новые, интересные, ещё непрочитанные произведения.


Обсуждение, отзывы о книге «Windows 11 For Seniors For Dummies» и просто собственные мнения читателей. Оставьте ваши комментарии, напишите, что Вы думаете о произведении, его смысле или главных героях. Укажите что конкретно понравилось, а что нет, и почему Вы так считаете.