Jason Gumster - Blender For Dummies
Здесь есть возможность читать онлайн «Jason Gumster - Blender For Dummies» — ознакомительный отрывок электронной книги совершенно бесплатно, а после прочтения отрывка купить полную версию. В некоторых случаях можно слушать аудио, скачать через торрент в формате fb2 и присутствует краткое содержание. Жанр: unrecognised, на английском языке. Описание произведения, (предисловие) а так же отзывы посетителей доступны на портале библиотеки ЛибКат.
- Название:Blender For Dummies
- Автор:
- Жанр:
- Год:неизвестен
- ISBN:нет данных
- Рейтинг книги:5 / 5. Голосов: 1
-
Избранное:Добавить в избранное
- Отзывы:
-
Ваша оценка:
Blender For Dummies: краткое содержание, описание и аннотация
Предлагаем к чтению аннотацию, описание, краткое содержание или предисловие (зависит от того, что написал сам автор книги «Blender For Dummies»). Если вы не нашли необходимую информацию о книге — напишите в комментариях, мы постараемся отыскать её.
Author Jason van Gumster shares his insight as an independent animator and digital artist to help Blender newcomers turn their ideas into three-dimensional drawings. From exporting and sharing scenes to becoming a part of the Blender community, this accessible book covers it all!
Create 3D characters—no experience required Build scenes with texture and real lighting features Animate your creations and share them with the world Avoid common rookie mistakes This book is the ideal starting place for newcomers to the world of 3D modeling and animation.
Blender For Dummies — читать онлайн ознакомительный отрывок
Ниже представлен текст книги, разбитый по страницам. Система сохранения места последней прочитанной страницы, позволяет с удобством читать онлайн бесплатно книгу «Blender For Dummies», без необходимости каждый раз заново искать на чём Вы остановились. Поставьте закладку, и сможете в любой момент перейти на страницу, на которой закончили чтение.
Интервал:
Закладка:
 Notice that when you have the Move, Rotate, or Scale gizmos active, a white circle appears either around the origin of the gizmo or all the way around the gizmo. Refer to Figure 3-3 if you need a refresher. This white circle control gives you the ability to transform your object relative to your current view angle (except for Scale, which gives you the ability to uniformly scale on all axes). For example, you can move a selected object in the XY plane of the View orientation by left-clicking and dragging this circle with the Move gizmo active. This convenient shortcut prevents you from having to continually switch orientation modes for the manipulator.
You can use the Ctrl and Shift keys while transforming to have more control. Move in fixed increments with default settings by holding down Ctrl. Hold down Shift while transforming an object to make adjustments on a finer scale. Hold down the Ctrl+Shift key combo while transforming to make adjustments in smaller fixed increments. Interestingly, these same modifier keys work when using any of Blender’s value input fields.
 This fixed-increment control is similar to (though not exactly the same as) the basic snapping to the grid , or increment snapping, found in other 2D and 3D applications. Blender also offers the ability to snap your selected object to other objects (or parts of them), called snap targets , in your scene. Choices for snap targets are Increment , Vertex, Edge, Face, Volume, Edge Center, and Edge Perpendicular . You can snap directly to the 3D scene’s grid by toggling the Absolute Grid Snap check box. You choose which snap target you want to use by left-clicking the Snapping menu in the 3D Viewport’s header, as shown in Figure 3-5.
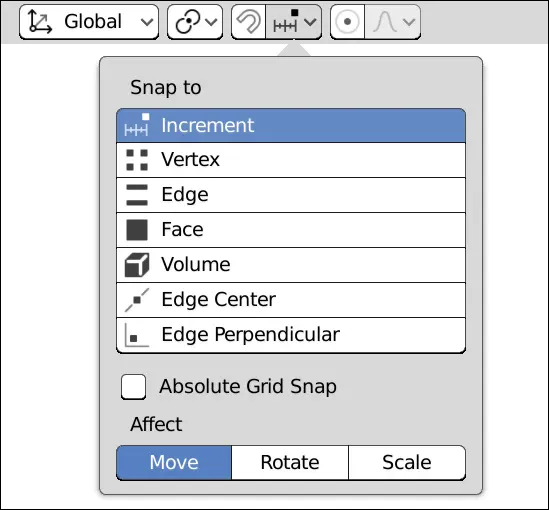
FIGURE 3-5:The Snapping menu.
 Holding Ctrl while transforming is actually a way to temporarily enable snapping behavior based on a chosen snap target. However, you may prefer snapping to be the default behavior (so you don’t have to hold down Ctrl). You can enable snapping by left-clicking the magnet icon next to the Snapping menu in the 3D Viewport’s header or by using the Shift+Tab hotkey. This option tells Blender to snap as default and that holding down Ctrl then temporarily disables snapping.
Here are the different available types of snap targets in Blender:
Increment: In Blender’s default behavior, your selection is snapped to fixed increments of Blender’s base unit.
Vertex: The vertex is the fundamental element of a mesh object in Blender. Using this target, the center of your selection snaps to vertices or points (for curves and armatures) in other objects or the same object.
Edge: The line connecting vertices is referred to as an edge. Select this target to snap your selection to edges in objects of your scene.
Face: Edges connect to one another to create polygons, referred to as faces. Choose this option to snap to them with your selection.
Volume: When faces connect to create a surface, that closed surface is referred to as a volume. You can choose this option to snap your selection to an object’s volume. This option is particularly useful when creating a rig for animating characters, as described in Chapter 12.
Edge Center: Whereas Edge snapping snaps your selection to any close point on an edge, the Edge Center option snaps you to the center of an edge that you move your mouse cursor near.
Edge Perpendicular: The Edge Perpendicular option is a little tricky to wrap your head around. It works relative to the original location of your selection. When you translate your selection, Blender draws a small X at its original location. You can snap to any edge that makes a perpendicular angle with that X.
Snapping targets work in both Object mode as well as Edit mode. For more information on Edit mode, vertices, edges, and faces, see Chapter 4.
You can quickly change snap modes by using the Shift+Ctrl+Tab hotkey combination.
You can observe the changes made to your object in real time by looking in the 3D Viewport’s header as you transform it. Figure 3-6 shows how the header explicitly indicates how much you’re changing the object in each axis.
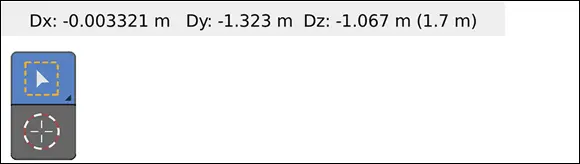
FIGURE 3-6:You can view changes in the 3D Viewport’s header.
 Transform operations are consistent across all manipulator modes in Blender, so you can apply any of these methods of interacting with the Translate manipulator in the Rotate and Scale manipulator modes. And don’t forget that you aren’t limited to working in just the Global coordinate system. You can choose any of the other six orientations from the Transform Orientation menu and the object gizmos adjust to fit that orientation.
Saving Time by Using Hotkeys
Many Blender users find that the object gizmos obstruct their view too much when working, so they never enable them or even use the transform tools from the Toolbar. But wait, with the gizmos gone, how do I transform my objects? I’m glad you asked. Enter one of the most powerful features of Blender: hotkeys.
Part of the beauty of Blender’s hotkeys are that they take a lot of pressure off of your mouse hand and shorten the distance of mouse-based operations. The accumulation of these little time-saving actions is what makes using hotkeys so powerful.
Transforming with hotkeys
You can access nearly every piece of major functionality in Blender with hotkeys. Transforms are no exception. One of the other terms for moving in Blender is grabbing . That naming has specific significance as it pertains to hotkeys. To see what I mean, follow these steps to Grab/Move your object:
1 Select the object you want to move.
2 Press G.Congratulations! You moved your object.
3 Confirm the move by left-clicking or pressing Enter.Cancel by right-clicking or pressing Esc.
To rotate your object, press R. Scale it by pressing S. See a pattern here? Quite a few of Blender’s default hotkeys are easy to remember. Most of them just use the first letter from the operation in question. And just like when using the gizmo, the familiar Ctrl, Shift, and Ctrl+Shift keypresses for snapping and fine adjustments still apply.
Also, because Blender tries to maintain consistency throughout its interface, you can use these hotkeys in more than just the 3D Viewport. For example, the same grab and scale operations work when you edit keyframes and motion curves in the Graph Editor. How’s that for convenient?
Интервал:
Закладка:
Похожие книги на «Blender For Dummies»
Представляем Вашему вниманию похожие книги на «Blender For Dummies» списком для выбора. Мы отобрали схожую по названию и смыслу литературу в надежде предоставить читателям больше вариантов отыскать новые, интересные, ещё непрочитанные произведения.


Обсуждение, отзывы о книге «Blender For Dummies» и просто собственные мнения читателей. Оставьте ваши комментарии, напишите, что Вы думаете о произведении, его смысле или главных героях. Укажите что конкретно понравилось, а что нет, и почему Вы так считаете.