Jason Gumster - Blender For Dummies
Здесь есть возможность читать онлайн «Jason Gumster - Blender For Dummies» — ознакомительный отрывок электронной книги совершенно бесплатно, а после прочтения отрывка купить полную версию. В некоторых случаях можно слушать аудио, скачать через торрент в формате fb2 и присутствует краткое содержание. Жанр: unrecognised, на английском языке. Описание произведения, (предисловие) а так же отзывы посетителей доступны на портале библиотеки ЛибКат.
- Название:Blender For Dummies
- Автор:
- Жанр:
- Год:неизвестен
- ISBN:нет данных
- Рейтинг книги:5 / 5. Голосов: 1
-
Избранное:Добавить в избранное
- Отзывы:
-
Ваша оценка:
Blender For Dummies: краткое содержание, описание и аннотация
Предлагаем к чтению аннотацию, описание, краткое содержание или предисловие (зависит от того, что написал сам автор книги «Blender For Dummies»). Если вы не нашли необходимую информацию о книге — напишите в комментариях, мы постараемся отыскать её.
Author Jason van Gumster shares his insight as an independent animator and digital artist to help Blender newcomers turn their ideas into three-dimensional drawings. From exporting and sharing scenes to becoming a part of the Blender community, this accessible book covers it all!
Create 3D characters—no experience required Build scenes with texture and real lighting features Animate your creations and share them with the world Avoid common rookie mistakes This book is the ideal starting place for newcomers to the world of 3D modeling and animation.
Blender For Dummies — читать онлайн ознакомительный отрывок
Ниже представлен текст книги, разбитый по страницам. Система сохранения места последней прочитанной страницы, позволяет с удобством читать онлайн бесплатно книгу «Blender For Dummies», без необходимости каждый раз заново искать на чём Вы остановились. Поставьте закладку, и сможете в любой момент перейти на страницу, на которой закончили чтение.
Интервал:
Закладка:
IN THIS CHAPTER
 Understanding transform orientations
Making changes to 3D objects
Speeding up the process with hotkeys
Blender is built for speed, and its design heavily emphasizes working as quickly and efficiently as possible for extended periods of time. On more than one occasion, I’ve found myself working in Blender for 10 to 15 hours straight (or longer). Although, admittedly, part of this ridiculous scheduling has to do with my own minor lunacy, the fact that I’m able to be that productive for that long is a testament to Blender’s design. This chapter gets you started in taking full advantage of that power. I cover the meat and potatoes of interacting with three-dimensional (3D) space in Blender, such as moving objects and editing polygons.
If you’ve worked in other 3D programs, chances are good that a number of Blender concepts may seem particularly alien to you. Although this divide is reduced with each update, to quote Yoda, “You must unlearn what you have learned” in your journey to become a Blender Jedi. If you’ve never worked in 3D, you may actually have a slight advantage over a trained professional who’s used to a different workflow. Hooray for starting fresh!
Grabbing, Scaling, and Rotating
The three most basic ways of changing an object in a 3D scene are called transformations by mathematicians. In Blender, the terms are a little bit more straightforward:
Change location using translation.
Change size using scale.
Change rotation using orientation .
Rather than use the mathematical terms of translation, scale, and orientation, most Blenderheads use the terms grab , scale , and rotate , respectively. Other programs might use the term move in place of grab or size in place of scale. Whatever you call them, and whatever program you use, these three operations place any object in 3D space at any arbitrary size and with any arbitrary orientation.
Differentiating Between Coordinate Systems
Before you bound headlong into applying transformations to your objects, you need to understand how coordinate systems work in 3D space. All coordinate systems in Blender are based on a grid consisting of three axes:
The X-axis typically represents side-to-side movement.
The Y-axis represents front-to-back movement.
The Z-axis goes from top to bottom.
This grid system with axes is referred to as the Cartesian grid. The origin, or center, of this grid is at the (0,0,0) coordinate. The difference in the coordinate systems within Blender lies in the way this grid is oriented relative to a selected 3D object. Figure 3-1 shows the Transform Orientations menu in the 3D Viewport header when you left-click it as well as the corresponding pie menu that you can see by pressing the Comma (,) hotkey.
 If you’re coming from another 3D program, you may find the way Blender handles coordinates a bit disorienting. Blender uses what’s known as a “right-handed, Z-axis up” convention. Some programs (such as Cinema 4D and Maya) have the Y-axis representing vertical movement and the Z-axis going from front to back. And still other programs have either Z or Y as the vertical axis, but oriented in a left-handed convention. Currently, you can’t change the coordinate system in Blender to match any of these programs, so the right-handed, Z-up system is one of those things that migrating users just need to get used to.
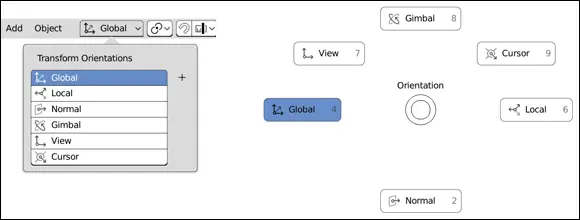
FIGURE 3-1:The Transform Orientations menu from the 3D Viewport’s header (left) and when invoked as a pie menu by pressing the Comma (,) hotkey.
As Figure 3-1 shows, you can choose from six orientations: Global, Local, Normal, Gimbal, View, and Cursor . Working in any of these coordinate systems gives you absolute control of how your object lives in 3D space. Depending on how you’d like to transform your object, one orientation may be more appropriate than the others. Blender also gives you the ability to create custom orientations. That topic is slightly more advanced than I have room to cover in this book, but after you create a custom orientation, it also becomes available on the Transform Orientations menu.
 This list describes details of the six possible orientations:
Global: You see this orientation of Blender’s base grid in the 3D Viewport. In many ways, the Global orientation is the primary orientation to which everything else relates, and it’s the base coordinate system described at the beginning of this section. The Z-axis, marked in blue, runs vertically in the space. The Y-axis is marked in green, moving along the front-to-back line, and the X-axis is in red, along the side-to-side line. The origin is located directly at the center of the grid.
Local: In addition to the Global orientation, each 3D object in Blender has a local coordinate system. The base of this system isn’t the same as the Global coordinate system’s base. Instead, this coordinate system is relative to the center point, or origin, of your object. The object origin is represented by the orange dot that’s usually located at the center of your 3D object. By default, when you first add a new object in Blender, its Local coordinate system is aligned to the Global axis, but after you start moving your object around, its Local coordinate system can differ greatly from the Global orientation.
Normal: The Normal orientation is a set of axes that’s perpendicular to some arbitrary plane. When working with just objects, this description doesn’t really apply, so the Normal orientation is exactly the same as the Local orientation. When you begin editing meshes, though, Normal orientation makes more sense because you have normals (imaginary lines that extend perpendicular to the surface of a triangle or plane) to work with. Blender also uses the Normal orientation for the local coordinate system of bones when working with armatures for animation. A nice way to think about the Normal orientation is the “more local than local” orientation. Chapter 4covers editing meshes in more detail, and Chapter 12covers working with armatures in depth.
Gimbal: When you rotate an object about its X-, Y-, and Z-axes, the angles about those axes are known as Euler (pronounced like oiler ) angles. Unfortunately, a side effect of using Euler angles is that you have the possibility of running into gimbal lock . You run into this problem when one of your rotation axes matches another one. For example, if you rotate your object 90 degrees about its X-axis, then rotating around its Y-axis is the same as rotating about its Z-axis; mathematically speaking, they’re locked together, which can be a problem, especially when animating. This orientation mode in Blender helps you visualize where the axes are, so you can avoid gimbal lock.
Читать дальшеИнтервал:
Закладка:
Похожие книги на «Blender For Dummies»
Представляем Вашему вниманию похожие книги на «Blender For Dummies» списком для выбора. Мы отобрали схожую по названию и смыслу литературу в надежде предоставить читателям больше вариантов отыскать новые, интересные, ещё непрочитанные произведения.


Обсуждение, отзывы о книге «Blender For Dummies» и просто собственные мнения читателей. Оставьте ваши комментарии, напишите, что Вы думаете о произведении, его смысле или главных героях. Укажите что конкретно понравилось, а что нет, и почему Вы так считаете.