Jason Gumster - Blender For Dummies
Здесь есть возможность читать онлайн «Jason Gumster - Blender For Dummies» — ознакомительный отрывок электронной книги совершенно бесплатно, а после прочтения отрывка купить полную версию. В некоторых случаях можно слушать аудио, скачать через торрент в формате fb2 и присутствует краткое содержание. Жанр: unrecognised, на английском языке. Описание произведения, (предисловие) а так же отзывы посетителей доступны на портале библиотеки ЛибКат.
- Название:Blender For Dummies
- Автор:
- Жанр:
- Год:неизвестен
- ISBN:нет данных
- Рейтинг книги:5 / 5. Голосов: 1
-
Избранное:Добавить в избранное
- Отзывы:
-
Ваша оценка:
Blender For Dummies: краткое содержание, описание и аннотация
Предлагаем к чтению аннотацию, описание, краткое содержание или предисловие (зависит от того, что написал сам автор книги «Blender For Dummies»). Если вы не нашли необходимую информацию о книге — напишите в комментариях, мы постараемся отыскать её.
Author Jason van Gumster shares his insight as an independent animator and digital artist to help Blender newcomers turn their ideas into three-dimensional drawings. From exporting and sharing scenes to becoming a part of the Blender community, this accessible book covers it all!
Create 3D characters—no experience required Build scenes with texture and real lighting features Animate your creations and share them with the world Avoid common rookie mistakes This book is the ideal starting place for newcomers to the world of 3D modeling and animation.
Blender For Dummies — читать онлайн ознакомительный отрывок
Ниже представлен текст книги, разбитый по страницам. Система сохранения места последней прочитанной страницы, позволяет с удобством читать онлайн бесплатно книгу «Blender For Dummies», без необходимости каждый раз заново искать на чём Вы остановились. Поставьте закладку, и сможете в любой момент перейти на страницу, на которой закончили чтение.
Интервал:
Закладка:
Technically, you can even animate your annotations (for giving feedback on animated work). You just need to scrub forward on the Timeline and make a new annotation mark. Your annotations will update on playback as you change to those frames. You can adjust the timing of your annotations from the Grease Pencil context of the Dope Sheet.
 You can actually make quite detailed and intricate animations using annotations alone. However, if you’re going to try and do full-blown 2D or 2.5D animation, I suggest you use Blender’s Grease Pencil objects instead. They’re more powerful and way better-suited for the job. See Chapter 15for more on animating with Grease Pencil.
Don’t know how to do something? Hooray for fully integrated search!
 Blender has a search feature that’s fully integrated into Blender’s interface. If you’ve been working your way through this chapter, you’ve probably already used it when adding custom event maps.
The benefit here is that if you know the operation you want to perform, but don’t know where to go in Blender’s interface to access it, you can simply search for that operator and perform it immediately. How’s that for awesome?
The fastest way to access Blender’s integrated search feature from any editor is to press F3. A blank menu with a search field at the top appears. From here, simply start typing the name of the operator you want, and Blender updates the menu with search results that match what you’ve typed. Furthermore, if a hotkey is associated with that operation, it shows up to the right of the operator name in the menu so that you can remember the hotkey in the future. As an example, open the search menu (F3) and type save. As you type, the menu updates with operations within Blender that relate to saving.
Using the integrated search feature is a great way to familiarize yourself with the way Blender works, even more so if you’re migrating from another program. In that case, you know the terminology for what you want to do; you just have to find out how Blender does it. Figure 2-12 shows Blender’s integrated search menu.
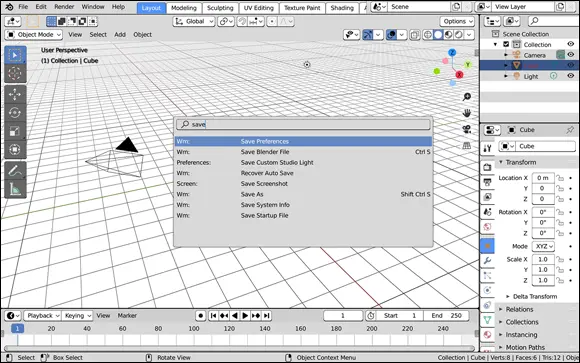
FIGURE 2-12:Blender’s integrated search menu is a great way to get familiar with Blender’s operators.
Customizing Blender to Fit You
You can tweak Blender’s screen layout, known as a workspace , to virtually any configuration you can imagine. However, Blender’s customization features go much deeper than just readjusting the areas in a Blender window. With a little time and effort, you can completely overhaul Blender to be as comfortable of a work environment as possible. This ability to customize is especially useful for people who are migrating to Blender from other 3D graphics programs. I won’t say that you can make Blender behave exactly like any of these other programs, but sometimes little things like using the same keyboard shortcuts help make the transition smoother.
 Although this section gives you the means to completely bend Blender’s interface to your will, bear in mind that unless otherwise specified, this book relies on the default settings that ship with Blender. Unless you can remember your customized behaviors, it may be more helpful to use Blender’s default settings (File ⇒ Defaults ⇒ Load Factory Settings).
Using preset workspaces
You can make a variety of workspaces depending on the sort of work you’re doing. By default, Blender comes with a variety of preset workspaces, broken up into five major categories: General, 2D Animation, Sculpting, VFX, and Video Editing. Each category has two or more workspaces to choose from, with a few workspaces available in multiple categories. To see all the categories and workspaces available, click on the plus (+) tab at the end of the series of workspace tabs at the top of your Blender window.
If you don’t see the plus tab, your screen resolution may be set such that all the tabs aren’t visible. Hover your mouse cursor over the tabs and scroll your mouse wheel to expose the tabs that have gotten obscured by other parts of Blender’s interface.
Once you click on the plus tab, you should be greeted with a menu like the one shown in Figure 2-13.
The following sections give a quick breakdown of each workspace per category.
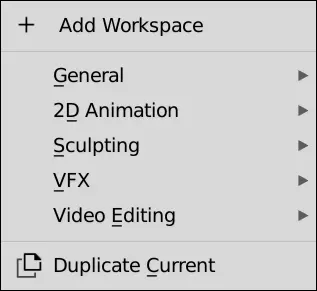
FIGURE 2-13:Add any workspace to your Blender window by navigating the menu invoked by clicking the plus icon at the end of the workspace tabs along the top of the Blender window.
General
These workspaces are the most common in a general 3D animation workflow.
Animation: The Animation workspace gives you a screen layout with an assortment of editors that allow you to animate in your 3D scene efficiently. See Chapters 11and 13for more on using this workspace.
Compositing: Compositing is the art of mixing images (or, more commonly, sequences of images, like in videos) so they look like a single integrated image. This workspace is where you can do everything from simple color adjustment to adding balls of electricity to a character’s hands. Chapter 18has more on compositing in Blender.
Layout: In 3D animation, the layout stage is where you block in your scene and figure out how your characters and camera are positioned relative to each other and their environment. It’s where all your scene planning starts, so it makes sense that this workspace is the default one that loads when you first launch Blender. The screen layout for this workspace is a good general-purpose place to start any 3D project.
Modeling: Unless everything in your scene is supposed to be simple cubes and spheres, you’re going to want to have more complex-looking characters, props, and environments. The modeling workspace is an ideal workbench for building your 3D creations. Chapters 5, 6, and 7get heavily into modeling and using this workspace.
Rendering: Once you’ve gone through the process of building out and animating your scene, you’re likely interested in sharing the results. Not everyone has a copy of Blender (but they could, it’s free!), so the common practice is to render that scene to image or video. From the Rendering workspace, you can focus on refining those final output images, getting Blender to produce the highest quality output in the shortest possible amount of time. Chapter 16covers rendering in more detail.
Scripting: Scripting in this case doesn’t refer to writing screenplays (though you could technically use this workspace for that. I have!). Instead, in this case, scripting is the process of writing little snips of code to automate steps in your process and generally make your life in 3D more pleasant. Writing scripts is a more advanced topic than this book covers, but there are plenty of online resources if you’re interested in learning. In any case, this workspace is what you’d use if you were writing scripts.
Читать дальшеИнтервал:
Закладка:
Похожие книги на «Blender For Dummies»
Представляем Вашему вниманию похожие книги на «Blender For Dummies» списком для выбора. Мы отобрали схожую по названию и смыслу литературу в надежде предоставить читателям больше вариантов отыскать новые, интересные, ещё непрочитанные произведения.


Обсуждение, отзывы о книге «Blender For Dummies» и просто собственные мнения читателей. Оставьте ваши комментарии, напишите, что Вы думаете о произведении, его смысле или главных героях. Укажите что конкретно понравилось, а что нет, и почему Вы так считаете.