Jason Gumster - Blender For Dummies
Здесь есть возможность читать онлайн «Jason Gumster - Blender For Dummies» — ознакомительный отрывок электронной книги совершенно бесплатно, а после прочтения отрывка купить полную версию. В некоторых случаях можно слушать аудио, скачать через торрент в формате fb2 и присутствует краткое содержание. Жанр: unrecognised, на английском языке. Описание произведения, (предисловие) а так же отзывы посетителей доступны на портале библиотеки ЛибКат.
- Название:Blender For Dummies
- Автор:
- Жанр:
- Год:неизвестен
- ISBN:нет данных
- Рейтинг книги:5 / 5. Голосов: 1
-
Избранное:Добавить в избранное
- Отзывы:
-
Ваша оценка:
Blender For Dummies: краткое содержание, описание и аннотация
Предлагаем к чтению аннотацию, описание, краткое содержание или предисловие (зависит от того, что написал сам автор книги «Blender For Dummies»). Если вы не нашли необходимую информацию о книге — напишите в комментариях, мы постараемся отыскать её.
Author Jason van Gumster shares his insight as an independent animator and digital artist to help Blender newcomers turn their ideas into three-dimensional drawings. From exporting and sharing scenes to becoming a part of the Blender community, this accessible book covers it all!
Create 3D characters—no experience required Build scenes with texture and real lighting features Animate your creations and share them with the world Avoid common rookie mistakes This book is the ideal starting place for newcomers to the world of 3D modeling and animation.
Blender For Dummies — читать онлайн ознакомительный отрывок
Ниже представлен текст книги, разбитый по страницам. Система сохранения места последней прочитанной страницы, позволяет с удобством читать онлайн бесплатно книгу «Blender For Dummies», без необходимости каждый раз заново искать на чём Вы остановились. Поставьте закладку, и сможете в любой момент перейти на страницу, на которой закончили чтение.
Интервал:
Закладка:
There are three primary ways to move the 3D cursor in your Blender scene:
Shift+right-click: If you Shift+right-click anywhere in the 3D Viewport, Blender places the 3D cursor directly at that location, oriented with its axes towards the viewport. This means of placing the 3D cursor is super-fast, but you’re limited in orientation options because it uses only the same orientation as the one you’re using to look into the 3D Viewport.
Sidebar View tab: If you press N while in the 3D Viewport, Blender should reveal its Sidebar region along the right side of the editor area. If you go to the View tab, you should see a panel labeled 3D Cursor. From the Location and Rotation value fields in this panel, you can very accurately adjust the position and orientation of the 3D cursor.
Cursor tool: Along the left side of the 3D Viewport is Blender’s Toolbar. The second tool from the top looks just like the 3D cursor. When you choose to activate this tool, you can place the 3D cursor anywhere in your scene with a simple left-click. That in itself is nice, but the real benefits of using this tool are the options you get in the Active Tool context of the Properties editor. Of particular interest is the Orientation drop-down menu. By default, this menu is set to View, reflecting the same behavior you get when Shift+right-clicking. However, you can change to any of the following options:None: If you choose None as your orientation, Blender just keeps the 3D cursor at whatever orientation it’s currently using.View: This orientation type is the default behavior. The 3D cursor simply points at you through the 3D Viewport.Transform: Choosing the Transform orientation option tells Blender to have the 3D cursor share the same orientation as is set in the Transform Orientation menu in the 3D Viewport’s header. By default, that menu is set to Global, but there are other options as well, covered in Chapter 3.Geometry: The Geometry option is extremely handy while modeling. If you left-click to place the 3D cursor on an object in your scene, not only will Blender place the 3D cursor there, but its orientation will also adjust to match the surface geometry of that object. This feature is most useful when trying to place an object so it looks like it’s naturally protruding from an object’s surface.
Figure 2-6 shows the 3D Viewport’s Sidebar region as well as the Active Tool context of the Properties editor where you can have these controls over your 3D cursor.
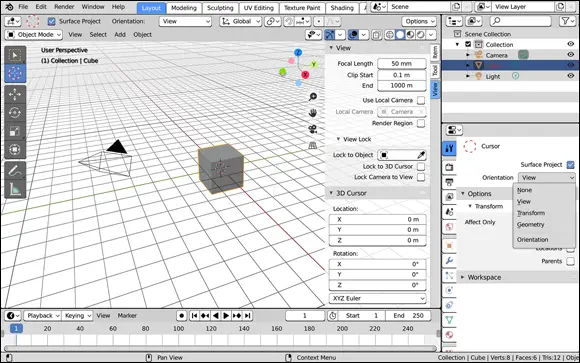
FIGURE 2-6:You can control the position and orientation of your 3D cursor from the Sidebar in the 3D Viewport, as well as the Active Tool context of the Properties editor when the Cursor tool is active.
In terms of adjusting your 3D Viewport, you can use the 3D cursor as a quick way to recenter your view. Simply place the 3D cursor anywhere in the 3D Viewport by Shift+right-clicking. Now press Shift+C. This hotkey combination relocates the 3D cursor to the origin coordinates of the 3D environment and then brings all objects into view. The Shift+C hotkey combination is like pressing Home with the added benefit of moving the cursor to the origin.
In Chapter 3, I cover the topic of moving, scaling, and rotating objects. Usually, you want to use Blender’s default behavior of doing these operations relative to the median point of the selected objects. However, you can also perform any of these operations relative to the 3D cursor by pressing the Period (.) key on your keyboard and choosing 3D Cursor from the pie menu that appears. Alternatively, you can select 3D Cursor from the Pivot Point menu in the 3D Viewport’s header. Figure 2-7 shows the two menus you can use for changing your pivot point. The default behavior is Median Point.
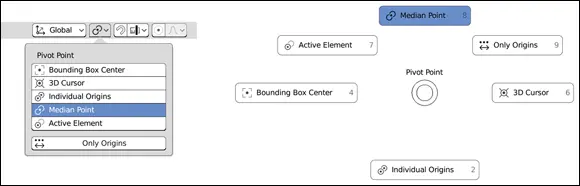
FIGURE 2-7:The Pivot Point menu in the 3D Viewport’s header (left) and as a pie menu (right).
The 3D cursor is also very useful for snapping , or moving a selection to a specific point in space. For a better idea of what snapping means, hover your mouse over the 3D Viewport and press Shift+S. A menu like the one in Figure 2-8 appears.
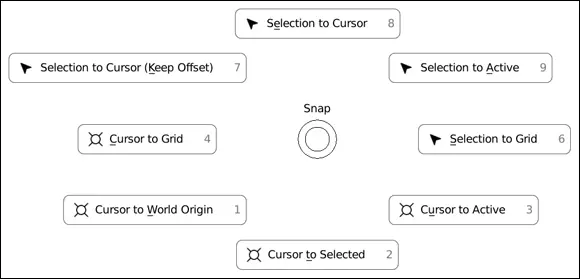
FIGURE 2-8:The Snap menu.
Through this menu, you can snap your selected object to a fixed coordinate on the grid in the 3D Viewport, the location of the 3D cursor, or to the center of the grid, also known as the world origin of the scene. You also have the ability to snap the 3D cursor to the middle of multiple selected objects, a fixed location on the grid, or to the active object in the scene. This method is a very effective way to move an object to a specific point in 3D space, and it’s all thanks to the little 3D cursor.
Extra Features in the 3D Viewport
A handful of additional features in Blender’s 3D Viewport are worth mentioning. They can be classified as productivity enhancers, learning aids, or comfort features for users migrating from other programs. This section outlines a few of these features.
Quad View
If you’ve used other 3D graphics programs, you may be used to something referred to as Quad View , where the 3D Viewport is split into four regions: top, front, and right orthographic views, along with a user perspective view. You can create a layout similar to this through the somewhat arduous task of manually splitting areas and then setting up each area as a 3D Viewport from each of those perspectives. However, with no clear way to lock those views in place, you could very easily change one of your orthographic views to user perspective on accident. Fortunately, there’s a better way. Go to the 3D Viewport’s header and choose View ⇒ Area ⇒ Toggle Quad View or use the hotkey Ctrl+Alt+Q, and your 3D Viewport will switch to look like the one in Figure 2-9.
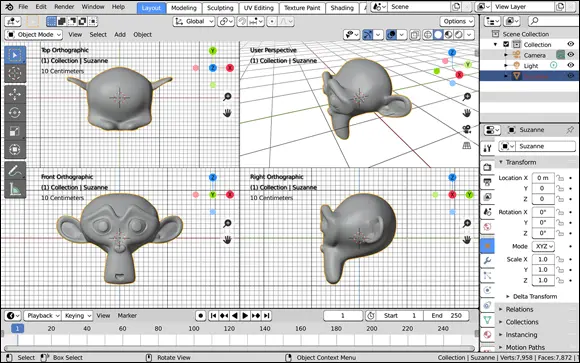
FIGURE 2-9:Using the Ctrl+Alt+Q hotkey, you can quickly switch between Blender’s regular viewport and a Quad View viewport like some other 3D programs have.
 When toggling back to Full View from Quad View, Blender always jumps back to whatever angle you’re viewing from in the user perspective view quadrant.
Regions
In Chapter 1, I briefly describe regions as areas in an editor that give you additional tools specific to that editor. In fact, you’ve already had exposure to a couple types of region in this chapter: the header, the Toolbar, and the Sidebar. This section focuses on the latter two in more detail.
Flanking either side of the 3D Viewport is a Toolbar on the left, and on the right is a region for modifying the properties of the 3D Viewport, referred to as the Sidebar.
The Sidebar
You can toggle the visibility of the Sidebar by choosing View ⇒ Sidebar in the header or by pressing N (for i Nformation) while your mouse cursor is in the 3D Viewport. In fact, quite a few editors in Blender have a Sidebar. And with the exception of the Text Editor, which uses Ctrl+F (because it would be annoying if the Sidebar popped up every time you typed an N in the Text Editor), you can consistently open all of them by using the N hotkey.
Читать дальшеИнтервал:
Закладка:
Похожие книги на «Blender For Dummies»
Представляем Вашему вниманию похожие книги на «Blender For Dummies» списком для выбора. Мы отобрали схожую по названию и смыслу литературу в надежде предоставить читателям больше вариантов отыскать новые, интересные, ещё непрочитанные произведения.


Обсуждение, отзывы о книге «Blender For Dummies» и просто собственные мнения читателей. Оставьте ваши комментарии, напишите, что Вы думаете о произведении, его смысле или главных героях. Укажите что конкретно понравилось, а что нет, и почему Вы так считаете.