Jason Gumster - Blender For Dummies
Здесь есть возможность читать онлайн «Jason Gumster - Blender For Dummies» — ознакомительный отрывок электронной книги совершенно бесплатно, а после прочтения отрывка купить полную версию. В некоторых случаях можно слушать аудио, скачать через торрент в формате fb2 и присутствует краткое содержание. Жанр: unrecognised, на английском языке. Описание произведения, (предисловие) а так же отзывы посетителей доступны на портале библиотеки ЛибКат.
- Название:Blender For Dummies
- Автор:
- Жанр:
- Год:неизвестен
- ISBN:нет данных
- Рейтинг книги:5 / 5. Голосов: 1
-
Избранное:Добавить в избранное
- Отзывы:
-
Ваша оценка:
Blender For Dummies: краткое содержание, описание и аннотация
Предлагаем к чтению аннотацию, описание, краткое содержание или предисловие (зависит от того, что написал сам автор книги «Blender For Dummies»). Если вы не нашли необходимую информацию о книге — напишите в комментариях, мы постараемся отыскать её.
Author Jason van Gumster shares his insight as an independent animator and digital artist to help Blender newcomers turn their ideas into three-dimensional drawings. From exporting and sharing scenes to becoming a part of the Blender community, this accessible book covers it all!
Create 3D characters—no experience required Build scenes with texture and real lighting features Animate your creations and share them with the world Avoid common rookie mistakes This book is the ideal starting place for newcomers to the world of 3D modeling and animation.
Blender For Dummies — читать онлайн ознакомительный отрывок
Ниже представлен текст книги, разбитый по страницам. Система сохранения места последней прочитанной страницы, позволяет с удобством читать онлайн бесплатно книгу «Blender For Dummies», без необходимости каждый раз заново искать на чём Вы остановились. Поставьте закладку, и сможете в любой момент перейти на страницу, на которой закончили чтение.
Интервал:
Закладка:
In the 3D Viewport, the Sidebar serves three primary purposes, each designated by a specific tab:
Item: From the Item tab, you can directly modify your selected object by typing in explicit location, rotation, and scale values within the Transform panel.
Tool: The Tool tab has much the same content you would see in the Active Tool context of the Sidebar. This tab is particularly useful if you’re working with a maximized 3D Viewport (Shift+Spacebar). I tend to use it a lot when sculpting and painting.
View: The View tab is dedicated to customizing your 3D Viewport. From here, you can control features like the viewport camera (which is different from the scene camera), the location and orientation of the 3D cursor, and the collections that are visible in the 3D Viewport. Chapter 4has more on working with collections. The View tab is also where you can control annotations in the 3D Viewport. There’s more on annotations later in this chapter.
The Toolbar
 The Toolbar is located along the left side of the 3D Viewport. You can toggle its visibility by choosing View ⇒ Toolbar in the 3D Viewport’s header or by using the T hotkey.
The Toolbar is a new feature in Blender, as of version 2.80. It allows you to have a workflow similar to other computer graphics applications where you first select a tool and then use that tool to act on an object or selection. Depending on what mode you’re in (Edit mode, Object mode, Sculpt mode, and so on), you will have a whole bunch of tools or only a handful.
Tool Settings
Specific to the 3D Viewport’s header, there’s an additional space at the top of that region, sometimes referred to as the Topbar . This area of the header is where you see some of the specific settings available for whatever tool you choose in the Toolbar. You can toggle the visibility of the Topbar by choosing View ⇒ Tool Settings in the 3D Viewport’s header menu.
The controls in the Topbar are really handy, but they’re also available in the Sidebar as well as the Active Tool tab of the Properties editor. Personally, I tend to hide the Topbar to save screen space, but if you’re used to programs like Photoshop or Krita, you may find the Topbar more familiar.
The Last Operator panel
There’s an additional quasi-region in the 3D Viewport that’s extremely useful. At the bottom left of the 3D Viewport is the Last Operator panel. If you’ve just opened Blender, you won’t see this panel at all (because you haven’t done anything yet). However, if you perform an action in Blender — also known as an operator — like moving your selected object or adding a new object, this panel updates to display values relevant to that operator. Using this panel, you can perform a quick, rough operation and then tweak it to be more precise. For example, if you add a UV Sphere to your scene (Add ⇒ Mesh ⇒ UV Sphere), Blender adds a UV Sphere object to your scene at the location of the 3D cursor with 32 segments and 16 rings. Using the Last Operator panel, you can not only adjust the location of your new sphere, but you can also modify the number of segments and rings it has. You can see more on how the Last Operator panel is used in Chapter 5.
 Depending on the last action you do in Blender, the Last Operator panel can sometimes take up quite a bit of space, so you may choose to leave it collapsed. However, it can be annoying to constantly move your mouse back to the Last Operator panel just to expand and collapse it. Fortunately, there’s a faster way. You can access the Last Operator panel by pressing F9. Upon doing so, a “floating” Last Operator appears under your mouse cursor. Figure 2-10 shows the floating Last Operator panel after adding a UV sphere to the scene.
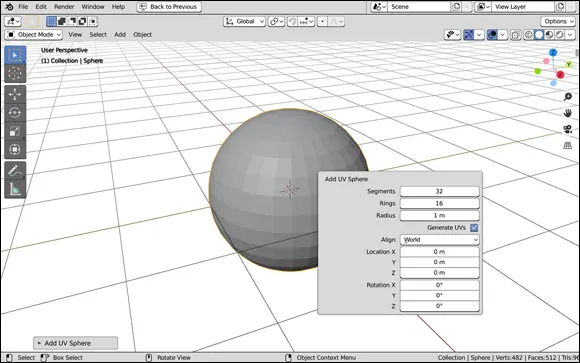
FIGURE 2-10:You can open a floating Last Operator panel by pressing F9.
 You should note that the Last Operator panel is relevant only for the last operation you actually performed. It’s not a construction history, and it doesn’t persistently remain in memory after you perform subsequent operations. For example, if you add a UV Sphere and then immediately rotate that sphere, there’s no way for you to adjust the number of segments and rings in it from the Last Operator panel. Even if you undo the rotate operation, those Last Operator values won’t return (after all, Undo is another operation). The Last Operator panel relates to the last thing you did — no more, no less.
Collaborating (with others and yourself) with annotations
 If you’re making anything big with 3D computer graphics like a movie or a video game, you’re most likely going to be collaborating with other people. 3D computer graphics in general, and animation specifically, is an extremely collaborative art form. Otherwise, it would take forever to get anything completed. If you’re working with other people, it’s often useful to be able to pass notes to each other within the context of your work so you can give helpful feedback or let the next person in the pipeline know why you did something. In fact, this can even be useful if you’re working solo. I leave notes to myself all the time in my
 .blendfiles as reminders so I don’t have to mentally keep track of every random design decision I made while working.
Blender’s annotation feature gives you the ability to leave these kinds of notes in your .blendfiles, right in the editor you’re working in. The controls for annotations are at the bottom of the View tab of the Sidebar. Expand the Annotations panel and you should see a button labeled New. Click that button and the panel will expand to look like what’s shown in Figure 2-11.
The list box can hold multiple layers of annotations. By default Blender pre-populates this list box with a single layer named Note. To the left of the layer is a color swatch that dictates the color of any annotations on that layer. Add and remove layers by using the plus and minus buttons to the right of the list box. Below the layer list box is a Thickness slider that controls the thickness of any annotations you make on that layer.
The easiest way to make a new annotation is to use the Annotate tool in the Toolbar. Activate this tool by clicking and you’re instantly able to start writing and drawing in your 3D Viewport on your active annotation layer. If you hold down your mouse button while clicking the Annotate tool in the Toolbar, you also get options to draw lines, polygons, and erase.
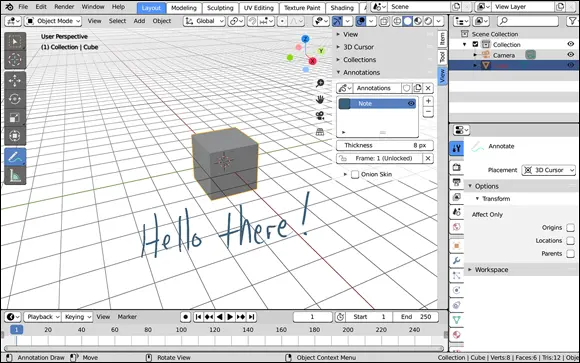
FIGURE 2-11:The Annotations panel in the View tab of the Sidebar is where you control how your annotations look in the 3D Viewport.
For faster access to annotating, you don’t have to use the Annotate tool. You can just hold down D while left-clicking and dragging your mouse cursor in the 3D Viewport. This action gives you quick access to Annotate’s draw tool and lets you add marks on whichever annotation layer you have active in the Sidebar.
Интервал:
Закладка:
Похожие книги на «Blender For Dummies»
Представляем Вашему вниманию похожие книги на «Blender For Dummies» списком для выбора. Мы отобрали схожую по названию и смыслу литературу в надежде предоставить читателям больше вариантов отыскать новые, интересные, ещё непрочитанные произведения.


Обсуждение, отзывы о книге «Blender For Dummies» и просто собственные мнения читателей. Оставьте ваши комментарии, напишите, что Вы думаете о произведении, его смысле или главных героях. Укажите что конкретно понравилось, а что нет, и почему Вы так считаете.