Doug Lowe - Networking For Dummies
Здесь есть возможность читать онлайн «Doug Lowe - Networking For Dummies» — ознакомительный отрывок электронной книги совершенно бесплатно, а после прочтения отрывка купить полную версию. В некоторых случаях можно слушать аудио, скачать через торрент в формате fb2 и присутствует краткое содержание. Жанр: unrecognised, на английском языке. Описание произведения, (предисловие) а так же отзывы посетителей доступны на портале библиотеки ЛибКат.
- Название:Networking For Dummies
- Автор:
- Жанр:
- Год:неизвестен
- ISBN:нет данных
- Рейтинг книги:5 / 5. Голосов: 1
-
Избранное:Добавить в избранное
- Отзывы:
-
Ваша оценка:
Networking For Dummies: краткое содержание, описание и аннотация
Предлагаем к чтению аннотацию, описание, краткое содержание или предисловие (зависит от того, что написал сам автор книги «Networking For Dummies»). Если вы не нашли необходимую информацию о книге — напишите в комментариях, мы постараемся отыскать её.
helps both beginning network administrators and home users to set up and maintain a network. Updated coverage of broadband and wireless technologies, as well as storage and back-up procedures, ensures that you’ll learn how to build a wired or wireless network, secure and optimize it, troubleshoot problems, and much more.
From connecting to the Internet and setting up a wireless network to solving networking problems and backing up your data—this #1 bestselling guide covers it all.
Build a wired or wireless network Secure and optimize your network Set up a server and manage Windows user accounts Use the cloud—safely Written by a seasoned technology author—and jam-packed with tons of helpful step-by-step instructions—this is the book network administrators and everyday computer users will turn to again and again.
Networking For Dummies — читать онлайн ознакомительный отрывок
Ниже представлен текст книги, разбитый по страницам. Система сохранения места последней прочитанной страницы, позволяет с удобством читать онлайн бесплатно книгу «Networking For Dummies», без необходимости каждый раз заново искать на чём Вы остановились. Поставьте закладку, и сможете в любой момент перейти на страницу, на которой закончили чтение.
Интервал:
Закладка:
Here are a few guidelines for storing files on network drives:
Using the network drive for your own files works best if the network drive is set up for private storage that other users can’t access. That way, you don’t have to worry about the nosy guy down in Accounting who likes to poke around in other people’s files.
Don’t overuse the network drive. Remember that other users have probably filled up their own hard drives, so they want to use the space on the network drive too.
Before you store personal files on a network drive, make sure that you have permission. A note from your mom will do.
On domain networks, a drive (typically, drive H:) is commonly mapped to a user’s home folder. The home folder is a network folder that’s unique for each user. You can think of it as a network version of Documents. If your network is set up with a home folder, use it rather than Documents for any important work-related files. That’s because the home folder is usually included in the network’s daily backup schedule. By contrast, most networks do not back up data you store in Documents.
Make a temporary resting place for files on their way to other users
“Hey, Lisa, could you send me a copy of last month’s baseball stats?”
“Sure, Bart.” But how? If the baseball stats file resides on Lisa’s local drive, how does Lisa send a copy of the file to Bart’s computer? Lisa can do it by copying the file to a network drive. Then Bart can copy the file to his local hard drive.
Here are some tips to keep in mind when you use a network drive to exchange files with other network users:
Remember to delete files that you saved to the network drive after they’re picked up! Otherwise, the network drive quickly fills up with unnecessary files.
Create a folder on the network drive specifically intended for holding files en route to other users. I like to name this folder PITSTOP.
 In many cases, it's easier to send files to other network users by email than by using a network folder. Just send a message to the other network user and attach the file you want to share. The advantage of sending a file by email is that you don’t have to worry about details like where to leave the file on the server and who’s responsible for deleting the file.
Back up your local hard drive
If enough drive space is available on the file server, you can use it to store backup copies of the files on your hard drive. Just copy the files that you want to back up to a shared network folder.
Obviously, if you copy all your data files to the network drive — and everybody else follows suit — it can fill up quickly. Check with the network manager before you start storing backup copies of your files on the server. The manager may have already set up a special network drive that’s designed just for backups. And if you’re lucky, your network manager may be able to set up an automatic backup schedule for your important data so that you don’t have to remember to back it up manually.
I hope that your network administrator also routinely backs up the contents of the network server’s disk to tape. (Yes, tape — see Chapter 22for details.) That way, if something happens to the network server, the data can be recovered from the backup tapes.
Oh, the Network Places You’ll Go
Windows enables you to access network resources, such as shared folders, by browsing the network. In Windows 7, choose Network from the Start menu. In Windows 10, open Windows Explorer (click File Explorer on the taskbar) and then click Network. Figure 3-2 shows the Windows 10 version of the network browser.
The network shown in Figure 3-2 consists of just two computers: the desktop client computer running Windows 10 (WIN10-01) and a server computer running Windows Server 2016 (WIN1601). In an actual network, you would obviously see more than just two computers.

FIGURE 3-2:Browsing the network in Windows 10.
You can open a computer by double-clicking its icon to reveal a list of shared resources available on the computer. For example, Figure 3-3 shows the resources shared by the WIN1601 computer.
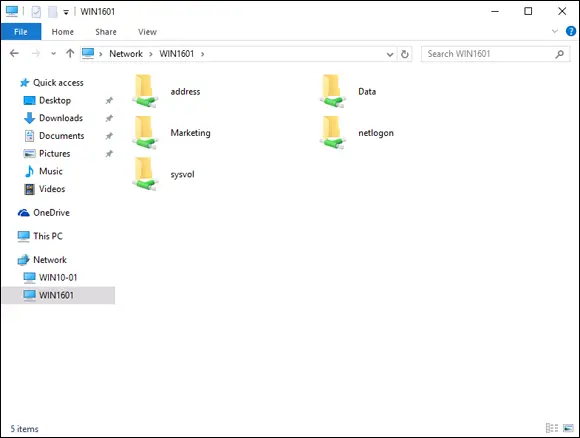
FIGURE 3-3:The resources available on a server computer.
You can also browse the network from any Windows application program. For example, you may be working with Microsoft Word and want to open a document file that’s stored in a shared folder on your network. All you have to do is use the Open command to bring up the dialog box, and then choose Network in the Navigation pane to view the available network devices.
Mapping Network Drives
If you often access a particular shared folder, you may want to use the special trick known as mapping to access the shared folder more efficiently. Mapping assigns a drive letter to a shared folder. Then you can use the drive letter to access the shared folder as though it were a local drive. In this way, you can access the shared folder from any Windows program without having to browse the network.
For example, you can map a shared folder named Data on the server named Win1601 Files to drive K:on your computer. Then, to access files stored in the shared Data folder, you look on drive K:.
To map a shared folder to a drive letter, follow these steps:
1 Open File Explorer. Windows 7: Choose Start ⇒ Computer. Windows 8, 8.1, and 10: Open the desktop and click the File Explorer icon on the taskbar, and then click Computer in the Location list on the left side of the screen.
2 Open the Map Network Drive dialog box. Windows 7: Access this dialog by clicking the Map Network Drive button located on the toolbar. Windows 8 and 8.1: Click Map Network Drive on the Ribbon. Windows 10: Click the Computer tab, and then click Map Network Drive.Figure 3-4 shows the Map Network Drive dialog box for Windows 10. The dialog box for earlier versions of Windows is similar.
3 (Optional) Change the drive letter in the Drive drop-down list.You probably don't have to change the drive letter that Windows selects (in Figure 3-4, drive Z:). If you’re picky, though, you can select the drive letter from the Drive drop-down list. FIGURE 3-4:The Map Network Drive dialog box.
4 Click the Browse button.The dialog box shown in Figure 3-5 appears. FIGURE 3-5:Browsing for the folder to map.
5 Use the Browse for Folder dialog box to find and select the shared folder you want to use.You can navigate to any shared folder on any computer in the network.
6 Click OK.The Browse for Folder dialog box is dismissed, and you return to the Map Network Drive dialog box (refer to Figure 3-4).
7 (Optional) If you want this network drive to be automatically mapped each time you log on to the network, select the Reconnect at Sign-in check box.If you leave the Reconnect at Sign-in check box deselected, the drive letter is available only until you shut down Windows or log out of the network. If you select this option, the network drive reconnects automatically each time you log on to the network. Be sure to select the Reconnect at Sign-in check box if you use the network drive often.
Читать дальшеИнтервал:
Закладка:
Похожие книги на «Networking For Dummies»
Представляем Вашему вниманию похожие книги на «Networking For Dummies» списком для выбора. Мы отобрали схожую по названию и смыслу литературу в надежде предоставить читателям больше вариантов отыскать новые, интересные, ещё непрочитанные произведения.


Обсуждение, отзывы о книге «Networking For Dummies» и просто собственные мнения читателей. Оставьте ваши комментарии, напишите, что Вы думаете о произведении, его смысле или главных героях. Укажите что конкретно понравилось, а что нет, и почему Вы так считаете.