Doug Lowe - Networking For Dummies
Здесь есть возможность читать онлайн «Doug Lowe - Networking For Dummies» — ознакомительный отрывок электронной книги совершенно бесплатно, а после прочтения отрывка купить полную версию. В некоторых случаях можно слушать аудио, скачать через торрент в формате fb2 и присутствует краткое содержание. Жанр: unrecognised, на английском языке. Описание произведения, (предисловие) а так же отзывы посетителей доступны на портале библиотеки ЛибКат.

- Название:Networking For Dummies
- Автор:
- Жанр:
- Год:неизвестен
- ISBN:нет данных
- Рейтинг книги:5 / 5. Голосов: 1
-
Избранное:Добавить в избранное
- Отзывы:
-
Ваша оценка:
Networking For Dummies: краткое содержание, описание и аннотация
Предлагаем к чтению аннотацию, описание, краткое содержание или предисловие (зависит от того, что написал сам автор книги «Networking For Dummies»). Если вы не нашли необходимую информацию о книге — напишите в комментариях, мы постараемся отыскать её.
helps both beginning network administrators and home users to set up and maintain a network. Updated coverage of broadband and wireless technologies, as well as storage and back-up procedures, ensures that you’ll learn how to build a wired or wireless network, secure and optimize it, troubleshoot problems, and much more.
From connecting to the Internet and setting up a wireless network to solving networking problems and backing up your data—this #1 bestselling guide covers it all.
Build a wired or wireless network Secure and optimize your network Set up a server and manage Windows user accounts Use the cloud—safely Written by a seasoned technology author—and jam-packed with tons of helpful step-by-step instructions—this is the book network administrators and everyday computer users will turn to again and again.
Networking For Dummies — читать онлайн ознакомительный отрывок
Ниже представлен текст книги, разбитый по страницам. Система сохранения места последней прочитанной страницы, позволяет с удобством читать онлайн бесплатно книгу «Networking For Dummies», без необходимости каждый раз заново искать на чём Вы остановились. Поставьте закладку, и сможете в любой момент перейти на страницу, на которой закончили чтение.
Интервал:
Закладка:
8 If a protocol that you need isn’t listed, click the Install button to add the needed protocol.A dialog box appears, asking whether you want to add a network client, protocol, or service. Click Protocol and then click Add. A list of available protocols appears. Select the one you want to add; then click OK.
9 To remove a network item that you don’t need (such as File and Printer Sharing for Microsoft Networks), select the item, and click the Uninstall button.For security reasons, you should make it a point to remove any clients, protocols, or services that you don’t need.
10 To configure TCP/IP settings, click Internet Protocol Version 4 (TCP/IPv4); click Properties to display the TCP/IP Properties dialog box (shown in Figure 2-7); adjust the settings; and then click OK.The TCP/IP Properties dialog box lets you choose among these options: Obtain an IP Address Automatically: Choose this option if your network has a DHCP server that assigns IP addresses automatically. Choosing this option dramatically simplifies administering TCP/IP on your network. (See Chapter 6for more information about DHCP.) FIGURE 2-7:Configuring TCP/IP. Use the Following IP Address: If your computer must have a specific IP address, choose this option and then type the computer’s IP address, subnet mask, and default gateway address. (For more information about these settings, see Chapter 6.) Obtain DNS Server Address Automatically: The DHCP server can also provide the address of the Domain Name System (DNS) server that the computer should use. Choose this option if your network has a DHCP server. (See Chapter 6for more information about DNS.) Use the Following DNS Server Addresses: Choose this option if a DNS server isn’t available. Then type the IP addresses of the primary and secondary DNS servers.
Joining a Windows Computer to a Domain
When Windows first installs, it isn’t joined to a domain network. Instead, it’s available as part of a workgroup, which is an unmanaged network suitable only for the smallest of networks with just a few computers and without dedicated servers. To use a computer in a domain network, you must join the computer to the domain. Here are the steps for Windows 10:
1 Click the Start icon (or press the Start button on the keyboard), and then tap or click Settings.The Settings page appears (refer to Figure 2-1).
2 Click System.The System settings page appears.
3 Click About.The PC settings page appears, as shown in Figure 2-8. FIGURE 2-8:The PC settings page.
4 (Optional) To change the name of the computer, click Rename PC.You’re prompted to enter a new name and then reboot the computer.Before you join a domain, you should ensure that the computer’s name won’t be the same as the name of a computer that’s already a member of the domain. If it is, you should first change the name. If you do change the computer’s name, repeat the procedure from Step 1 after the reboot.
5 Click Join a Domain.The Join a Domain dialog box appears, as shown in Figure 2-9.
6 Enter the domain name and click Next.You’re prompted for the user name and password of a user who has administration privileges on the domain, as shown in Figure 2-10.
7 Click OK. FIGURE 2-9:Joining a domain. FIGURE 2-10:You must provide domain administrator credentials to join a domain.
8 Enter the username and password for an Administrator account when prompted.You’re asked to provide this information only if a computer account hasn’t already been created for the client computer.
9 When informed that you need to restart the computer, click Restart Now.The computer is restarted and added to the domain.
Configuring Mac Network Settings
Every Macintosh ever built, even an original 1984 model, includes networking support. Newer Macintosh computers have better built-in networking features than older Macintosh computers, of course. The newest Macs include built-in Gigabit Ethernet connections or 802.11ac wireless connections, or both. Support for these network connections is pretty much automatic, so all you have to do is plug your Mac into a network or connect to a wireless network, and you’re ready to go.
Most network settings on macOS are automatic. If you want, you can look at and change the default network settings by following these steps:
1 Choose ⇒ System Preferences and then click Network.The Network preferences page appears, as shown in Figure 2-11. FIGURE 2-11:Network preferences.
2 Click Advanced.The advanced network settings are displayed, as shown in Figure 2-12.
3 Click the TCP/IP tab.This brings up the TCP/IP settings, as shown in Figure 2-13. From this page, you can view the currently assigned IP address for the computer. And, if you want, you can assign a static IP address by changing the Configure IPv4 drop-down from Using DHCP to Manually. Then, you can enter your own IP address, subnet mask, and router address. (For more information about IP addresses, refer to Chapter 6.) FIGURE 2-12:Advanced network settings. FIGURE 2-13:Mac network TCP/IP settings.
4 Click the DNS tab.This brings up the DNS settings, as shown in Figure 2-14. Here, you can see the DNS servers being used, and you can add additional DNS servers if you want. FIGURE 2-14:DNS settings.
5 Click the Hardware tab.This brings up the hardware settings, as shown in Figure 2-15. The most useful bit of information on this tab is the MAC address, which is sometimes needed to set up wireless security. (For more information, refer to Chapter 8.)
6 Close the Network window.
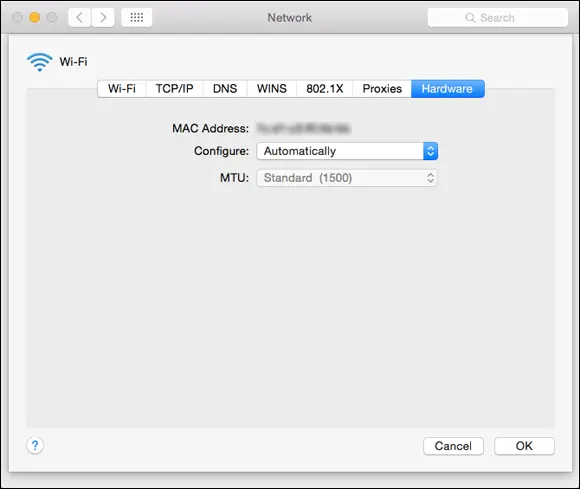
FIGURE 2-15:Hardware settings.
Joining a Mac Computer to a Domain
If you’re using a Mac in a Windows domain environment, you can join the Mac to the domain by following these steps:
1 Choose ⇒ System Preferences and then click Users & Groups.This brings up the Users & Groups page, as shown in Figure 2-16. FIGURE 2-16:Users & Groups.
2 Select the user account you want to join to the domain and then click Login Options.The Login Options page appears, as shown in Figure 2-17.
3 If the lock icon at the lower left of the page is locked, click it and enter your password when prompted.By default, the user login options are locked to prevent unauthorized changes. This step unlocks the settings so that you can join the domain.
4 Click the Join button.You’re prompted to enter the name of the domain you want to join, as shown in Figure 2-18. FIGURE 2-17:Login Options. FIGURE 2-18:Joining a domain.
5 Enter the name of the domain you want to join.When you enter the domain name, the dialog box expands to allow you to enter domain credentials to allow you to join the domain, as shown in Figure 2-19. FIGURE 2-19:Authenticating with the domain.
6 Enter the name and password of a domain administrator account, and then click OK.You return to the Login Options page, which shows that you’ve successfully joined the domain (see Figure 2-20).
7 Close the Users & Groups window.
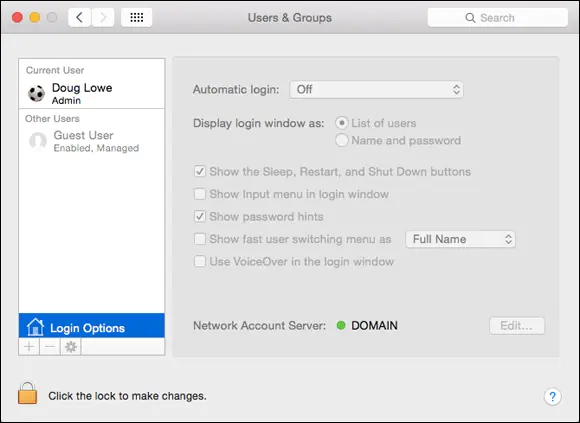
FIGURE 2-20:Congratulations! You have now joined the domain.
Chapter 3
Life on the Network
IN THIS CHAPTER
 Using local resources and network resources
Интервал:
Закладка:
Похожие книги на «Networking For Dummies»
Представляем Вашему вниманию похожие книги на «Networking For Dummies» списком для выбора. Мы отобрали схожую по названию и смыслу литературу в надежде предоставить читателям больше вариантов отыскать новые, интересные, ещё непрочитанные произведения.


Обсуждение, отзывы о книге «Networking For Dummies» и просто собственные мнения читателей. Оставьте ваши комментарии, напишите, что Вы думаете о произведении, его смысле или главных героях. Укажите что конкретно понравилось, а что нет, и почему Вы так считаете.