Doug Lowe - Networking For Dummies
Здесь есть возможность читать онлайн «Doug Lowe - Networking For Dummies» — ознакомительный отрывок электронной книги совершенно бесплатно, а после прочтения отрывка купить полную версию. В некоторых случаях можно слушать аудио, скачать через торрент в формате fb2 и присутствует краткое содержание. Жанр: unrecognised, на английском языке. Описание произведения, (предисловие) а так же отзывы посетителей доступны на портале библиотеки ЛибКат.
- Название:Networking For Dummies
- Автор:
- Жанр:
- Год:неизвестен
- ISBN:нет данных
- Рейтинг книги:5 / 5. Голосов: 1
-
Избранное:Добавить в избранное
- Отзывы:
-
Ваша оценка:
Networking For Dummies: краткое содержание, описание и аннотация
Предлагаем к чтению аннотацию, описание, краткое содержание или предисловие (зависит от того, что написал сам автор книги «Networking For Dummies»). Если вы не нашли необходимую информацию о книге — напишите в комментариях, мы постараемся отыскать её.
helps both beginning network administrators and home users to set up and maintain a network. Updated coverage of broadband and wireless technologies, as well as storage and back-up procedures, ensures that you’ll learn how to build a wired or wireless network, secure and optimize it, troubleshoot problems, and much more.
From connecting to the Internet and setting up a wireless network to solving networking problems and backing up your data—this #1 bestselling guide covers it all.
Build a wired or wireless network Secure and optimize your network Set up a server and manage Windows user accounts Use the cloud—safely Written by a seasoned technology author—and jam-packed with tons of helpful step-by-step instructions—this is the book network administrators and everyday computer users will turn to again and again.
Networking For Dummies — читать онлайн ознакомительный отрывок
Ниже представлен текст книги, разбитый по страницам. Система сохранения места последней прочитанной страницы, позволяет с удобством читать онлайн бесплатно книгу «Networking For Dummies», без необходимости каждый раз заново искать на чём Вы остановились. Поставьте закладку, и сможете в любой момент перейти на страницу, на которой закончили чтение.
Интервал:
Закладка:
You discover that someone else already sent a 50 trillion–page report ahead of you that isn’t expected to finish printing until the national debt is paid off.
The price of a framis valve suddenly goes up by $2, rendering foolish the recommendations you made in your report.
Your boss calls and tells you that his brother-in-law will be attending the meeting, so won’t you please print an extra copy of the proposal for him? Oh, and a photocopy won’t do. Originals only, please.
You decide to take lunch, so you don’t want the output to print until you get back.
Fortunately, your print job isn’t totally beyond your control just because you already sent it to the network printer. You can easily change the status of jobs that you already sent. You can change the order in which jobs print, hold a job so that it doesn’t print until you say so, or cancel a job.
You can probably make your network print jobs do other tricks, too: shake hands, roll over, and play dead. But the basic tricks — hold, cancel, and change the print order — are enough to get you started.
To play with the printer queue, open the Control Panel by choosing Start ⇒ Control Panel in Windows 7 or earlier; or press the Windows key, type Control, and the click the Control Panel icon. Then click Devices and Printers and double-click the icon for the printer that you want to manage. A window similar to the one shown in Figure 3-9 appears. You can see that just one document has been sent to the printer.
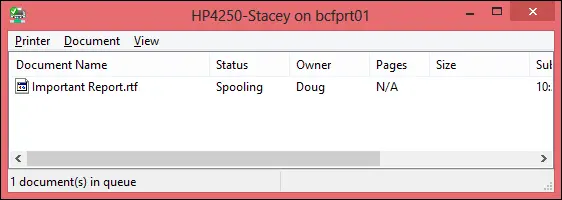
FIGURE 3-9:Managing a print queue.
To manipulate the print jobs that appear in the print queue or in the printer itself, use these tricks:
To temporarily stop a job from printing: Select the job and choose Document ⇒ Pause Printing. Choose the same command again to release the job from its state of frustration and print it out, already.
To delete a print job: Select the job and choose Document ⇒ Cancel Printing.
To stop the printer: Choose Printer ⇒ Pause Printing. To resume, choose the command again.
To delete all print jobs: Choose Printer ⇒ Purge Print Documents.
To cut to the front of the line: Drag to the top of the list the print job that you want to print.
All these tips apply to your print jobs only. Unfortunately, you can’t capriciously delete other people’s print jobs.
Logging off the Network
After you finish using the network, log off. Logging off the network makes the network drives and printers unavailable. Your computer is still physically connected to the network (unless you cut the network cable with pruning shears; it’s a bad idea — don’t do it!), but the network and its resources are unavailable to you.
Here are a few other tips to keep in mind when you log off:
After you turn off your computer, you’re automatically logged off the network. After you start your computer, you have to log on again. Logging off the network is a good idea if you’re going to leave your computer unattended for a while. As long as your computer is logged in to the network, anyone can use it to access the network. And because unauthorized users can access it under your user ID, you get the blame for any damage they do.
In Windows, you can log off the network by clicking the Start button and choosing the Log Off command. This process logs you off the network without restarting Windows: In Windows 7: Click Start and then click the right-facing arrow that appears next to the little padlock icon. In Windows 8, 8.1, and 10: Press Ctrl+Alt+Del and then choose Sign Out.
Chapter 4
More Ways to Use Your Network
IN THIS CHAPTER
 Transforming your computer into a network server
Sharing folders with network users
Working in the Public folder
Sharing your printer
Using Office on a network
Working with files offline
Chapter 3introduces you to the basics of using a network: logging on, accessing data on shared network folders, printing, and logging off. In this chapter, I go beyond these basics. You find out how to turn your computer into a server that shares its own files and printers, how to use one of the most popular network computer applications — email — and how to work with Office on a network.
Sharing Your Stuff
As you probably know, networks consist of two types of computers: client computers and server computers. In the economy of computer networks, client computers are the consumers — the ones that use network resources, such as shared printers and disk drives. Servers are the providers — the ones that offer their own printers and hard drives to the network so that the client computers can use them.
This chapter shows you how to turn your humble Windows client computer into a server computer so that other computers on your network can use your printer and any folders that you decide you want to share. In effect, your computer functions as both a client and a server at the same time. A couple of examples show how:
It’s a client when you send a print job to a network printer or when you access a file stored on another server’s hard drive.
It’s a server when someone else sends a print job to your printer or accesses a file stored on your computer’s hard drive.
Enabling File and Printer Sharing
Before you can share your files or your printer with other network users, you must set up a Windows File and Printer Sharing feature. Without this feature installed, your computer can be a network client but not a server.
If you’re lucky, the File and Printer Sharing feature is already set up on your computer. To find out, open Windows Explorer and right-click Desktop in the Navigation pane. If the menu includes a Share With command, File and Printer Sharing is already set up, so you can skip the rest of this section. If you can’t find a Share With command, follow these steps:
1 Click the Start button, type Network and Sharing Center, and press Enter.This step opens the Network and Sharing Center.
2 Click Change Advanced Sharing Settings.The Advanced Sharing Settings page is displayed.
3 Click the down arrow next to the network you want to enable file and printer sharing for. For a home computer: Click the down arrow next to Home or Work (Windows 7) or Private (Windows 8 and later). For a computer in a public location: Click the down arrow next to Guest or Public. For a computer connected to a domain network: Click the down arrow next to Domain.Figure 4-1 shows the settings for a Domain network. The settings for a Home, Guest, or Public computer are the same. FIGURE 4-1:Enabling file and printer sharing. Do not enable file or printer sharing for the Public network. Enabling file or printer sharing on a public network exposes your computer’s data to other users on the same public network.
Читать дальшеИнтервал:
Закладка:
Похожие книги на «Networking For Dummies»
Представляем Вашему вниманию похожие книги на «Networking For Dummies» списком для выбора. Мы отобрали схожую по названию и смыслу литературу в надежде предоставить читателям больше вариантов отыскать новые, интересные, ещё непрочитанные произведения.


Обсуждение, отзывы о книге «Networking For Dummies» и просто собственные мнения читателей. Оставьте ваши комментарии, напишите, что Вы думаете о произведении, его смысле или главных героях. Укажите что конкретно понравилось, а что нет, и почему Вы так считаете.