Carolyn Abram - Facebook For Dummies
Здесь есть возможность читать онлайн «Carolyn Abram - Facebook For Dummies» — ознакомительный отрывок электронной книги совершенно бесплатно, а после прочтения отрывка купить полную версию. В некоторых случаях можно слушать аудио, скачать через торрент в формате fb2 и присутствует краткое содержание. Жанр: unrecognised, на английском языке. Описание произведения, (предисловие) а так же отзывы посетителей доступны на портале библиотеки ЛибКат.
- Название:Facebook For Dummies
- Автор:
- Жанр:
- Год:неизвестен
- ISBN:нет данных
- Рейтинг книги:5 / 5. Голосов: 1
-
Избранное:Добавить в избранное
- Отзывы:
-
Ваша оценка:
Facebook For Dummies: краткое содержание, описание и аннотация
Предлагаем к чтению аннотацию, описание, краткое содержание или предисловие (зависит от того, что написал сам автор книги «Facebook For Dummies»). Если вы не нашли необходимую информацию о книге — напишите в комментариях, мы постараемся отыскать её.
In a chatty, straightforward style, your friendly hosts, Carolyn Abram and Amy Karasavas—both former Facebook employees—help you get settled in with the basics, like setting up your profile and adding content, as well as protecting your privacy when you want to decide who can and can't see your posts. They then show you how to get involved as you add new friends, toggle your newsfeed, shape your timeline story, join groups, and more. They even let you in on ways to go pro and use Facebook for work, such as building a promo page and showing off your business to the world. Once you come out of your virtual shell, there'll be no stopping you!
Build your profile and start adding friends Send private messages and instant notes Share your memories Tell stories about your day Set your privacy and curate your news feed Don't be a wallflower: with this book you have the ideal icebreaker to get the party started so you can join in with all the fun!
Facebook For Dummies — читать онлайн ознакомительный отрывок
Ниже представлен текст книги, разбитый по страницам. Система сохранения места последней прочитанной страницы, позволяет с удобством читать онлайн бесплатно книгу «Facebook For Dummies», без необходимости каждый раз заново искать на чём Вы остановились. Поставьте закладку, и сможете в любой момент перейти на страницу, на которой закончили чтение.
Интервал:
Закладка:
News Feed preferences
Hiding posts and people is a good way to incrementally adjust your News Feed over time. But if you’re looking to see a bigger effect right away, you may want to adjust your News Feed preferences instead. Your News Feed preferences allow you to choose friends you want to see first, unfollow friends you already know you don’t want in your News Feed, and reconnect with people you may have unfollowed in the past.
To get to the News Feed Preferences window, open the Account menu (the down arrow in the top bar). Then click Settings and Privacy, and choose News Feed Preferences from the menu that opens. The Preferences window shown in Figure 4-11 appears.
There are four sections of preferences you can use to influence News Feed.
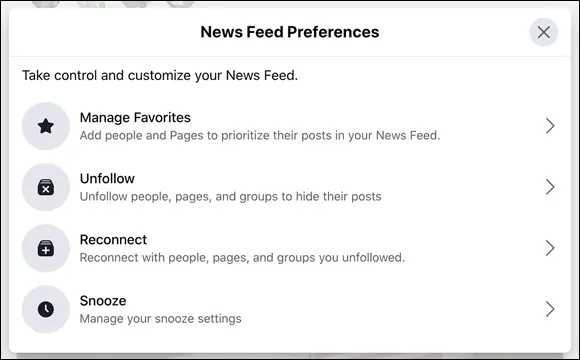
FIGURE 4-11:The News Feed Preferences window.
Manage favorites
Adding friends to your favorites is a way of designating people you always want to see in News Feed. You may want to put your spouse, child, or best friend here. If you have a more distant friend whose posts you still love, adding that person to your favorites means you won’t miss a thing.
Posts from prioritized friends will always be at the top of your News Feed when you log in. Unfortunately, if your friends don’t post very often, there won’t be anything to show you. News Feed needs something to work with. The only thing that differentiates such a post (other than the fact that it’s at the top of your News Feed when you log in) is a blue star in the upper-right corner.
Click Manage Favorites to open a window for choosing people from your friends list. Facebook displays the people it thinks you’ll likely want to see first at the top; you may have to scroll down to find whom you’re looking for. Click the star icon next to any friend’s name and face to select that person. (Click again to deselect the friend.) When you’re finished, click the back arrow in the upper-left corner.
Unfollow
By default, when you become friends with someone you also start following them. This means their posts may appear in your News Feed. However, not all friendships are created equal, so unfollowing is a simple way to stop seeing posts while still maintaining the friendship. You don’t need a particular reason to unfollow people (or unfollow a Page). You can do it because they post too frequently, you don’t like what they post, or they just broke your best friend’s heart.
To select people (and Pages) you want to unfollow, click Unfollow in the News Feed Preferences window. A list appears of all the people, Pages, and groups you currently follow. Click the blue check mark next to a name to unfollow. Click the back arrow when you're finished.
Reconnect
If your News Feed seems stale or bland, consider refollowing people you've unfollowed. Clicking Reconnect in the Preferences window opens a list of people whom you've unfollowed. Click the little folder with a plus sign to add them back into the News Feed mix. Click the back arrow when you're finished.
Snooze
Click Snooze to view all the people, Pages, and groups you've snoozed. (Remember, snoozing means you won’t see posts from that person for 30 days.) If you find yourself missing their friendly faces, click the clock icon next to each name to end the snooze early.
Sharing Your Own News
While there are millions of things to do on Facebook (and this book tries to cover every single one of them), the most basic action on Facebook is sharing. The previous parts of this chapter cover how you see and interact with the things your friends have shared. Now it’s time to put yourself out there and start sharing things yourself.
First things first: Take a look at share box at the top of your News Feed and shown in Figure 4-12. A similar box appears at the top of your timeline and most groups and Pages. You use the share box to create and share posts with your friends. Any posts you make from the share box will go on your timeline and may appear in your friends’ News Feeds.
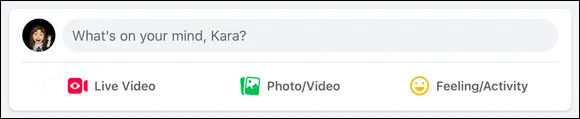
FIGURE 4-12:Start sharing here.
Like much of Facebook, a lot is packed into this little box. Before going into all the details of what you can share and how, we start with the most basic type of post: a status update.
Status updates
A status update is a way of reporting what’s going on with you right now. Facebook uses the phrase “What’s on your mind?” to prompt a status update. So you can share what you’re thinking about, what you’re doing, or really anything. To update your status, follow these steps:
1 Click the share box, where it says, “What’s on Your Mind, < Your Name >?”The share box expands and the rest of the screen fades away so you can focus on your post, as shown in Figure 4-13.
2 Type your status.If you’re experiencing writer’s block, check out the next section, “ Figuring out what to say.”
3 Click Post.The Post button is at the bottom of the share box and will turn blue as soon as you begin typing.
Like we said, sharing on Facebook is easy.
After you’ve shared your status, your friends will likely see it in their News Feeds and will be able to like and comment on your status.
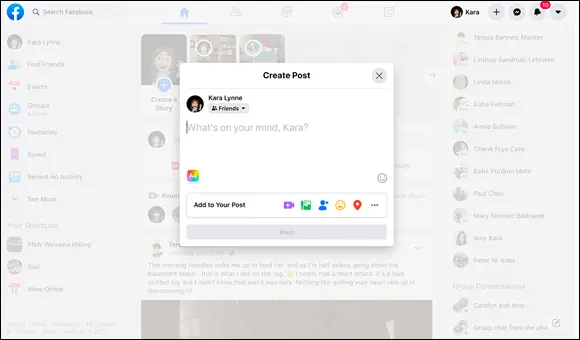
FIGURE 4-13:The share box, expanded.
Figuring out what to say
There isn’t a simple answer to the question of what you should or shouldn’t post as a status update. The question “What’s on your mind?” is meant to provoke whatever it is you’d like to share.
In general, sharing where you are or what you’re doing makes sense as a status update. When Carolyn sees updates from her friends, they're often a random thought that passed through their heads as they were out and about during the day. If a football game is on, she can often figure out what’s happening based on her friends’ status updates. Check out your own friends’ posts to see what they're talking about.
You might share something notable you saw recently or tell a quick and funny story (or a longer one, as there isn’t a word limit on status updates) about your day. Originally, status updates all started with the words “< Your Name > is…” and for the most part status updates tend to be about what you’re doing or thinking right now.
All the examples captured in the figures in this chapter are the sorts of posts we see regularly on Facebook. If you’re feeling uninspired, feel free to post that you're reading Facebook For Dummies.
Beyond the basic status update
Now that you know the basics of posting a status update, you can learn more about the other buttons and options you see in the share box. Adding links to your updates allows you to share interesting things you’ve found all over the Internet. You can also click any of the buttons at the bottom of the share box to add a pop of color to your post, and you can add photos, tags, and details about what you’re doing and where you are.
You can combine almost all these additions to your posts, for example, adding first an emoji and then a photo. However, you can’t add both links and photos from your computer at the same time. All these options can be accessed from the share box shown in Figure 4-13, after you've clicked the “What’s on your mind?” text box.
Читать дальшеИнтервал:
Закладка:
Похожие книги на «Facebook For Dummies»
Представляем Вашему вниманию похожие книги на «Facebook For Dummies» списком для выбора. Мы отобрали схожую по названию и смыслу литературу в надежде предоставить читателям больше вариантов отыскать новые, интересные, ещё непрочитанные произведения.


Обсуждение, отзывы о книге «Facebook For Dummies» и просто собственные мнения читателей. Оставьте ваши комментарии, напишите, что Вы думаете о произведении, его смысле или главных героях. Укажите что конкретно понравилось, а что нет, и почему Вы так считаете.