Barbara Obermeier - Photoshop Elements 2022 For Dummies
Здесь есть возможность читать онлайн «Barbara Obermeier - Photoshop Elements 2022 For Dummies» — ознакомительный отрывок электронной книги совершенно бесплатно, а после прочтения отрывка купить полную версию. В некоторых случаях можно слушать аудио, скачать через торрент в формате fb2 и присутствует краткое содержание. Жанр: unrecognised, на английском языке. Описание произведения, (предисловие) а так же отзывы посетителей доступны на портале библиотеки ЛибКат.
- Название:Photoshop Elements 2022 For Dummies
- Автор:
- Жанр:
- Год:неизвестен
- ISBN:нет данных
- Рейтинг книги:5 / 5. Голосов: 1
-
Избранное:Добавить в избранное
- Отзывы:
-
Ваша оценка:
Photoshop Elements 2022 For Dummies: краткое содержание, описание и аннотация
Предлагаем к чтению аннотацию, описание, краткое содержание или предисловие (зависит от того, что написал сам автор книги «Photoshop Elements 2022 For Dummies»). Если вы не нашли необходимую информацию о книге — напишите в комментариях, мы постараемся отыскать её.
Photoshop Elements 2022 For Dummies
Photoshop Elements 2022 For Dummies — читать онлайн ознакомительный отрывок
Ниже представлен текст книги, разбитый по страницам. Система сохранения места последней прочитанной страницы, позволяет с удобством читать онлайн бесплатно книгу «Photoshop Elements 2022 For Dummies», без необходимости каждый раз заново искать на чём Вы остановились. Поставьте закладку, и сможете в любой момент перейти на страницу, на которой закончили чтение.
Интервал:
Закладка:
Creating different views of an image
What? Different views of the same picture, you say? Yes, indeed. You might create a new view when you want to zoom in on an area for some precise editing and then want to switch back to a wider view. Here’s how you do it:
1 Click a thumbnail image in the Photo Bin.You must have a photo open in the Photo Editor Image window. The photo you click in the Photo Bin appears in the image window as the active document.
2 Choose View ⇒ New Window for . Note that is the name of the file in the image window.
3 Zoom to the new view.A new view appears for the active document, and you see another thumbnail image added to the Photo Bin. To zoom quickly, click the Zoom tool in the Tools panel and then click a few times on the picture in the image window to zoom in to the photo.
Viewing filenames
By default, photos open and are displayed in the Photo Bin without the associated filenames. However, if you mouse over a photo in the Photo Bin, a tooltip opens that displays the name of the file. If you want the name of each file shown in the Photo Bin without having to mouse over the files, open a contextual menu on a photo in the Photo Bin and choose Show Filenames.
Using Photo Bin Actions
On the Photo Bin Actions menu, you find handy tasks that you can perform on photos open in the Photo Editor. Click the Photo Bin Options menu to display the menu commands, as shown in Figure 3-12.
Here’s what each Photo Bin Action does:
Print Bin Files: Select the files in the Photo Bin that you want to print and then choose Print Bin Files. The selected files open in the Print dialog box, where you can make photo prints of the selected images.
Save Bin as an Album: You can add photos to an existing album, or you can create a new album. You can do many wonderful things with Photo Albums.
Show Grid: By default, no divider lines appear between photos in the Photo Bin. When you choose Show Grid, divider lines appear between the photos.
Using Some Creative Features
Adding some creative effects to your photos has long been a stellar aspect of Elements. Quite often, users explore many interesting edits in the Guided Edit panel. Guided Edits not only provide you with many interesting effects to apply to your photos but also offer you easy step-by-step instructions on how to use each effect.
New Guided Edit components have been introduced in each new upgrade to Elements over the past several years. However, this year we don’t see a new Guided Edit in Elements, but we do see some interesting menu commands that provide you with sone fascinating results.
Using Guided Edits
Guided mode is a marvelous editing feature in Elements. To access Guided mode, click the Guided tab near the top of the Photo Editor workspace.
Guided mode is like having a personal assistant to walk you through several steps in an editing process. When you click the Guided tab in the Photo Editor, you find several tabs at the top of the window (see Figure 3-13). These tabs represent various categories. Click a tab, and below the tabs you find individual editing solutions represented as thumbnail images with names of the Guided mode and a description of what the edit provides you with.
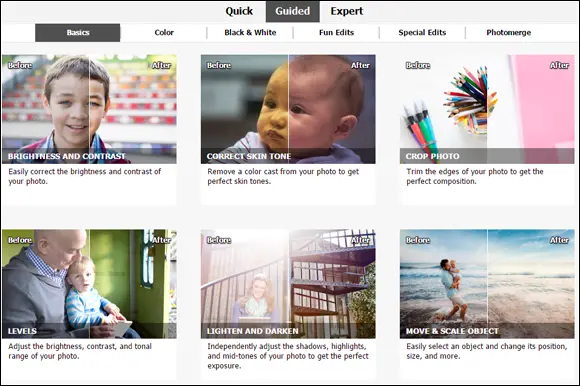
FIGURE 3-13:Click the Guided tab to open the Guided Edit panel.
When you click an editing option, a panel opens on the right side of the window. In the panel is a sequence of steps. Follow the steps, and you end up with a result similar to the example shown in the panel.
 In Elements 2021, three new Guided Edits were introduced in the program: Perfect Landscape, for perfecting landscape photos; Creative Duotone Effect, for creating two-color images; and Move and Scale, for moving or scaling (or both) an object in a photo. The Move and Scale Guided Edit walks you through selecting an object and provides a choice for Moving or Duplicating the object.
 The best way to discover what results you can achieve is to open photos and apply various edits using the Guided panel. Some of the more complicated options, such as creating Out of Bounds effects, offer you a link to online video tutorials to help you further simplify the process.
In Elements 2022, as we said, there are no new Guided Edits introduced in this current release. However, taking off from the Moving and Scaling Guided Edit introduced in Elements 2021, we find some menu commands that are similar to Moving Objects. The commands are found in the Enhance menu.
Moving Objects and Moving Photos
In the Enhance menu, you find two new menu commands: Moving Overlays and Moving Objects. Moving Overlays lets you choose from a variety of objects that you can apply to a photo, and through animation, you can choose to move the objects. The file is then exported as a movie file.
Moving Photos enables you to add some animation to a photo, You can, for example, zoon in, zoom out, move left, move right, and perform several more animated movements.
To use the menu commands, you begin by opening a photo in Expert editing mode. In Figure 3-14, you can see the Moving Overlays option that we chose from the Enhance menu. When using Moving Overlays, you choose an object from one of three menus at the top-right side of the window. You can choose to have the overlay appear in front of or behind a subject in your photo. To have the element appear behind the subject, select the check box for Protect Subject.
To add an overlay to the photo, double-click one of the elements in the Add Overlays panel, and an object appears in the photo. You can duplicate the object by simply clicking and dragging it away from the default placed objects.
To preview the results, click the Play button (the right-pointing arrow at the bottom of the window). When satisfied with the results, click Export. You can choose to export the file as an animated GIF or an MP4 movie file.
For more information on using these and other commands in the Enhance menu, see Chapter 11.
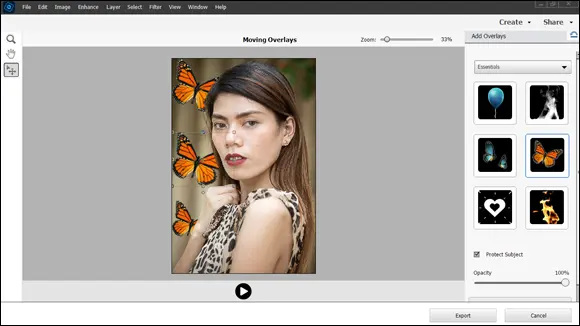
FIGURE 3-14:Choose Moving Overlays from the Enhance menu to open the Moving Overlays window.
Controlling the Editing Environment
Opening Elements for the first time is like moving into a new office. Before you begin work, you need to organize the office. At minimum, you need to set up the desk and computer before you can do anything. In Elements terms, the office organization consists of specifying preference settings. Preferences are settings that provide a means to customize your work in Elements and to fine-tune the program according to your personal work habits.
In the following sections, we explain the preference options that you most likely want to adjust. If you need more detail about a preference option than the following section provides, look at the help documents discussed in Chapter 1.
 Elements has two Preferences dialog boxes: one in the Photo Editor workspace and another in the Organizer workspace. The following sections cover the Preferences dialog box that you open when in the Photo Editor, whether you’re using Windows or the Mac. See Chapter 4for details about Organizer preferences.
Интервал:
Закладка:
Похожие книги на «Photoshop Elements 2022 For Dummies»
Представляем Вашему вниманию похожие книги на «Photoshop Elements 2022 For Dummies» списком для выбора. Мы отобрали схожую по названию и смыслу литературу в надежде предоставить читателям больше вариантов отыскать новые, интересные, ещё непрочитанные произведения.


Обсуждение, отзывы о книге «Photoshop Elements 2022 For Dummies» и просто собственные мнения читателей. Оставьте ваши комментарии, напишите, что Вы думаете о произведении, его смысле или главных героях. Укажите что конкретно понравилось, а что нет, и почему Вы так считаете.