Barbara Obermeier - Photoshop Elements 2022 For Dummies
Здесь есть возможность читать онлайн «Barbara Obermeier - Photoshop Elements 2022 For Dummies» — ознакомительный отрывок электронной книги совершенно бесплатно, а после прочтения отрывка купить полную версию. В некоторых случаях можно слушать аудио, скачать через торрент в формате fb2 и присутствует краткое содержание. Жанр: unrecognised, на английском языке. Описание произведения, (предисловие) а так же отзывы посетителей доступны на портале библиотеки ЛибКат.
- Название:Photoshop Elements 2022 For Dummies
- Автор:
- Жанр:
- Год:неизвестен
- ISBN:нет данных
- Рейтинг книги:5 / 5. Голосов: 1
-
Избранное:Добавить в избранное
- Отзывы:
-
Ваша оценка:
Photoshop Elements 2022 For Dummies: краткое содержание, описание и аннотация
Предлагаем к чтению аннотацию, описание, краткое содержание или предисловие (зависит от того, что написал сам автор книги «Photoshop Elements 2022 For Dummies»). Если вы не нашли необходимую информацию о книге — напишите в комментариях, мы постараемся отыскать её.
Photoshop Elements 2022 For Dummies
Photoshop Elements 2022 For Dummies — читать онлайн ознакомительный отрывок
Ниже представлен текст книги, разбитый по страницам. Система сохранения места последней прочитанной страницы, позволяет с удобством читать онлайн бесплатно книгу «Photoshop Elements 2022 For Dummies», без необходимости каждый раз заново искать на чём Вы остановились. Поставьте закладку, и сможете в любой момент перейти на страницу, на которой закончили чтение.
Интервал:
Закладка:
When you choose TIFF from the Format drop-down list and click Save in the Save/Save As dialog box, the TIFF Options dialog box opens. Your options for image compression include
NONE: Selecting this option results in no compression. You use this option when sending files to creative professionals for creating layouts in programs such as Adobe InDesign. (None of the three compression schemes listed next is recommended for printing files to commercial printing devices.)
LZW: This lossless compression scheme results in much lower file sizes without destroying data.
ZIP: ZIP is also a lossless compression scheme. You can favor ZIP compression over LZW when you have large areas of the same color in an image.
JPEG: JPEG is lossy and results in the smallest file sizes. Use JPEG here the same as when you apply JPEG compression with files saved in the JPEG format.
Leave the remaining items in the dialog box at defaults and click OK to save the image.
Getting Familiar with Color
In this section, you find some fundamental principles to make your work in Elements easier when you’re editing color images.
 Your first level of understanding color is to understand what RGB is and how it works. RGB stands for red, green, and blue. These are the primary colors in the computer world. Forget about what you know about primary colors in an analog world; computers see primary colors as RGB. RGB color is divided into color channels. Although you can’t see the individual channels in Elements, you still need to understand just a little about color channels.
When you see a color pixel (a tiny square), the color is represented as different levels of gray in each channel. This may sound confusing at first, but stay with us for just a minute. When you have a color channel, such as the red channel, and you let all light pass through the channel, you end up with a bright red. If you screen that light a little with a gray filter, you let less light pass through, thereby diluting the red color. This is how channels work. Individually, they all use different levels of gray that permit up to 256 levels of light to pass through them. When you change the intensity of light in the different channels, you ultimately change the color.
Each channel can have up to 256 levels of gray that mask out light. The total number of possibilities for creating color in an RGB model is achieved by multiplying the values for each channel (256 × 256 × 256). The result is more than 16.7 million; that’s the total number of colors a computer monitor can display in RGB color.
This is all well and good as far as theory goes, but what does that mean in practical terms? Actually, you see some of this information in Elements’ tools and dialog boxes. As an experiment, open a file in Elements and choose Enhance ⇒ Adjust Lighting ⇒ Levels; the Levels dialog box shown in Figure 2-5 opens.
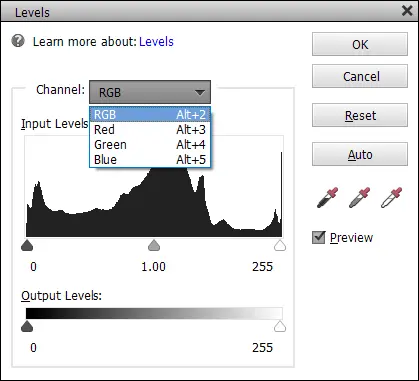
FIGURE 2-5:The Levels dialog box.
Notice that the Channel drop-down list shows you Red, Green, and Blue as individual channels, as well as a composite RGB selection. Furthermore, the Output Levels area shows you values ranging from 0 on the left to 255 on the right. Considering that 0 is a number, you have a total of 256 different levels of gray.
What’s important is that you know that your work in color is related to RGB images that comprise three different channels. There are 256 levels of gray that can let through or hold back light and change brightness values and color. See Chapters 10and 11for more on using tools, such as levels, to adjust color in this way.
Getting Color Right
In Elements, when it comes to color, the challenge isn’t understanding color theory or definitions, but rather matching the RGB color you see on your computer monitor as closely as possible to your output. Output can be a printout from a color printer or a screen view on a web page.
We say match “as closely as possible” because you can’t expect to achieve an exact match. You have far too many printer and monitor variables to deal with. However, if you properly manage color, you can get a very close match.
To match color between your monitor and your output, you need to first calibrate your monitor and then choose a color workspace profile. In the following sections, you can find all the details.
Color the easy way
The upcoming sections are complex and require some dedicated effort to follow the descriptions. If you’re interested in sharing photos only onscreen (that is, on your own website or on Instagram, Facebook, Twitter, and so on) and you plan to leave the printing to others, you don’t need to bother with color correction and going through a maze of steps to get the color perfected. In that case, you can skip the technical stuff in the following sections.
Your only consideration for onscreen viewing is your overall monitor brightness. If your monitor displays images darker or lighter than other computers viewing your images, you need to follow the upcoming sections and understand how to adjust your overall monitor brightness.
Calibrating your monitor
Your monitor needs to be calibrated to adjust the gamma and brightness; correct any color tints or colorcasts; and generally get your monitor to display, as precisely as possible, accurate colors on your output. You can choose among a few tools to adjust monitor brightness. These tools range from a low-cost hardware device that sells for less than $100 to expensive calibration equipment for $3,000 or more.
Gamma is the brightness of midlevel tones in an image. In technical terms, gamma is a parameter that describes the shape of the transfer function for one or more stages in an imaging pipeline.
We skip the costly high-end devices and software utilities that don’t do you any good and suggest that you make, at the very least, one valuable purchase for creating a monitor profile: a hardware profiling system. On the low end, some affordable devices go a long way toward helping you adjust your monitor brightness and color balance. The newest Datacolor Spyder (SpyderX) costs $170. Hardware tools of various kinds can help you create monitor profiles for working with color. The best way to find a device that works for you is to search the Internet for hardware descriptions, dealers, and costs.
On LCD/LED monitors, you need to adjust the hardware controls to bring your monitor into a match for overall brightness with your photo prints. Be certain to run many test prints and match your prints against your monitor view to make the two as similar as possible.
You have a lot to focus on when calibrating monitors and getting the color right on your monitor and your output. We talk more about color prints in Chapter 15.
Choosing a color workspace
After you adjust your monitor color by using a hardware profiling system, your next step is to choose your color workspace. In Elements, you have a choice between two workspace colors: either sRGB or Adobe RGB (1998). You access your color workspace settings by choosing Edit ⇒ Color Settings. The Color Settings dialog box opens, as shown in Figure 2-6.
Читать дальшеИнтервал:
Закладка:
Похожие книги на «Photoshop Elements 2022 For Dummies»
Представляем Вашему вниманию похожие книги на «Photoshop Elements 2022 For Dummies» списком для выбора. Мы отобрали схожую по названию и смыслу литературу в надежде предоставить читателям больше вариантов отыскать новые, интересные, ещё непрочитанные произведения.


Обсуждение, отзывы о книге «Photoshop Elements 2022 For Dummies» и просто собственные мнения читателей. Оставьте ваши комментарии, напишите, что Вы думаете о произведении, его смысле или главных героях. Укажите что конкретно понравилось, а что нет, и почему Вы так считаете.