Barbara Obermeier - Photoshop Elements 2022 For Dummies
Здесь есть возможность читать онлайн «Barbara Obermeier - Photoshop Elements 2022 For Dummies» — ознакомительный отрывок электронной книги совершенно бесплатно, а после прочтения отрывка купить полную версию. В некоторых случаях можно слушать аудио, скачать через торрент в формате fb2 и присутствует краткое содержание. Жанр: unrecognised, на английском языке. Описание произведения, (предисловие) а так же отзывы посетителей доступны на портале библиотеки ЛибКат.
- Название:Photoshop Elements 2022 For Dummies
- Автор:
- Жанр:
- Год:неизвестен
- ISBN:нет данных
- Рейтинг книги:5 / 5. Голосов: 1
-
Избранное:Добавить в избранное
- Отзывы:
-
Ваша оценка:
Photoshop Elements 2022 For Dummies: краткое содержание, описание и аннотация
Предлагаем к чтению аннотацию, описание, краткое содержание или предисловие (зависит от того, что написал сам автор книги «Photoshop Elements 2022 For Dummies»). Если вы не нашли необходимую информацию о книге — напишите в комментариях, мы постараемся отыскать её.
Photoshop Elements 2022 For Dummies
Photoshop Elements 2022 For Dummies — читать онлайн ознакомительный отрывок
Ниже представлен текст книги, разбитый по страницам. Система сохранения места последней прочитанной страницы, позволяет с удобством читать онлайн бесплатно книгу «Photoshop Elements 2022 For Dummies», без необходимости каждый раз заново искать на чём Вы остановились. Поставьте закладку, и сможете в любой момент перейти на страницу, на которой закончили чтение.
Интервал:
Закладка:
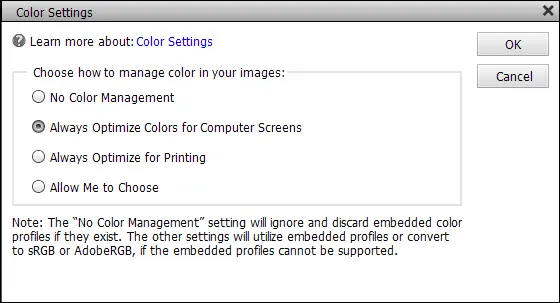
FIGURE 2-6:The Color Settings dialog box.
The Color Settings dialog box gives you these options:
No Color Management: This choice turns off all color management. Don’t choose this option for any work you do in Elements. When using No Color Management, you need to work with files that have color profiles embedded in the photos. You most likely won’t use these types of photos. For information on when you might use the No Color Management option, see Chapter 15.
Always Optimize Colors for Computer Screens: Selecting this radio button sets your workspace to sRGB. sRGB color is used quite often for viewing images on your monitor, but this workspace often results in the best choice for color printing, too. Many color printers can output all the colors you can see in the sRGB workspace. In addition, many photo services we talk about in Chapter 15prefer this workspace color.
Always Optimize for Printing: Selecting this option sets your color workspace to Adobe RGB (1998). The color in this workspace represents the best color you can see on newer monitors, as well as many of the newer inkjet printers. As a default, this is your best choice.
Allow Me to Choose: When you select this option, Elements prompts you for a profile assignment when you open images that contain no profile. This setting is handy if you work back and forth between screen and print images.
Understanding how profiles work
You probably created a monitor color profile when you calibrated your monitor. You probably also selected a color profile when you opened the Color Settings dialog box and selected your workspace color. When you start your computer, your monitor color profile kicks in and adjusts your overall monitor brightness and corrects for any colorcasts. When you open a photo in Elements, color is converted automatically from your monitor color space to your workspace color.
At print time, you use another color profile to output your photos to your desktop color printer. Color is then converted from your workspace color to your printer’s color space. In Chapter 15, we show you how to use color profiles for printing. For now, just realize that each of these color profiles, and using each one properly, determine whether you can get good color output.
Chapter 3
Exploring the Photo Editor
IN THIS CHAPTER
 Examining the Editor workspace
Using the Photo Bin
Using Creative Effects
Launching Preferences
Customizing the presets
Photoshop Elements has two workspaces: the Organizer, which we discuss in Chapter 4, and the Photo Editor, introduced in Chapter 1. You manage and arrange your photos in the Organizer, and you edit photos in the Photo Editor.
In this chapter, we continue our discussion of the Photo Editor so that you can refine your photo-editing skills. You discover the Photo Editor’s workspace in depth and how to access the Photo Editor’s three editing modes: Expert, Quick, and Guided.
Examining the Photo Editor
Before you begin editing photos, you’ll find it helpful to look over the Photo Editor and figure out how to move around the workspace. When the Photo Editor is in Expert mode, you find the following (as labeled in Figure 3-1):
1 Menu bar: As does just about every other program you launch, Elements supports drop-down lists. The menus are logically constructed and identified to provide commands for working with your pictures (including many commands that you don’t find supported in tools and on panels). A quick glimpse at the menu names gives you a hint of what might be contained in a given menu list. Throughout this book, we point you to the menu bar whenever it’s helpful. Most of the menu commands you find in Elements 2022 are the same as those found in earlier versions of Elements.
2 Photo Editor modes: The Photo Editor has three modes. The Expert mode is shown in Figure 3-1. You find an introduction to Quick mode in Chapter 1and a more detailed look at Quick mode in Chapter 10. An introduction to Guided mode appears later in this chapter, in the “ Using Some Creative Features” section. Parts 3and 4cover all the different features of Expert mode, including making selections, creating composites from several images, drawing, adding text, and exploring creative flourishes with filters and effects.
3 Create menu: When you open the Create menu and choose an option, you leave the current editing mode. For example, when in Expert mode, choose Create ⇒ Photo Collage, and all the options that were available in the Photo Editor temporarily disappear when the Creation Wizard opens. To return to the Photo Editor, complete the creation or cancel the wizard. Chapter 17guides you through the options in the Create menu.
4 Features buttons: On Windows, you find three buttons in the top-right corner. These buttons are used to (1) minimize the window; (2) maximize/minimize the window; and (3) close the application. On Apple Macintosh, the same three buttons appear, but they are placed in the top-left corner of the window.
5 Share menu: The Share menu works similarly to the Create menu and offers options for sharing your images. Chapter 16focuses on the Share menu.
6 Panel Bin: Figure 3-1 shows the Layers panel. You change panels by clicking the icons at the bottom of the Panel Bin. (The icons are described in item S.) Creations (things you make) are also contained in the Panel Bin when you click the Create button (item E).
7 Open menu: When you have several files open in the Photo Editor, the Open menu is one way to switch among these files. To use this menu, click the down-pointing arrow adjacent to the Open button and, from the drop-down list, choose the image you want to move to the foreground. Note: The Open menu also offers you an option to create a new, blank file.In Figure 3-1, several files are open, indicated by the tabs at the top of the image window. You can also place an open file in the foreground in the image window in these other ways:Click a tab at the top of the image window to move the image to the foreground (item Q).Click a photo in the Photo Bin (see item J).Open the Window menu and choose a photo listed at the bottom of the menu.Photographer: Ted Padova FIGURE 3-1:The Photo Editor workspace.
8 File tabs: Multiple photos opened in the Photo Editor appear in different tabs at the top of the window by default.In technical-speak, this is a docked position, meaning that the photos are docked in the image window. You can click a tab and drag it down to undock the photo To undock photos you must change a preference setting in the General Preferences by checking Allow Floating Windows in Expert Mode. (See “ Controlling the Editing Environment,” later in this chapter, for more on changing preferences.) Doing so makes the photo appear as a floating window. You might want to float windows when copying and pasting image data between two or more photos. You can also view all open files in a floating window without choosing All Floating from the Layout pop-up menu (item M). To use this menu command, you must first enable the Preferences to allow floating windows.
Читать дальшеИнтервал:
Закладка:
Похожие книги на «Photoshop Elements 2022 For Dummies»
Представляем Вашему вниманию похожие книги на «Photoshop Elements 2022 For Dummies» списком для выбора. Мы отобрали схожую по названию и смыслу литературу в надежде предоставить читателям больше вариантов отыскать новые, интересные, ещё непрочитанные произведения.


Обсуждение, отзывы о книге «Photoshop Elements 2022 For Dummies» и просто собственные мнения читателей. Оставьте ваши комментарии, напишите, что Вы думаете о произведении, его смысле или главных героях. Укажите что конкретно понравилось, а что нет, и почему Вы так считаете.