Barbara Obermeier - Photoshop Elements 2022 For Dummies
Здесь есть возможность читать онлайн «Barbara Obermeier - Photoshop Elements 2022 For Dummies» — ознакомительный отрывок электронной книги совершенно бесплатно, а после прочтения отрывка купить полную версию. В некоторых случаях можно слушать аудио, скачать через торрент в формате fb2 и присутствует краткое содержание. Жанр: unrecognised, на английском языке. Описание произведения, (предисловие) а так же отзывы посетителей доступны на портале библиотеки ЛибКат.
- Название:Photoshop Elements 2022 For Dummies
- Автор:
- Жанр:
- Год:неизвестен
- ISBN:нет данных
- Рейтинг книги:5 / 5. Голосов: 1
-
Избранное:Добавить в избранное
- Отзывы:
-
Ваша оценка:
Photoshop Elements 2022 For Dummies: краткое содержание, описание и аннотация
Предлагаем к чтению аннотацию, описание, краткое содержание или предисловие (зависит от того, что написал сам автор книги «Photoshop Elements 2022 For Dummies»). Если вы не нашли необходимую информацию о книге — напишите в комментариях, мы постараемся отыскать её.
Photoshop Elements 2022 For Dummies
Photoshop Elements 2022 For Dummies — читать онлайн ознакомительный отрывок
Ниже представлен текст книги, разбитый по страницам. Система сохранения места последней прочитанной страницы, позволяет с удобством читать онлайн бесплатно книгу «Photoshop Elements 2022 For Dummies», без необходимости каждый раз заново искать на чём Вы остановились. Поставьте закладку, и сможете в любой момент перейти на страницу, на которой закончили чтение.
Интервал:
Закладка:
Whether you have to press the Shift key to select tools is controlled by a preference setting. To change the default setting so that you don’t have to press Shift, choose Edit ⇒ Preferences ⇒ General or press Ctrl+K. (Choose Adobe Photoshop Elements Editor ⇒ Preferences ⇒ General or press ⌘ +K on the Mac.) Then, in General Preferences, deselect the Use Shift Key for Tool Switch check box.
The shortcuts work for you at all times, except when you’re typing text with the cursor active inside a text block. Be certain to click the Tools panel to select a tool when you finish editing text, or select the Commit green check mark to end using the Text tool.
The tools are varied, and you may find that you don’t use all the tools in the Tools panel in your workflow. Rather than describe the tool functions here, we address the tools in the rest of this book as they pertain to their respective Elements tasks.
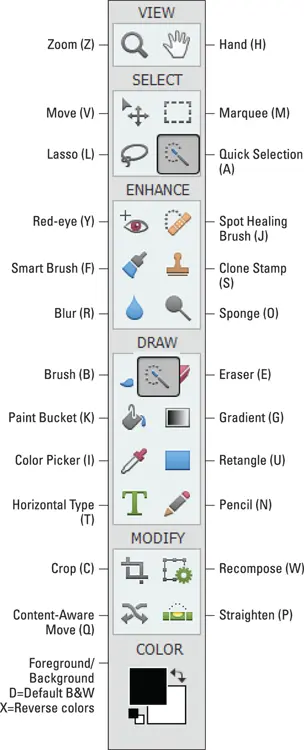
Photo: Ted Padova
FIGURE 3-8:The Tools panel with keystroke equivalents to access a tool from the keyboard.
Selecting from the Tool Options
When you click a tool on the Tools panel, the Tool Options box appears at the bottom of the workspace and offers you choices specific to the selected tool. (Refer to Figure 3-7, which shows the Quick Selection tool options.) In addition to providing you with choices for selecting tools within a tool group, you can adjust settings for a selected tool.
In Figure 3-7, you see choices for adjusting the Quick Selection tool, varying the size of the tooltip, and refining the selection.
You can find many of these fine-tuning adjustments in the Tool Options for most of the tools you select in the Tools panel.
Playing with panels
The panels are where you control features such as layers, effects, and more. In the Photo Editor, you open these panels in the Panel Bin:
Layers: The Layers panel displays all the layers you’ve added to a photo. We talk much more about layers in Chapter 9. For now, look at how the different panels are designed. In the Layers panel, you find various tools at the top left and an icon with horizontal lines in the top-right corner, to the right of the Trash icon (as shown in Figure 3-9).You can select multiple layers and click the folder icon at the top of the Layers panel to create a new layer group. All the grouped layers are nested in a folder.When you click the icon at the top right, a pop-up menu appears (see Figure 3-10), which shows menu items supporting the tasks you perform in the Layers panel.
Effects: At the bottom of the Panel Bin, click the fx button to open the Effects panel. The Effects panel contains tabs offering a umber of choices for applying a number of different effects to your pictures. You simply click an effect thumbnail you want when you edit the photo. We cover applying effects in Chapter 12. FIGURE 3-9:The Layers panel with a Background and three layers.
Filters: Click Filters to open the panel where you can apply a number of different filter effects to the open image. For more on using Filters, see Chapter 12.
Styles: Click Styles, and you find a drop-down menu listing numerous styles. Open a category and click a style to apply to an image. In some respects, this panel behaves similarly to Filters. For more on Styles, see Chapter 12.
Graphics: The Graphics panel contains several menus where you can choose among a huge assortment of graphic illustrations that can also be added to your photos. For more information on using the Graphics panel, see Chapter 17.
More: Click the down-pointing arrow at the bottom of the Panel Bin to the right of the More button, and a pop-up menu opens, allowing you to choose additional panels. The Layers, Effects, Filters, Styles, Graphics, and Favorites panels are docked in the Panel Bin and can’t be removed.The panels you open from the pop-up menu shown in Figure 3-11 open as floating panels. These are your options:Actions: Actions enable you to automate a series of edits to your pictures. In Figure 3-11, you can see the Actions that are supported when you open the More menu and select the Actions tab. As with other panels, a pop-up menu is supported, and it offers Load, Replace, Reset, and Clear options so that you can modify Actions.Elements still doesn’t support recording your own series of editing steps and capturing the steps as an Action. However, most of the Actions that are created in Adobe Photoshop can be loaded in Elements. FIGURE 3-10:The Layers panel pop-up menu. FIGURE 3-11:Actions panel opened in a group of floating windows. You can find a number of free downloadable Actions on the Internet. Just search for Photoshop Actions and explore the many downloads available to you.Adjustments: The Adjustments panel works only when you have an Adjustment layer. For details about using the Adjustments panel and Adjustment layers, see Chapter 9.Color Swatches: This panel displays color swatches you might use for coloring and painting that we cover in Chapter 13.Favorites: Opens the Favorites panel where you find a list of items you designated as a favorite edit.Histogram: Open this panel to display a histogram of the photo in the foreground. We talk more about histograms in Chapter 11.History: Choose this item to display the History panel. For more on using the History panel, see the section about retracing your steps in Chapter 1.Info: The Info panel provides readouts for different color values and physical dimensions of your photos.Navigator: The Navigator panel helps you zoom in and move around on a photo in the image window.Custom Workspace: When you choose Custom Workspace, you can dock and undock panels. This option enables you to configure a custom workspace to your liking.
Create/Share panel: These panels also exist in the Organizer. Click Create at the top right of the Panel Bin to open the Create panel in the Photo Editor. In both the Photo Editor and the Organizer, the Create panel is used for making a number of creations such as calendars, photo books, greeting cards, photo collages, and more. The Share panel contains many options for sharing your photos. We talk more about making creations in Chapter 17, and we cover using the Share panel in Chapter 16.
When you open the additional panels as floating windows, the panels are docked in a common floating window. You can drag a panel out of the docked position and view it as a separate panel or move it to the docked panels.
 When you open a panel in either the Organizer or the Photo Editor, you find other options available from tools, drop-down lists, and a menu you open by clicking the icon with horizontal lines in the top-right corner of the panel.
Using the Photo Bin
The Photo Bin displays thumbnail views of all your open images (see Figure 3-12). You can immediately see a small image of all the pictures you have open at one time, as shown earlier in Figure 3-1. You can also see thumbnail views of all the different views you create for a single picture. Find out all the details in the following sections.

FIGURE 3-12:Open the Photo Bin Options pop-up menu to display various actions you can perform on pictures open in the Photo Bin.
 If you want to rearrange the order of the thumbnails in the Photo Bin, you can click and drag any thumbnail to the left or right.
Интервал:
Закладка:
Похожие книги на «Photoshop Elements 2022 For Dummies»
Представляем Вашему вниманию похожие книги на «Photoshop Elements 2022 For Dummies» списком для выбора. Мы отобрали схожую по названию и смыслу литературу в надежде предоставить читателям больше вариантов отыскать новые, интересные, ещё непрочитанные произведения.


Обсуждение, отзывы о книге «Photoshop Elements 2022 For Dummies» и просто собственные мнения читателей. Оставьте ваши комментарии, напишите, что Вы думаете о произведении, его смысле или главных героях. Укажите что конкретно понравилось, а что нет, и почему Вы так считаете.