Bob LeVitus - macOS Monterey For Dummies
Здесь есть возможность читать онлайн «Bob LeVitus - macOS Monterey For Dummies» — ознакомительный отрывок электронной книги совершенно бесплатно, а после прочтения отрывка купить полную версию. В некоторых случаях можно слушать аудио, скачать через торрент в формате fb2 и присутствует краткое содержание. Жанр: unrecognised, на английском языке. Описание произведения, (предисловие) а так же отзывы посетителей доступны на портале библиотеки ЛибКат.
- Название:macOS Monterey For Dummies
- Автор:
- Жанр:
- Год:неизвестен
- ISBN:нет данных
- Рейтинг книги:5 / 5. Голосов: 1
-
Избранное:Добавить в избранное
- Отзывы:
-
Ваша оценка:
macOS Monterey For Dummies: краткое содержание, описание и аннотация
Предлагаем к чтению аннотацию, описание, краткое содержание или предисловие (зависит от того, что написал сам автор книги «macOS Monterey For Dummies»). Если вы не нашли необходимую информацию о книге — напишите в комментариях, мы постараемся отыскать её.
is your personal roadmap to finding every single awesome new bell and whistle in this world-famous operating system.
You’ll read about upgrades to the accessibility options, how to use Live Text to grab text from all of your photos, manage your iPhone from your Mac and vice versa, and use the new Universal Control to seamlessly transition between Apple devices.
You can also:
Learn how to watch TV or a movie with friends while you’re on a FaceTime call Explore the new “Shared With You” feature so you can access the content people send to you directly in the relevant app Explore the online world with the Safari browser included with every installation of MacOS Monterey Perfect for anyone who wants to take full advantage of the latest version of Apple’s intuitive and user-friendly operating system,
is the fastest, easiest way to master the newest features and the coolest capabilities included with macOS Monterey. With hundreds of pages of simple instructions and images of the macOS interface, this is the last handbook you’ll need to make the most of the newest macOS.
macOS Monterey For Dummies — читать онлайн ознакомительный отрывок
Ниже представлен текст книги, разбитый по страницам. Система сохранения места последней прочитанной страницы, позволяет с удобством читать онлайн бесплатно книгу «macOS Monterey For Dummies», без необходимости каждый раз заново искать на чём Вы остановились. Поставьте закладку, и сможете в любой момент перейти на страницу, на которой закончили чтение.
Интервал:
Закладка:
Customizing Your Dock
The dock is a convenient way to get at oft-used icons. By default, the dock comes stocked with icons that Apple thinks you’ll need most frequently (refer to Table 3-1), but you can customize it to contain any icons that you choose, as you discover in the following sections. You also find out how to resize the dock to fit your new set of icons and how to tell dock icons what your preferences are.
Adding dock icons
 You can customize your dock with favorite applications, a document you update daily, or maybe a folder containing your favorite recipes. Use the dock for anything you need quick access to.
Adding an application, file, or folder to the dock is as easy as 1-2-3:
1 Open a Finder window that contains an application, a document file, or a folder you use frequently. You can also drag an icon — including a hard drive icon — from the desktop or any Finder window.
2 Click the item you want to add to the dock.As shown in Figure 3-4, I chose the TextEdit application. (It’s highlighted.)
3 Drag the icon out of the Finder window and onto the dock.The icons to the left and right of the new icon magically part to make room for it. Note that the dock icon isn’t the actual item. That item remains wherever it was — in a window or on the desktop. The icon you see in the dock is a shortcut that opens the item. I briefly mentioned aliases (known as shortcuts in the Windows world) earlier, but the icon on the dock is actually an alias of the icon you dragged onto the dock.Furthermore, when you remove an icon from the dock, as you find out how to do in a moment, you aren’t removing the actual application, document, or folder. You’re removing only its shortcut from the dock.

FIGURE 3-4:Adding an icon to the dock is as easy as 1-2-3. Just drag the icon onto the dock.
Folder, disk, document, and URL icons must sit on the right side of the divider line in the dock; application icons must sit on the left side of it. Why does the dock force these rules upon you? I suppose that someone at Apple thinks this is what’s best for you. Who knows? But that’s the rule: apps on the left; folders, disks, documents, and URLs on the right.
 As long as you follow the rule, you can add several items to either side of the divider line at the same time by selecting them all and dragging the group to that side of the dock. You can delete only one icon at a time from the dock, however.
Adding a URL to the dock works slightly differently. Here’s a quick way to add a URL to the dock:
1 Open Safari, and go to the page with a URL that you want to save in the dock.
2 Click the small icon that you find to the left of the URL in the address bar and drag it to the right side of the dividing line in the dock.
3 Release the mouse button when the icon is right where you want it in the dock.The icons in the dock slide over and make room, as shown in Figure 3-5, and the URL appears as a dock icon. From now on, when you click the URL icon that you moved to your dock, Safari opens to that page.
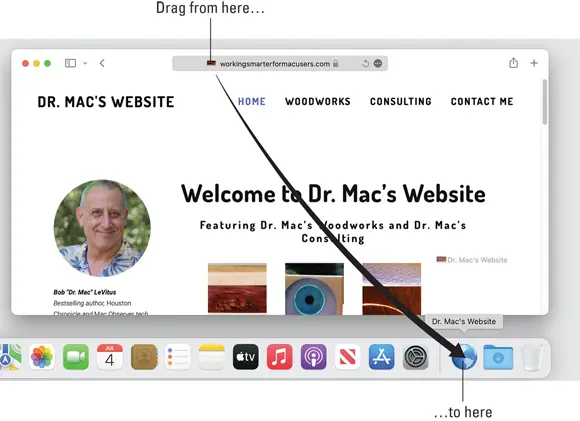
FIGURE 3-5:Drag the icon from Safari’s address bar to the right side of the dock.
If you open an item whose icon that normally doesn’t appear in the dock, and you want to keep its temporary icon in the dock permanently, you have two ways to tell it to stick around after you quit the program:
Control-click (or click and hold down) and choose Options ⇒ Keep in Dock from the menu that pops up.
Drag the icon (for an application that’s currently open) off and then back to the dock (or to a different position in the dock) without letting go of the mouse button.
Removing an icon from the dock
Removing an item from the dock is as easy as 1-2-3 but without the 3:
1 Drag its icon off the dock and onto the desktop.
2 When you see the Remove bubble, release the icon (mouse button).
3 There is no Step 3.
You can also choose Remove from Dock in the item’s dock menu to get it out of your dock, but this way is way more fun.
You can’t remove the icon of a program that’s currently running from the dock by dragging it. Either wait until you quit the program or Control-click (or click and hold down) and deselect Options ⇒ Keep in Dock.
Also, note that by moving an icon off the dock, you aren’t moving, deleting, or copying the item itself; you’re just removing its icon from the dock. The item is unchanged. The icon is sort of like a library catalog card: Just because you remove the card from the card catalog doesn’t mean that the book is gone from the library.
The dock used to come with your Documents and Applications folders installed by default. Ever since Mountain Lion, the dock does not include those folders, at least not by default. I mention this only because having those folders on the dock is convenient, and you should consider adding them to your dock if they aren’t already there.
On the other hand, for those with Macs that once ran OS X 10.7 (Lion) or earlier versions and have since been upgraded to Monterey, your Documents and Applications folders should still be on your Monterey dock unless you removed them at some point.
Resizing the dock
If the default size of the dock bugs you, you can make the dock smaller and save yourself a lot of screen real estate. This space comes in especially handy when you add your own stuff to the dock.
To shrink or enlarge the dock (and its icons) without opening the Dock Preferences window, follow these steps:
1 Make the Sizer appear by moving your cursor over the divider line that you find between apps and documents near the right side of the dock.
2 Drag the Sizer down to make the dock smaller, holding down the mouse button until you find the size you like.The more you drag this control down, the smaller the dock gets.
3 To enlarge the dock again, just drag the Sizer back up.Bam! Big dock! You can enlarge the dock until it fills your screen from side to side.
What should you put on your dock?
Put things on the dock that you need quick access to and that you use often, or add items that aren’t quickly available from menus or a Finder window’s sidebar. If you like using the dock better than the Finder window’s sidebar (for example), add your Documents, Movies, Pictures, Music, or even your Home folder or hard drive to the dock.
I suggest adding these items to your dock:
A word-processing application: Most people use word-processing software more than any other applications. Just drag the icon for yours to the left side of the dock, and you’re good to go. If you don’t have a word processor such as Microsoft Word or Apple Pages already, give TextEdit a try. It’s in every macOS Applications folder, and it’s more powerful than you expect from a freebie.
Читать дальшеИнтервал:
Закладка:
Похожие книги на «macOS Monterey For Dummies»
Представляем Вашему вниманию похожие книги на «macOS Monterey For Dummies» списком для выбора. Мы отобрали схожую по названию и смыслу литературу в надежде предоставить читателям больше вариантов отыскать новые, интересные, ещё непрочитанные произведения.


Обсуждение, отзывы о книге «macOS Monterey For Dummies» и просто собственные мнения читателей. Оставьте ваши комментарии, напишите, что Вы думаете о произведении, его смысле или главных героях. Укажите что конкретно понравилось, а что нет, и почему Вы так считаете.