Bob LeVitus - macOS Monterey For Dummies
Здесь есть возможность читать онлайн «Bob LeVitus - macOS Monterey For Dummies» — ознакомительный отрывок электронной книги совершенно бесплатно, а после прочтения отрывка купить полную версию. В некоторых случаях можно слушать аудио, скачать через торрент в формате fb2 и присутствует краткое содержание. Жанр: unrecognised, на английском языке. Описание произведения, (предисловие) а так же отзывы посетителей доступны на портале библиотеки ЛибКат.

- Название:macOS Monterey For Dummies
- Автор:
- Жанр:
- Год:неизвестен
- ISBN:нет данных
- Рейтинг книги:5 / 5. Голосов: 1
-
Избранное:Добавить в избранное
- Отзывы:
-
Ваша оценка:
macOS Monterey For Dummies: краткое содержание, описание и аннотация
Предлагаем к чтению аннотацию, описание, краткое содержание или предисловие (зависит от того, что написал сам автор книги «macOS Monterey For Dummies»). Если вы не нашли необходимую информацию о книге — напишите в комментариях, мы постараемся отыскать её.
is your personal roadmap to finding every single awesome new bell and whistle in this world-famous operating system.
You’ll read about upgrades to the accessibility options, how to use Live Text to grab text from all of your photos, manage your iPhone from your Mac and vice versa, and use the new Universal Control to seamlessly transition between Apple devices.
You can also:
Learn how to watch TV or a movie with friends while you’re on a FaceTime call Explore the new “Shared With You” feature so you can access the content people send to you directly in the relevant app Explore the online world with the Safari browser included with every installation of MacOS Monterey Perfect for anyone who wants to take full advantage of the latest version of Apple’s intuitive and user-friendly operating system,
is the fastest, easiest way to master the newest features and the coolest capabilities included with macOS Monterey. With hundreds of pages of simple instructions and images of the macOS interface, this is the last handbook you’ll need to make the most of the newest macOS.
macOS Monterey For Dummies — читать онлайн ознакомительный отрывок
Ниже представлен текст книги, разбитый по страницам. Система сохранения места последней прочитанной страницы, позволяет с удобством читать онлайн бесплатно книгу «macOS Monterey For Dummies», без необходимости каждый раз заново искать на чём Вы остановились. Поставьте закладку, и сможете в любой момент перейти на страницу, на которой закончили чтение.
Интервал:
Закладка:
When you have an application open, the commands on the menu change, too — but just a little bit. What makes this cool is that you have access to some standard application menu items whether you’re running Mail, Safari, or almost any other app. For example, most (but not all) applications have Cut, Copy, and Paste commands in their Edit menus, and Open, Save, and Print commands in their File menus. You can find much more about commands for applications in Part 3, which explains how applications that come with macOS Monterey can help you get things done.
Contextual (shortcut) menus: They’re sooo contextual!
Contextual menus (also called shortcut menus ) list commands that apply only to the item that is currently selected. Contextual menus might be available in windows, on icons, and in most places on the desktop.
To see whether a contextual menu is available, either hold down the Control key and click — which you can call a Control-click to sound cool to your Mac friends — or, for those with two or more buttons on their mice, right-click. Finally, most Mac laptops (as well as the Magic Trackpad and the Magic Mouse) let you click the trackpad using two fingers to simulate a right-click or a Control-click.
 If this doesn’t work for you, launch System Preferences and click the Trackpad icon. Click the Point & Click tab and make sure that Click with Two Fingers is selected as your Secondary Click and (of course), the Secondary Click check box is enabled.
Another reason the contextual menu might not appear is that it is available only if any of its commands make sense for the item that you Control-click or right-click. That’s why people call ’em contextual! They’re specific to the current context, which is whatever is selected or Control-clicked.
Figure 2-7, left, shows the contextual menu that appears when you Control-click (or right-click) a document icon. Figure 2-7, right, shows the contextual menu you see when you Control-click the desktop.
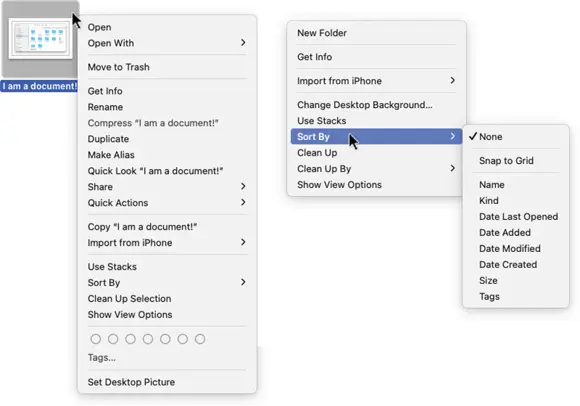
FIGURE 2-7:Only relevant items appear in a contextual menu.
Contextual menus are also available in most applications. Open your favorite app and try Control-clicking to find out whether those menus are there. In most cases, using a contextual menu is a quick way to avoid going to the menu bar to choose a command. In some programs — such as iMovie and Music — contextual menus are the only way to access some commands.
 To make the Finder-related contextual menus available to users who didn’t have the foresight to purchase this book, Apple added the Action icon (shown in the margin) to the toolbar. As a result, people who don’t know about Control-clicking or right-clicking (or have only one free hand) can access most contextual menu commands by clicking the Action button and displaying its context-sensitive menu of shortcuts. You, on the other hand, gentle reader, know how to get at these commands without having to run your mouse all the way up to the Action icon in the toolbar. Plus, a handful of commands appear in the Control-click/right-click contextual menu but don’t appear in the Action icon/menu.
 Get in the habit of Control-clicking (or right-clicking or two-finger clicking) items on your screen. Before you know it, using contextual menus will become second nature to you.
Recognizing disabled options
Menu items that appear in black on a menu are currently available. Menu items that aren’t currently available are grayed out, to indicate that they’re disabled for the time being. You can’t select a disabled menu item.
In Figure 2-8, the File menu on the left is pulled down while nothing is selected in Finder; this is why many of the menu items are disabled (in gray). These items are disabled because an item (such as a window or an icon) must be selected for you to use one of these menu items. For example, the Show Original command is grayed out because it works only if the selected item is an alias. On the right side of Figure 2-8, I selected a document before I pulled down the menu; note that many of the formerly disabled commands are enabled when an icon is selected. (The Show Original command is still grayed out because the selected icon is not an alias.)
Finally, note that items that end in an ellipsis (…), such as the Tags command in Figure 2-8, will open a dialog with additional options.
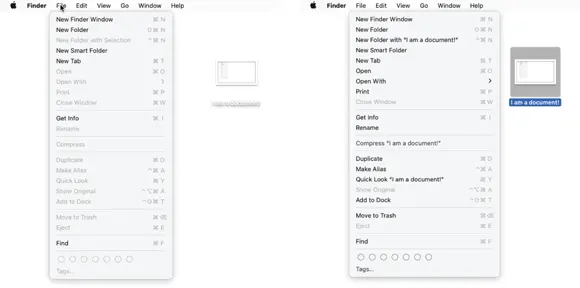
FIGURE 2-8:File menu with nothing selected (left) and with a document icon selected (right); the disabled items appear grayed out.
Navigating submenus
Some menu items have more menus attached to them, and these are called submenus, which are menus that are subordinate to a menu item. If a menu has a black arrow to the right of its name, it has a submenu.
To use a submenu, click a menu name once (to drop the menu down) and then slide your cursor down to any item with a black arrow. When the item is highlighted, move your mouse to the right just slightly. The submenu should pop out of the original menu’s item, as shown in Figure 2-9.
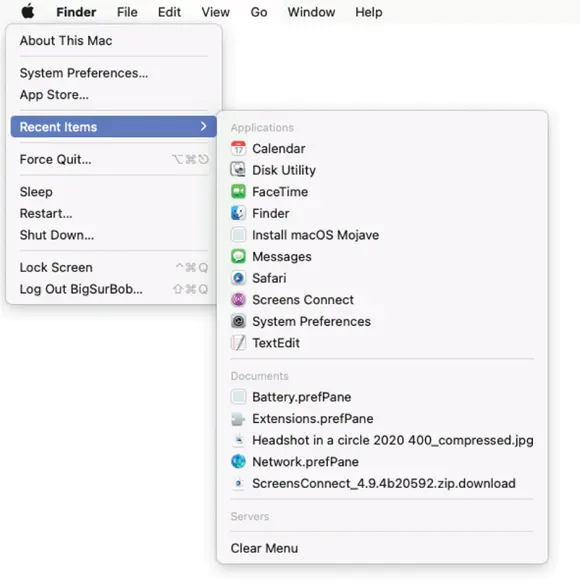
FIGURE 2-9:The Apple menu's Recent Items selection, with its submenu popped out.
Under the Apple menu tree
On the far-left side of the menu bar sits a little  , which displays a menu when clicked. No matter what application is active, the menu is always available in the top-left corner of your menu bar.
The menu bar is always available, even with apps that hide it in full-screen mode. To make it reappear, move the pointer to the top of the screen, wait a second or two, and watch the menu bar magically reappear.
From top to bottom, the menu gives you a number of options, including the following:
About This Mac: Choose this item to see what version of macOS you’re running, what kind of Mac and processor you’re using, how much memory your Mac has, the name of your startup disk, and much more. The window sports multiple tabs across the top of the window — Overview, Displays, Storage, and so on.Click the System Report button on the Overview tab to launch the Apple System Information utility; there, you can find out more than you’ll probably ever want or need to know about your Mac’s hardware and software.Click the Software Update button on the Overview tab to have your Mac check with the mothership (Apple) to see whether any updates are available for macOS, its included applications, third-party applications purchased at the Mac App Store, other Apple-branded applications (such as GarageBand, Final Cut Pro, Pages), or even Apple-branded peripheral devices, such as the iPod or iPhone.
Читать дальшеИнтервал:
Закладка:
Похожие книги на «macOS Monterey For Dummies»
Представляем Вашему вниманию похожие книги на «macOS Monterey For Dummies» списком для выбора. Мы отобрали схожую по названию и смыслу литературу в надежде предоставить читателям больше вариантов отыскать новые, интересные, ещё непрочитанные произведения.


Обсуждение, отзывы о книге «macOS Monterey For Dummies» и просто собственные мнения читателей. Оставьте ваши комментарии, напишите, что Вы думаете о произведении, его смысле или главных героях. Укажите что конкретно понравилось, а что нет, и почему Вы так считаете.