Bob LeVitus - macOS Monterey For Dummies
Здесь есть возможность читать онлайн «Bob LeVitus - macOS Monterey For Dummies» — ознакомительный отрывок электронной книги совершенно бесплатно, а после прочтения отрывка купить полную версию. В некоторых случаях можно слушать аудио, скачать через торрент в формате fb2 и присутствует краткое содержание. Жанр: unrecognised, на английском языке. Описание произведения, (предисловие) а так же отзывы посетителей доступны на портале библиотеки ЛибКат.

- Название:macOS Monterey For Dummies
- Автор:
- Жанр:
- Год:неизвестен
- ISBN:нет данных
- Рейтинг книги:5 / 5. Голосов: 1
-
Избранное:Добавить в избранное
- Отзывы:
-
Ваша оценка:
macOS Monterey For Dummies: краткое содержание, описание и аннотация
Предлагаем к чтению аннотацию, описание, краткое содержание или предисловие (зависит от того, что написал сам автор книги «macOS Monterey For Dummies»). Если вы не нашли необходимую информацию о книге — напишите в комментариях, мы постараемся отыскать её.
is your personal roadmap to finding every single awesome new bell and whistle in this world-famous operating system.
You’ll read about upgrades to the accessibility options, how to use Live Text to grab text from all of your photos, manage your iPhone from your Mac and vice versa, and use the new Universal Control to seamlessly transition between Apple devices.
You can also:
Learn how to watch TV or a movie with friends while you’re on a FaceTime call Explore the new “Shared With You” feature so you can access the content people send to you directly in the relevant app Explore the online world with the Safari browser included with every installation of MacOS Monterey Perfect for anyone who wants to take full advantage of the latest version of Apple’s intuitive and user-friendly operating system,
is the fastest, easiest way to master the newest features and the coolest capabilities included with macOS Monterey. With hundreds of pages of simple instructions and images of the macOS interface, this is the last handbook you’ll need to make the most of the newest macOS.
macOS Monterey For Dummies — читать онлайн ознакомительный отрывок
Ниже представлен текст книги, разбитый по страницам. Система сохранения места последней прочитанной страницы, позволяет с удобством читать онлайн бесплатно книгу «macOS Monterey For Dummies», без необходимости каждый раз заново искать на чём Вы остановились. Поставьте закладку, и сможете в любой момент перейти на страницу, на которой закончили чтение.
Интервал:
Закладка:
Top o’ the window to ya!
Take a gander at the top of a window — any window. You see three buttons in the top-left corner and the name of the window to the right of the Back and Forward icons. The three buttons (called gumdrop buttons by some folks because they look like, well, gumdrops) are officially known as Close, Minimize, and Zoom, and their colors (red, yellow, and green, respectively) are designed to pop off the screen.
Here’s what they do:
Close (red): Click this button to close the window.
Minimize (yellow): Click this button to minimize the window. Clicking Minimize appears to close the window, but instead of making it disappear, Minimize adds an icon for the window to the right side of the dock. See the section about minimizing windows into application icons in Chapter 3if a document icon doesn’t appear in your dock when you minimize the document's window.To view the window again, click the dock icon for the window that you minimized. If the window happens to be a QuickTime movie, the movie audio continues to play and a tiny still image from the video appears as its icon in the dock. (I discuss the dock in detail in Chapter 3.)
Zoom (green): Click a window’s green Zoom button, and the window expands to cover the whole screen, including the menu bar. If you prefer the old behavior, where a window zoomed to the largest size it could but didn’t cover the full screen, hold down the Option key when you click the green button.To shrink the window back to its previous dimensions, slide the cursor up to the very top of the screen, wait for the menu bar to appear, and then click the green Zoom button.Another way to escape from a full-screen window, at least in Finder, is to press the Esc key on your keyboard. Sadly, this trick doesn’t work with all apps, though it’s quite useful in apps that support it (most Apple apps and many others) as well as in Finder.Split View is semi-hidden beneath the green Zoom button. To see Split View in action, first click the green button for a moment — that is, perform the first half of a click without releasing the button. Or hover the cursor over the Zoom button for a moment (without clicking).Either way, a pop-up menu with three (or more) options appears; select Enter Full Screen, Tile Window to Left of Screen, or Tile Window to Right of Screen. You may see additional options to move the window to a different device (such as an iPad) via Sidecar if a suitable device is close enough to your Mac (see Chapter 27).After assigning a window to the left or right half of the screen, the other half displays miniature versions of all open windows. Hover the cursor over a miniature window to see its name; click a miniature window and it fills that half of the screen.To work in Split View, click either window to activate it and do what you have to do. To activate the other window, click it. To exit Split View, do one of the following:Press Esc.Move the pointer to the top of the screen; when the buttons (for both windows) reappear, click any button.Quit either application.
A scroll new world
Yet another way to see more of what’s in a window or pane is to scroll through it. Scroll bars appear at the bottom and right sides of any window or pane that contains more stuff — icons, text, pixels, or whatever — than you can see in the window. Figure 2-2, for example, shows two instances of the same window: Dragging the scroll bar on the right side of the smaller window would reveal the icons above and below the six (whole) icons that are currently visible. Dragging the scroll bar on the bottom of the smaller window would reveal items to the left and right of the six that are currently visible.
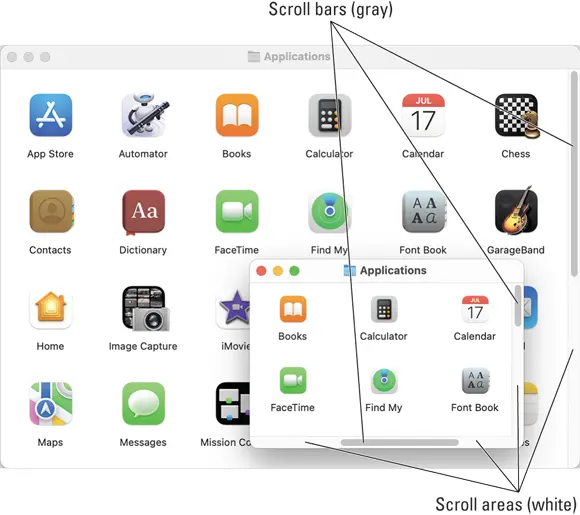
FIGURE 2-2:The same window twice. Use the scroll bars in the front window to see the icons above, below, to the left, or to the right.
Simply click and drag a scroll bar to move it up or down or side to side.
If your scroll bars don’t look exactly like the ones in Figure 2-2 or work as described in the following list, don’t worry. These are System Preferences you can configure to your heart’s desire, as you discover in Chapter 6.
Here are some ways you can scroll in a window:
Click a scroll bar and drag. The content of the window scrolls proportionally to how far you drag the scroll bar.
Click in the scroll bar area but don’t click the scroll bar itself. The window scrolls either one page up (if you click above the scroll bar) or down (if you click below the scroll bar). You can change a setting in your General System Preferences pane to cause the window to scroll proportionally to where you click. For what it’s worth, the Page Up and Page Down keys on your keyboard function the same way as clicking the white scroll area (the vertical scroll bar only) in Finder and many applications. These keys don’t work in every program, though, so don’t become too dependent on them. Also, if you purchased a mouse, a trackball, or another pointing device that has a scroll wheel, you can scroll vertically in the active (front) window with the scroll wheel or press and hold down the Shift key to scroll horizontally. Alas, this horizontal scrolling-with-the-Shift-key works in Finder windows but not in all applications. For example, it works in the Apple TextEdit application, but not in Microsoft Word.
Use the keyboard. In Finder, first click an icon in the window and then use the arrow keys to move up, down, left, or right. Using an arrow key selects the next icon in the direction it indicates — and automatically scrolls the window, if necessary. In other programs, you might or might not be able to use the keyboard to scroll. The best advice I can give you is to try it — either it will work or it won’t.
Use a two-finger swipe (on a trackpad). If you have a notebook with a trackpad or use a Magic Trackpad or Magic Mouse, just move the arrow cursor over the window and then swipe the trackpad with two fingers to scroll.
(Hyper)active windows
To work within a window, the window must be active. The active window is always the frontmost window, and inactive windows always appear behind the active window. You might not see an inactive window if it’s behind a bigger window, active or not.
Only one window can be active at a time. To make a window active, click it anywhere — in the middle, on the title bar, or on a scroll bar. It doesn’t matter where; just click anywhere to activate it.
 The exceptions are the Close, Minimize, and Zoom buttons on inactive windows, which always do what they do, regardless of whether a window is active or inactive.
Look at Figure 2-3 for an example of an active window in front of an inactive window (the Applications window and the Utilities window, respectively).
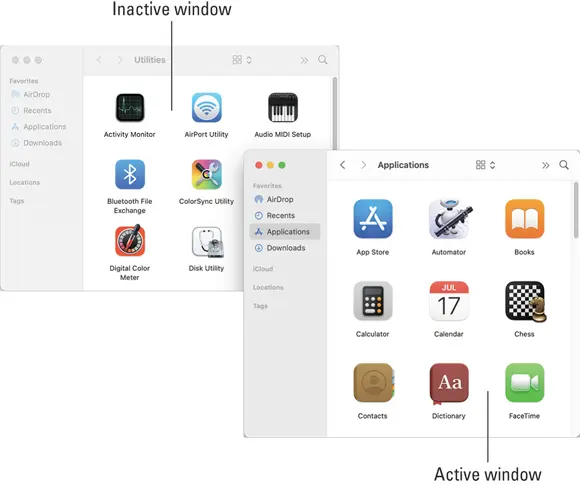
FIGURE 2-3:An active window in front of an inactive window.
The following is a list of the major visual cues that distinguish active from inactive windows:
The active window’s title bar: By default, the Close, Minimize, and Zoom buttons are bright red, yellow, and green, respectively, and the inactive windows’ buttons are light gray. This is a nice visual cue. Colored items are active, and gray ones are inactive. Better still, if you move your mouse cursor over an inactive window’s gumdrop buttons, they light up in their usual colors so you can close, minimize, or zoom an inactive window without first clicking it to making it active. Neat!
Читать дальшеИнтервал:
Закладка:
Похожие книги на «macOS Monterey For Dummies»
Представляем Вашему вниманию похожие книги на «macOS Monterey For Dummies» списком для выбора. Мы отобрали схожую по названию и смыслу литературу в надежде предоставить читателям больше вариантов отыскать новые, интересные, ещё непрочитанные произведения.


Обсуждение, отзывы о книге «macOS Monterey For Dummies» и просто собственные мнения читателей. Оставьте ваши комментарии, напишите, что Вы думаете о произведении, его смысле или главных героях. Укажите что конкретно понравилось, а что нет, и почему Вы так считаете.