Bob LeVitus - macOS Monterey For Dummies
Здесь есть возможность читать онлайн «Bob LeVitus - macOS Monterey For Dummies» — ознакомительный отрывок электронной книги совершенно бесплатно, а после прочтения отрывка купить полную версию. В некоторых случаях можно слушать аудио, скачать через торрент в формате fb2 и присутствует краткое содержание. Жанр: unrecognised, на английском языке. Описание произведения, (предисловие) а так же отзывы посетителей доступны на портале библиотеки ЛибКат.

- Название:macOS Monterey For Dummies
- Автор:
- Жанр:
- Год:неизвестен
- ISBN:нет данных
- Рейтинг книги:5 / 5. Голосов: 1
-
Избранное:Добавить в избранное
- Отзывы:
-
Ваша оценка:
macOS Monterey For Dummies: краткое содержание, описание и аннотация
Предлагаем к чтению аннотацию, описание, краткое содержание или предисловие (зависит от того, что написал сам автор книги «macOS Monterey For Dummies»). Если вы не нашли необходимую информацию о книге — напишите в комментариях, мы постараемся отыскать её.
is your personal roadmap to finding every single awesome new bell and whistle in this world-famous operating system.
You’ll read about upgrades to the accessibility options, how to use Live Text to grab text from all of your photos, manage your iPhone from your Mac and vice versa, and use the new Universal Control to seamlessly transition between Apple devices.
You can also:
Learn how to watch TV or a movie with friends while you’re on a FaceTime call Explore the new “Shared With You” feature so you can access the content people send to you directly in the relevant app Explore the online world with the Safari browser included with every installation of MacOS Monterey Perfect for anyone who wants to take full advantage of the latest version of Apple’s intuitive and user-friendly operating system,
is the fastest, easiest way to master the newest features and the coolest capabilities included with macOS Monterey. With hundreds of pages of simple instructions and images of the macOS interface, this is the last handbook you’ll need to make the most of the newest macOS.
macOS Monterey For Dummies — читать онлайн ознакомительный отрывок
Ниже представлен текст книги, разбитый по страницам. Система сохранения места последней прочитанной страницы, позволяет с удобством читать онлайн бесплатно книгу «macOS Monterey For Dummies», без необходимости каждый раз заново искать на чём Вы остановились. Поставьте закладку, и сможете в любой момент перейти на страницу, на которой закончили чтение.
Интервал:
Закладка:
 If you’re a longtime Mac user, you probably hold down the mouse button the whole time between clicking the name of the menu and selecting the command you want. You can still do it that way, but you can also click the menu name to open it, release the mouse button, point at the item you want to select, and then click again. In other words, macOS menus stay open after you click their names, even if you’re not holding down the mouse button. After you click a menu’s name to open it, you can even type the first letter (or letters) of the item to select it and then execute that item by pressing the spacebar or the Return key. Furthermore, menus remain open until you click something else.
Go ahead and give it a try … I’ll wait.
 The terms given in the preceding list apply to all Mac laptop, desktop, and pro systems. If you use a trackpad with your Mac, you'll want to add a few more terms — such as tap, swipe, rotate, pinch, and spread — to your lexicon. You can read all about them in Chapters 2and 13.
Not Just a Beatles Movie: Help and the Help Menu
One of the best features of all Macs is the excellent built-in help, and macOS Monterey doesn’t cheat you on that legacy: This system has online help in abundance. When you have a question about how to do something, Help Center is the first place you should visit (after this book, of course).
Clicking the Help menu reveals the Search field at the top of the menu and the macOS Help item. Choosing macOS Help opens the window shown in Figure 1-5.
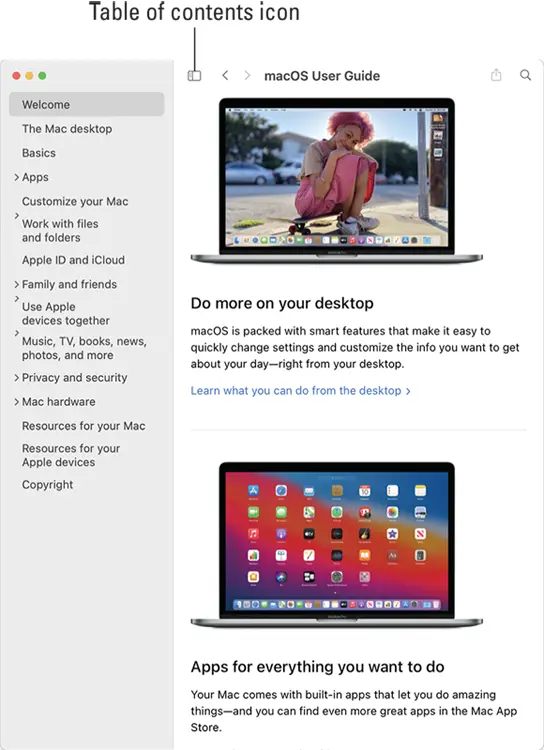
FIGURE 1-5:Mac Help is nothing if not helpful.
Although the keyboard shortcut for Help no longer appears on the Help menu, the same shortcut as always, Shift+⌘ +?, still opens Help.
You can browse Help by clicking a topic in the table of contents and then clicking a subtopic. If you don’t see the table of contents, click the Table of contents icon, labeled in Figure 1-5.
To search Mac Help, simply type a word or phrase in either Search field — the one in the Help menu itself or the one near the top of the Help window on the right side — and then press Return. In a few seconds, your Mac provides one or more articles to read, which (theoretically) are related to your question. As long as your Mac is connected to the internet, search results include articles from the Apple online support database.
Although you don’t have to be connected to the internet to use Mac Help, you do need an internet connection to get the most out of it. ( Chapter 15can help you set up an internet connection, if you don’t have one.) That’s because macOS installs only certain help articles on your hard drive. If you ask a question that those articles don’t answer, Mac Help connects to the Apple website and downloads the answer (assuming that you have an active internet connection). These answers appear when you click Show All near the bottom of some article lists. Click one of these entries, and Help Viewer retrieves the text over the internet. This is sometimes inconvenient but also quite smart, because Apple can update the Help system at any time without requiring any action from you.
Furthermore, after you ask a question and Mac Help has grabbed the answer from the Apple website, the answer remains on your hard drive forever. If you ask for it again — even at a later date — your computer won’t have to download it from the Apple website again.
If you see a See More Results on the Web link, you can click it to launch Safari and perform a web search for the phrase you typed.
macOS also has a cool feature I like to call automatic visual help cues. Here’s how they work:
1 In the Help menu’s Search field, type a word or phrase.
2 Select any item that has a menu icon to its left (such as the items with Trash in their names in Figure 1-6).The automatic visual cue — an arrow — appears, pointing at that command in the appropriate menu.
Finally, don’t forget that most apps have their own Help systems, so if you want general help with your Mac, you need to first click the Finder icon in the dock, click the desktop, or use the app-switching shortcut ⌘ +Tab to activate Finder. Only then can you choose Mac Help from Finder’s Help menu.
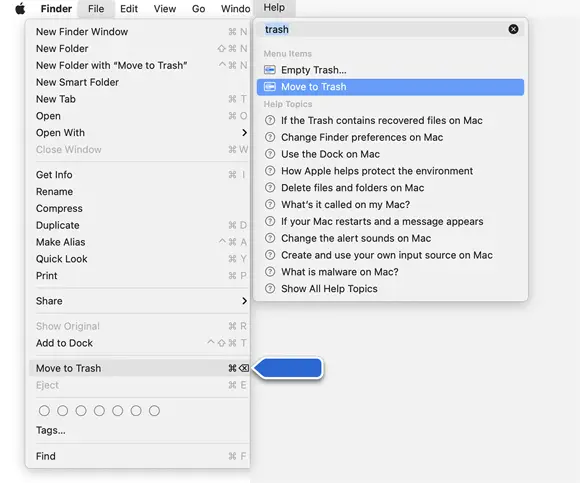
FIGURE 1-6:If you choose an item with a menu icon, an arrow points to that item in context.
Chapter 2
Desktop and Windows and Menus (Oh My!)
IN THIS CHAPTER
 Understanding Finder
Checking out the parts of a window
Dealing with dealie-boppers in windows
Resizing, moving, and closing windows
Getting comfortable with menu basics
This chapter introduces important features of macOS, starting with the first things you see when you log in: Finder and its desktop. After a quick look around the desktop, you get a look into two of its most useful features: windows and menus.
Windows are (and have always been) an integral part of using your Mac. In fact, Macs had windows before Microsoft Windows was invented.
Windows in Finder (or, as a Windows user might say, “on the desktop”) show you the contents of the hard drive, optical drive, flash (thumb) drive, network drive, disk image, and folder icons. Windows in applications do many things. The point is that windows are part of what makes your Mac a Mac; knowing how they work — and how to use them — is essential.
Menus are another quintessential part of the Mac experience. The latter part of this chapter starts you out with a few menu basics. As needed, I direct you to other parts of the book for greater detail. So relax and don’t worry. By the end of this chapter, you’ll be ready to work with windows and menus in any application that uses them (and most applications, games excluded, do).
Touring Finder and Its Desktop
Finder is the program that creates the desktop, keeps track of your files and folders, and is always running. Just about everything you do on your Mac begins and ends with Finder. It’s where you manage files, store documents, launch programs, and much more. If you ever expect to master your Mac, the first step is to master Finder and desktop.
Читать дальшеИнтервал:
Закладка:
Похожие книги на «macOS Monterey For Dummies»
Представляем Вашему вниманию похожие книги на «macOS Monterey For Dummies» списком для выбора. Мы отобрали схожую по названию и смыслу литературу в надежде предоставить читателям больше вариантов отыскать новые, интересные, ещё непрочитанные произведения.


Обсуждение, отзывы о книге «macOS Monterey For Dummies» и просто собственные мнения читателей. Оставьте ваши комментарии, напишите, что Вы думаете о произведении, его смысле или главных героях. Укажите что конкретно понравилось, а что нет, и почему Вы так считаете.