Bob LeVitus - macOS Monterey For Dummies
Здесь есть возможность читать онлайн «Bob LeVitus - macOS Monterey For Dummies» — ознакомительный отрывок электронной книги совершенно бесплатно, а после прочтения отрывка купить полную версию. В некоторых случаях можно слушать аудио, скачать через торрент в формате fb2 и присутствует краткое содержание. Жанр: unrecognised, на английском языке. Описание произведения, (предисловие) а так же отзывы посетителей доступны на портале библиотеки ЛибКат.
- Название:macOS Monterey For Dummies
- Автор:
- Жанр:
- Год:неизвестен
- ISBN:нет данных
- Рейтинг книги:5 / 5. Голосов: 1
-
Избранное:Добавить в избранное
- Отзывы:
-
Ваша оценка:
macOS Monterey For Dummies: краткое содержание, описание и аннотация
Предлагаем к чтению аннотацию, описание, краткое содержание или предисловие (зависит от того, что написал сам автор книги «macOS Monterey For Dummies»). Если вы не нашли необходимую информацию о книге — напишите в комментариях, мы постараемся отыскать её.
is your personal roadmap to finding every single awesome new bell and whistle in this world-famous operating system.
You’ll read about upgrades to the accessibility options, how to use Live Text to grab text from all of your photos, manage your iPhone from your Mac and vice versa, and use the new Universal Control to seamlessly transition between Apple devices.
You can also:
Learn how to watch TV or a movie with friends while you’re on a FaceTime call Explore the new “Shared With You” feature so you can access the content people send to you directly in the relevant app Explore the online world with the Safari browser included with every installation of MacOS Monterey Perfect for anyone who wants to take full advantage of the latest version of Apple’s intuitive and user-friendly operating system,
is the fastest, easiest way to master the newest features and the coolest capabilities included with macOS Monterey. With hundreds of pages of simple instructions and images of the macOS interface, this is the last handbook you’ll need to make the most of the newest macOS.
macOS Monterey For Dummies — читать онлайн ознакомительный отрывок
Ниже представлен текст книги, разбитый по страницам. Система сохранения места последней прочитанной страницы, позволяет с удобством читать онлайн бесплатно книгу «macOS Monterey For Dummies», без необходимости каждый раз заново искать на чём Вы остановились. Поставьте закладку, и сможете в любой момент перейти на страницу, на которой закончили чтение.
Интервал:
Закладка:
The active window’s toolbar: Toolbar icons are darker and more distinctive; the inactive window’s toolbar icons are light gray and more subdued.
The active window’s drop shadow: Notice how the active window has a more prominent shadow? This tricks your eye into thinking the active window is in front of the inactive one.
One last thing: If you’re wondering how to resize a window, just hover the cursor over a window’s edge or corner or over the dividing line between two panes in the same window (such as the sidebar and the main area of Finder windows). A helpful little arrow appears as a visual cue that you can now drag the edge, corner, or dividing line to resize the window or pane.
Dialog Dealie-Boppers
Dialogs are special windows that pop up over the active window. You generally see them when you select a menu item that ends in an ellipsis (…).
Dialogs can contain a number of standard Mac features (I call them dealie-boppers ), such as radio buttons, pop-up menus, tabs, text-entry fields, and check boxes. You see these features again and again in dialogs. Take a moment to look at each of these dealie-boppers in Figure 2-4.
Radio buttons: Radio buttons are so named because, like the buttons on your car radio (if you have a very old car), only one at a time can be active. (When they’re active, they appear to be pushed in, just like the old radio buttons.) Radio buttons always appear in a group of two or more; when you select one, all the others are automatically deselected. Here’s a nifty and undocumented shortcut: You can usually select check boxes and radio buttons by clicking their names (instead of the buttons or boxes).
Tabs: When a dialog contains more information than can fit in a single window, the info may be divided among panes denoted by tabs. In Figure 2-4, the New Document tab is selected on the left, and the Open and Save tab is selected on the right.
Pop-up menus: These menus are appropriately named because they pop up when you click them. In Figure 2-4, right, all five pop-up menus (Opening Files, Saving Files, Document Type, Styling, and Encoding) are unclicked and unpopped.You can always recognize a pop-up menu because it appears in a slightly rounded rectangle and has a double-ended arrow symbol (or a pair of arrows, if you like) on the right.Have you figured out yet what radio buttons, tabs, and pop-up menus have in common? Hint: All three enable you to make a single selection from a group of options. (Well, okay, that was more of an answer than a hint.)
Text-entry fields: In text-entry fields, you type text (including numbers) from the keyboard. In Figure 2-4, left, the Width, Height, Author, Organization, and Copyright options are text-entry fields.
Check boxes: The last dealie-bopper that you see frequently is the check box. In a group of check boxes, you can select as many options as you like. Check boxes are selected when they contain a check mark and deselected when they’re empty, as shown in Figure 2-4.
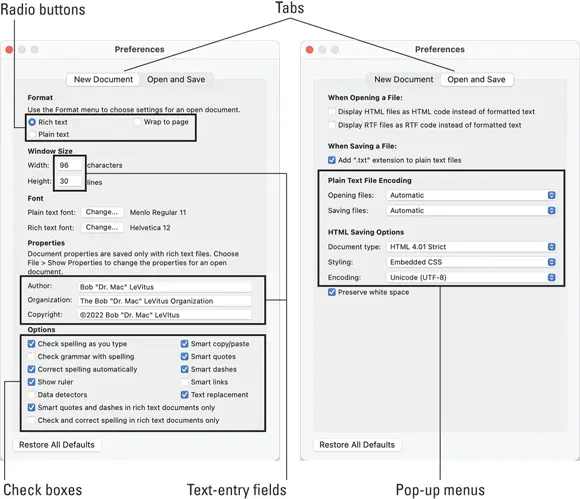
FIGURE 2-4:This Preferences window offers most of the dealie-boppers you’re ever likely to encounter.
I couldn’t find a dialog or window that included all the aforementioned dealie-boppers as well as the one other dealie-bopper you should become familiar with, the disclosure triangle. If you see a triangle in a dialog or sheet, try clicking it. If it’s a disclosure triangle, it will reveal additional options (or its contents if it’s a folder in Finder’s List view, as you see in Chapter 8).
 Some applications have tri-state check boxes (and no, I’m not talking geography here). These special check boxes are empty when nothing in the group is selected, sport an X when everything in the group is selected, and sport a minus sign (–) when some items in the group are selected and some are not.
Working with Windows
In the following sections, I give you a closer look at windows themselves: how you move them, size them, and use them. And although Monterey windows are similar to windows you’ve used in other versions of macOS (and even, dare I say it, Windows), you may just discover a new wrinkle or two.
 If you’re relatively new to the Mac, you may want to read this section while sitting at your computer, trying the techniques as you read them. Most people find it easier to remember something they've read if they actually do it. If you’ve been using your Mac for a while, you’ve probably figured out how windows work by now.
Opening and closing windows
To start peering into windows on your Mac, first you need to know how to open and close them. When you’re working in Finder, you can choose the following commands from the File menu. Note that you’ll probably find similar commands on the File menu of programs other than Finder.
You’ll use many of these commands frequently, so it would behoove you to memorize their keyboard shortcuts. If you’re not sure how keyboard shortcuts work, check out “ Using keyboard shortcut commands,” later in this chapter.
New Finder Window (⌘ +N): Opens a new Finder window. In other programs, ⌘ +N might open a new document, project, or whatever that program helps you create.
Open (⌘ +O): Opens the selected item, be it an icon, a window, or a folder.
Close Window (⌘ +W): Closes the active window. If no windows are open or if no window is selected, the Close Window command appears dimmed and can’t be chosen. Or if you prefer, you can close a window by clicking the red Close button in the top-left corner. If you hold down the Option key with the File menu open, the Close Window command changes to Close All. This useful command enables you to close all open Finder windows. But it shows up only when you press the Option key or use its keyboard shortcut (⌘ +Option+W); otherwise, it remains hidden. Note that several other commands in the File menu transmogrify when you press the Option key. It would be off topic to get into them here, but here’s a tip: Press the Option key, and browse all Finder menus. At least a dozen useful commands appear only when the Option key is pressed. Press it early and often for hidden (often time-saving) commands.
Resizing windows and window panes
If you want to see more (or less) of what’s in a window, just hover the pointer over any edge or corner and drag. When the cursor turns into a little double-headed arrow, click and drag to resize the window.
 Display windows, like those in Finder, frequently consist of multiple panes. For example, in a Finder window, note the thin line that divides the sidebar pane on the left from the contents pane on the right. When your mouse pointer hovers over the thin line, the cursor changes to a vertical bar (or it could be horizontal if the panes are one above the other) with little arrows pointing out of both sides, as shown in the margin.
When you see this cursor, you can click and drag anywhere in the dividing line that separates the sidebar from the rest of the window. Doing so resizes the two panes relative to each other; one gets larger and one gets smaller.
Читать дальшеИнтервал:
Закладка:
Похожие книги на «macOS Monterey For Dummies»
Представляем Вашему вниманию похожие книги на «macOS Monterey For Dummies» списком для выбора. Мы отобрали схожую по названию и смыслу литературу в надежде предоставить читателям больше вариантов отыскать новые, интересные, ещё непрочитанные произведения.


Обсуждение, отзывы о книге «macOS Monterey For Dummies» и просто собственные мнения читателей. Оставьте ваши комментарии, напишите, что Вы думаете о произведении, его смысле или главных героях. Укажите что конкретно понравилось, а что нет, и почему Вы так считаете.