Bob LeVitus - macOS Monterey For Dummies
Здесь есть возможность читать онлайн «Bob LeVitus - macOS Monterey For Dummies» — ознакомительный отрывок электронной книги совершенно бесплатно, а после прочтения отрывка купить полную версию. В некоторых случаях можно слушать аудио, скачать через торрент в формате fb2 и присутствует краткое содержание. Жанр: unrecognised, на английском языке. Описание произведения, (предисловие) а так же отзывы посетителей доступны на портале библиотеки ЛибКат.
- Название:macOS Monterey For Dummies
- Автор:
- Жанр:
- Год:неизвестен
- ISBN:нет данных
- Рейтинг книги:5 / 5. Голосов: 1
-
Избранное:Добавить в избранное
- Отзывы:
-
Ваша оценка:
macOS Monterey For Dummies: краткое содержание, описание и аннотация
Предлагаем к чтению аннотацию, описание, краткое содержание или предисловие (зависит от того, что написал сам автор книги «macOS Monterey For Dummies»). Если вы не нашли необходимую информацию о книге — напишите в комментариях, мы постараемся отыскать её.
is your personal roadmap to finding every single awesome new bell and whistle in this world-famous operating system.
You’ll read about upgrades to the accessibility options, how to use Live Text to grab text from all of your photos, manage your iPhone from your Mac and vice versa, and use the new Universal Control to seamlessly transition between Apple devices.
You can also:
Learn how to watch TV or a movie with friends while you’re on a FaceTime call Explore the new “Shared With You” feature so you can access the content people send to you directly in the relevant app Explore the online world with the Safari browser included with every installation of MacOS Monterey Perfect for anyone who wants to take full advantage of the latest version of Apple’s intuitive and user-friendly operating system,
is the fastest, easiest way to master the newest features and the coolest capabilities included with macOS Monterey. With hundreds of pages of simple instructions and images of the macOS interface, this is the last handbook you’ll need to make the most of the newest macOS.
macOS Monterey For Dummies — читать онлайн ознакомительный отрывок
Ниже представлен текст книги, разбитый по страницам. Система сохранения места последней прочитанной страницы, позволяет с удобством читать онлайн бесплатно книгу «macOS Monterey For Dummies», без необходимости каждый раз заново искать на чём Вы остановились. Поставьте закладку, и сможете в любой момент перейти на страницу, на которой закончили чтение.
Интервал:
Закладка:
System Preferences: Choose this item to open the System Preferences app (which I discuss further in Chapter 6and elsewhere).
App Store: Choose this item to launch the Mac App Store app.
Recent Items: This option lets you quickly access applications, documents, and servers you’ve used recently, as shown previously in Figure 2-9.
Force Quit: Use this option only in emergencies. What’s an emergency? Use it when an application becomes recalcitrant or otherwise misbehaves or refuses to quit when you say Quit. Memorize the keyboard shortcut for Force Quit (⌘ +Option+Esc). Sometimes a program gets so badly hosed that you can’t click anywhere and other keyboard shortcuts won’t do anything at all. It doesn’t happen often, nor does it happen to everyone. If it should happen to you, calmly press the magic key combo you memorized (⌘ +Option+Esc), and the Force Quit Applications dialog (usually) appears. Click the name of the program that’s acting up and then click the Force Quit button or press the Return key to make the balky application stop balking. The reason Force Quit should be used only in an emergency is that if you use it on an application that’s working fine and have any unsaved documents, your work since the last time you saved the file will be blown away.Or not. The Auto Save and Versions features are still the default for Apple’s own applications. You read more about these features in Chapter 7; if the app you’re using supports Auto Save features, you shouldn’t lose much (if any) work regardless of when you last saved.
Shut Down options: These five commands do exactly what their names imply: Sleep: Puts your Mac into an energy-efficient state of suspended animation. See the section about Energy Saver in Chapter 23for details on the Energy Saver System Preferences pane and sleeping. Restart: Quits all open programs and restarts your Mac. It’s quite polite about this task, asking if you want to save any unsaved changes in open documents before complying. Shut Down: Turns off your Mac. Refer to Chapter 1for details. Lock Screen (⌘ +Control+Q): Locks your screen instantly, and then requires your account password to unlock it. Log Out (⌘ +Shift+Q): Quits all open programs and logs you out. Again, your Mac will be ever so polite, asking if you want to save unsaved changes in open documents before complying. When it’s done, the login screen appears.
Using keyboard shortcut commands
Most menu items, or at least the most common ones, have keyboard shortcuts to help you quickly navigate your Mac without having to haggle so much with the mouse. Using these key combinations activates menu items without using the mouse; to use them, you press the Command (⌘ ) key and then press another key (or keys) without releasing the ⌘ key. Memorize the shortcuts that you use often.
Learn how to change keyboard shortcuts and even how to create ones of your own in Chapter 6.
 Some people refer to the Command key as the Apple key. That’s because on many keyboards that key has both the pretzel-like Command key symbol (⌘ ) and an Apple logo (
  ) on it. To avoid confusion, I always refer to ⌘ as the Command key.
Chapter 3
What’s Up, Dock?
IN THIS CHAPTER
 Getting to know the dock
Discovering the default dock icons
Talkin’ trash
Checking out dock icons and their menus
Delving into dock customization
The dock appears at the bottom of your screen by default, providing quick access to your most often-used applications, documents, and folders.
 Some users prefer to have the dock located on the left or right side of the screen instead of at the bottom. You see how to relocate your dock (and more) in the coming pages.
Folder icons on the dock are called stacks, which display their contents as your choice of a fan, a grid, or a list when clicked.
Other icons on the dock open an application or document with one click.
The dock is your friend. It’s a great place to put files, folders, and apps you use a lot so that they’re always just one click away.
A dock icon is merely a pointer (also known as an alias or a shortcut ) to applications, documents, and folders stored on your hard drive. So, you can add and remove icons from your dock (as you discover shortly) without affecting the actual applications, documents, and folders. Don’t be shy about adding items you use often as well as removing items you don’t use.
A Quick Introduction to Your Dock
Take a minute to look at the row of icons at the bottom of your display. That row, gentle reader, is the dock (shown in Figure 3-1), and those individual pictures are known as icons (which I discuss in greater detail momentarily). Note that I chopped the dock in Figure 3-1 into two pieces (with the left half on top) to make the icons bigger and easier to see.
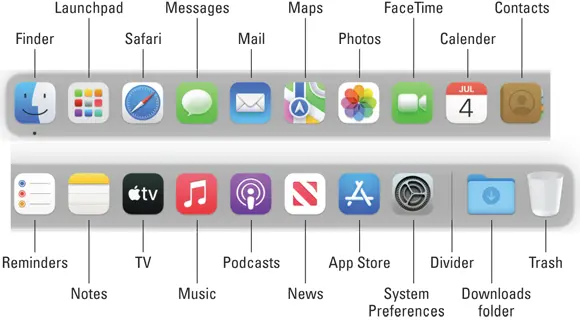
FIGURE 3-1:The dock and all its default icons.
Icons in the dock and Launchpad (see Chapter 10) are odd ducks; you activate them with a single click. Just remember that almost all other Finder icons are selected (highlighted) when you single-click them and opened only when you double-click them.
Here’s the rundown on what happens when you click dock icons:
If it’s an application icon, the application opens and becomes active. If the application is already open, it becomes active, which brings its menu and all its windows to the front.
If it’s a document icon, that document opens in its appropriate application, which becomes the active application. If that application is already open, it becomes the active application with this document in the front. If the item is an application or document and is already open when you click its dock icon, the app or document becomes active.
If it’s a folder icon or disk icon, a stack, fan, or grid with its contents appears so you can choose an item. If you choose Show in Finder from this menu, the folder’s window opens in Finder.
The default icons of the dock
Интервал:
Закладка:
Похожие книги на «macOS Monterey For Dummies»
Представляем Вашему вниманию похожие книги на «macOS Monterey For Dummies» списком для выбора. Мы отобрали схожую по названию и смыслу литературу в надежде предоставить читателям больше вариантов отыскать новые, интересные, ещё непрочитанные произведения.


Обсуждение, отзывы о книге «macOS Monterey For Dummies» и просто собственные мнения читателей. Оставьте ваши комментарии, напишите, что Вы думаете о произведении, его смысле или главных героях. Укажите что конкретно понравилось, а что нет, и почему Вы так считаете.