Bob LeVitus - Office 2021 for Macs For Dummies
Здесь есть возможность читать онлайн «Bob LeVitus - Office 2021 for Macs For Dummies» — ознакомительный отрывок электронной книги совершенно бесплатно, а после прочтения отрывка купить полную версию. В некоторых случаях можно слушать аудио, скачать через торрент в формате fb2 и присутствует краткое содержание. Жанр: unrecognised, на английском языке. Описание произведения, (предисловие) а так же отзывы посетителей доступны на портале библиотеки ЛибКат.
- Название:Office 2021 for Macs For Dummies
- Автор:
- Жанр:
- Год:неизвестен
- ISBN:нет данных
- Рейтинг книги:5 / 5. Голосов: 1
-
Избранное:Добавить в избранное
- Отзывы:
-
Ваша оценка:
Office 2021 for Macs For Dummies: краткое содержание, описание и аннотация
Предлагаем к чтению аннотацию, описание, краткое содержание или предисловие (зависит от того, что написал сам автор книги «Office 2021 for Macs For Dummies»). Если вы не нашли необходимую информацию о книге — напишите в комментариях, мы постараемся отыскать её.
Office 2021 For Macs For Dummies.
Office 2021 For Macs For Dummies
Office 2021 for Macs For Dummies — читать онлайн ознакомительный отрывок
Ниже представлен текст книги, разбитый по страницам. Система сохранения места последней прочитанной страницы, позволяет с удобством читать онлайн бесплатно книгу «Office 2021 for Macs For Dummies», без необходимости каждый раз заново искать на чём Вы остановились. Поставьте закладку, и сможете в любой момент перейти на страницу, на которой закончили чтение.
Интервал:
Закладка:
Draft view
Draft view, shown in Figure 4-5, is the view formerly known as normal view. It’s your quick-and-dirty “just get it done” view, useful for basic typing and editing tasks, or for any time you don’t need text to appear in What You See Is What You Get (WYSIWYG) form on your screen. This view is the one that many Word jockeys prefer for completing most tasks.
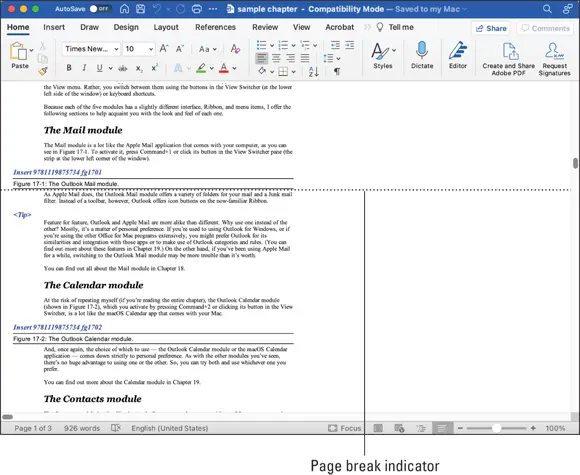
FIGURE 4-5:Draft view is the simplest view.
Note that the page break between pages 1 and 2 is denoted only by a thin dotted line. Compare Figure 4-5 to Figure 4-2, which also shows a WYSIWYG view.
 The older and slower your Mac’s processor, the faster draft view feels in comparison with layout views like Print Layout — another reason to consider using this view most of the time.
Focus view
We’ve tested word-processing and other types of writing programs that help people focus on work by blacking out everything on the screen except the document. We like the feature, but after using Word for so long, no other writing program felt right.
So you can understand why Word’s focus view, shown in Figure 4-6, has become a favorite view for many Word aficionados.
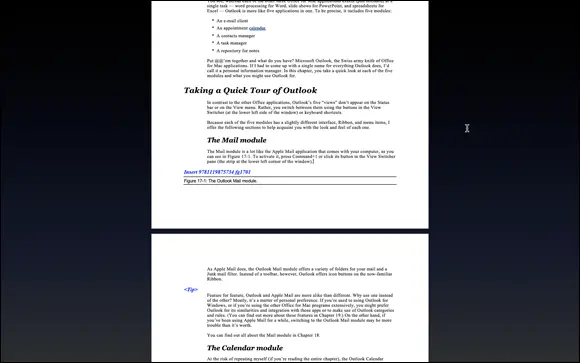
FIGURE 4-6:Focus view shows your document and little to nothing else.
See what we mean? You see nothing but the document — as shown in Figure 4-6. And as you can see, Word uses dark mode when in focus view.
Plus, the focus view is available in combination with other viewing formats. Simply select Draft, Outline, Web Layout, or Print Layout by clicking their respective icons in the bottom right of the window or by selecting them from the View menu or View tab on the ribbon. While in focus view, you’ll need to hover your cursor near the very bottom of the screen to see the view icons (see Figure 4-7).
You can enable or disable Focus in the following ways:
Press ⌘ +Control+Shift+F on your keyboard (you might find it easier to use two hands).
Click the Focus icon at the bottom of your document window.
Press the Escape (esc) key on your keyboard.
Click the Exit button in the upper left of the document window.
Choose View ⇒ Focus.

FIGURE 4-7:The toolbar and ribbon are accessed by hovering the cursor near the top of the screen.
 Hover the cursor at the top of the screen to reveal the toolbar and ribbon.
Full screen view
Full screen view is exactly as advertised — it displays the Word document in which you’re currently working across the entire expanse of your screen’s real estate. This view removes any other distractions on your screen, such as the dock or the Music app’s MiniPlayer.
You can enable or disable full screen view by
Pressing Fn F on your keyboard (or ⌘ +Control+F if your keyboard doesn’t have Fn keys)
Clicking the green dot in the upper-left corner of the document window
Pressing the Escape (esc) key on your keyboard
Choosing View ⇒ Enter (or Exit) Full Screen
If you need to see the items and menus in the toolbar, hover the cursor at the top of the screen to reveal them.
Immersive reader view
Immersive reader view is a unique reading and listening experience with several tools and tricks to help you access a document's contents with ease. Options such as Column Width and Read Aloud make it simple (and dare we say a bit fun) to read documents in Word.
To enable immersive reader view, which is shown in Figure 4-8, click the View tab on the ribbon and then click the Immersive Reader icon.
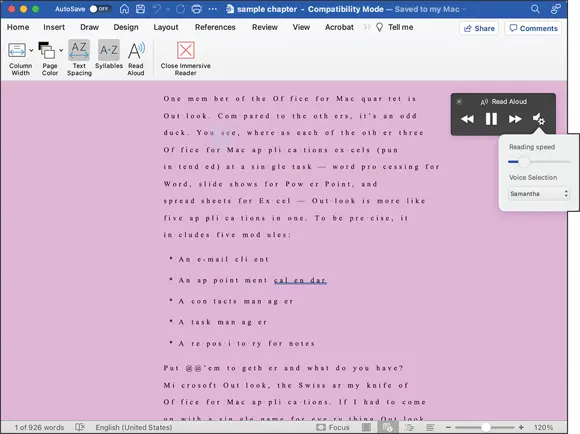
FIGURE 4-8:Immersive reader view with several of its tools activated.
The Immersive Reader tab on the ribbon has the following tools:
Column Width: Select the column width. Figure 4-8 displays a Moderate column width.
Page Color: Select from a range of page background colors. Orchid was selected for Figure 4-8.
Text Spacing: Increase the text's legibility by adding extra space between the characters and using a clean font. Enable Text Spacing is shown in Figure 4-8.
Syllables: Display break points in words to indicate syllables, as shown in Figure 4-8.
Read Aloud: Click to have Word read the text aloud and open the Read Aloud playback controls, shown in Figure 4-8. Click the gear icon to select a different playback speed and use a different voice. The word being read is highlighted as the reading progresses so that you can follow along visually.
Close Immersive Reader: Exit immersive reader view and return to the previous view you were using.
Remember that immersive reader view is meant to be a help, not a hindrance. If some of its options or tools disrupt your reading experience, you aren’t obliged to use them.
Zoom, zoom, zoom
You can make elements onscreen look bigger or smaller. There are three ways to zoom in or out of your document:
Click the Zoom icon in the View ribbon to open the Zoom dialog.
Choose View ⇒ Zoom and select an option from the list.
Use the zoom slide control in the lower-right corner of windows in Draft, Outline, Web Layout, and Print Layout mode.
All three are shown in Figure 4-9.
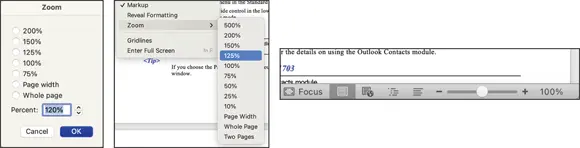
FIGURE 4-9:Use the Zoom dialog (left), Zoom menu (middle), or zoom slide control (right) all to enlarge or reduce onscreen elements.
If you choose the Page Width option in the Zoom dialog or Zoom menu, your text grows and shrinks automatically as you resize the window. Remember, though, that it’s the zoom that’s changing, not your font size.
Getting around in Your Document
When you begin filling your formerly blank Word document with text and images, which you can find out how to do in Chapter 5, it’s good to know how to move around effectively within the file. This section tells you how to do just that, using the mouse, trackpad, and keyboard keys. (Most people use a combination.)
A scroll new world: Navigating by using the mouse or trackpad
One way to move around in your document is to use the scroll bars and scroll arrows that appear at the sides and bottom of the Word window, as shown in Figure 4-10.
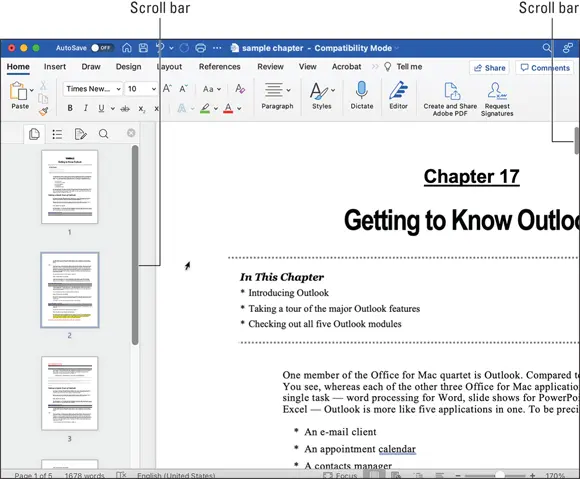
FIGURE 4-10:Use scroll bars to get around in your document.
Читать дальшеИнтервал:
Закладка:
Похожие книги на «Office 2021 for Macs For Dummies»
Представляем Вашему вниманию похожие книги на «Office 2021 for Macs For Dummies» списком для выбора. Мы отобрали схожую по названию и смыслу литературу в надежде предоставить читателям больше вариантов отыскать новые, интересные, ещё непрочитанные произведения.


Обсуждение, отзывы о книге «Office 2021 for Macs For Dummies» и просто собственные мнения читателей. Оставьте ваши комментарии, напишите, что Вы думаете о произведении, его смысле или главных героях. Укажите что конкретно понравилось, а что нет, и почему Вы так считаете.