Bob LeVitus - Office 2021 for Macs For Dummies
Здесь есть возможность читать онлайн «Bob LeVitus - Office 2021 for Macs For Dummies» — ознакомительный отрывок электронной книги совершенно бесплатно, а после прочтения отрывка купить полную версию. В некоторых случаях можно слушать аудио, скачать через торрент в формате fb2 и присутствует краткое содержание. Жанр: unrecognised, на английском языке. Описание произведения, (предисловие) а так же отзывы посетителей доступны на портале библиотеки ЛибКат.
- Название:Office 2021 for Macs For Dummies
- Автор:
- Жанр:
- Год:неизвестен
- ISBN:нет данных
- Рейтинг книги:5 / 5. Голосов: 1
-
Избранное:Добавить в избранное
- Отзывы:
-
Ваша оценка:
Office 2021 for Macs For Dummies: краткое содержание, описание и аннотация
Предлагаем к чтению аннотацию, описание, краткое содержание или предисловие (зависит от того, что написал сам автор книги «Office 2021 for Macs For Dummies»). Если вы не нашли необходимую информацию о книге — напишите в комментариях, мы постараемся отыскать её.
Office 2021 For Macs For Dummies.
Office 2021 For Macs For Dummies
Office 2021 for Macs For Dummies — читать онлайн ознакомительный отрывок
Ниже представлен текст книги, разбитый по страницам. Система сохранения места последней прочитанной страницы, позволяет с удобством читать онлайн бесплатно книгу «Office 2021 for Macs For Dummies», без необходимости каждый раз заново искать на чём Вы остановились. Поставьте закладку, и сможете в любой момент перейти на страницу, на которой закончили чтение.
Интервал:
Закладка:
Another thing to know about Office app menus is that an item that ends with an ellipsis ( … ) opens a dialog rather than performs an action immediately. Nothing happens unless or until you click OK or another action button. When you click OK, the appropriate action is performed either on the selected text, at the insertion point, or to the entire document, depending on the menu command.
 If you accidentally choose a menu item that opens a dialog, either click the Cancel button or press the Esc key on your keyboard to dismiss the dialog without making any changes to your document.
An arrow on the right side of a menu item, such as the ones next to Insert, Delete, and Select on Word’s Table menu, shown in Figure 3-1, means that you see a submenu when you select that item.
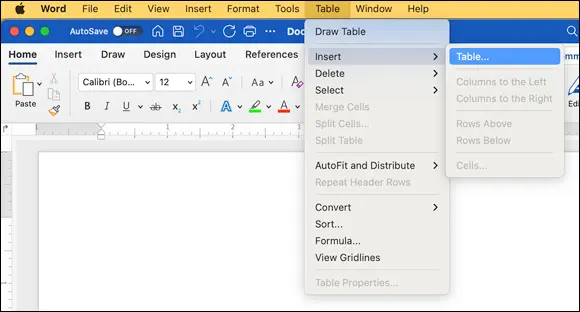
FIGURE 3-1:An arrow indicates that a menu item has a submenu; dimmed text indicates that an item isn’t available now.
When an item on a menu is dimmed, such as Split Table, Merge Cells, and Split Cells on the Table menu (refer to Figure 3-1), you can’t select the item because that command isn’t available at this time.
Why would an item be unavailable? In Figure 3-1, the items that are dimmed are available only when you’ve placed a table in your document and either the table is selected or the insertion point is somewhere in the table.
If you see a dimmed menu command, look at your document and ask yourself why it’s dim. Usually, the answer is a logical one, such as the command works only on a table or requires a text selection.
Toolbars, Ribbons, and Panes: Think “Visual” Menus
The big three Office apps (Word, Excel, and PowerPoint) offer at least one toolbar, one pane, and the ribbon (Outlook employs only a toolbar and the ribbon). Think of all three as visual menus. They make tasks easier and more convenient because you don’t have to remember a command name or which menu it’s on. Instead, you click a button or pull down a menu to execute the command.
Furthermore, some items on ribbons, toolbars, and panes can do more than meets the eye. You start with a look at how some of these items which may appear on ribbons, toolbars, and panes, work.
We flipped a coin and PowerPoint won, so it’s the PowerPoint ribbons, toolbars, and panes you see in the next section. We cover the specific items in them later in this book; for now, we introduce you to them and show you a bit about how they work.
The Quick Access toolbar
Word, Excel, PowerPoint, and Outlook all include the Quick Access toolbar, which provides super quick access (as its name implies) to common commands.
The Quick Access toolbar, shown in Figure 3-2, appears by default at the top of every document window. It can’t be moved or resized, so it’s said to be docked.
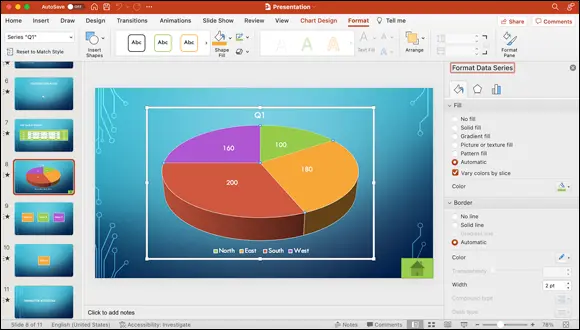
FIGURE 3-2:The Quick Access toolbar, shown here in PowerPoint.
To find out what any button on a toolbar does (or on a ribbon or pane, for that matter), move the mouse cursor directly over it and then don’t move the cursor for a few seconds. The button’s name then appears in the little tooltip box .
Reveling in the ribbon
Think of a ribbon as a group of context-sensitive toolbars designed to make your life easier. Each ribbon has multiple tabs; each tab contains tools suited for specific tasks.
You can, of course, click any tab to activate it, but the ribbon is context-sensitive. Note in Figure 3-2 that the PowerPoint ribbon has 11 tabs, including Home, Transitions, Animations, Chart Design, and Format. That’s because a chart in one of the slides is selected; were the chart not selected, you wouldn’t see the Chart Design and Format tabs.
Compare this ribbon with the one shown in Figure 3-3, where we've selected a text box instead of a chart. Note that the new tab, Shape Format, now appears on the ribbon and that the Format tab and the Chart Design tab have been removed, indicating that we’re no longer working with a selected chart but are working with a text box.
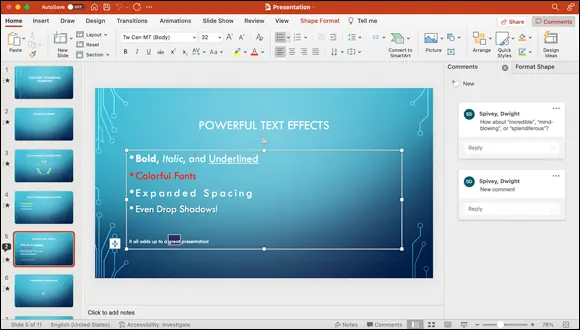
FIGURE 3-3:Notice the Chart Design and Format tabs on the ribbon have been replaced with the Shape Format tab.
Click the tab that’s already selected on the ribbon to hide it and leave only its tabs showing. You can also choose View ⇒ Ribbon on the menu at the top of the screen to toggle between hiding and showing ribbon tabs.
That’s really all you need to know to get started with ribbons. Trust us, there’s much more to come throughout the rest of the book.
You can add or delete commands from the preconfigured tabs and menus or create your own custom tabs from scratch. We show you just how to do so for each app in the coming chapters.
Panes are anything but a pain
In addition to toolbars, Word, Excel, and PowerPoint have numerous panes, which are basically like windows within the main window of your document, workbook, or slide. In PowerPoint, for example, some of these panes include Comments, Format Shape, Design Ideas, Format Picture, and Stock Images.
Each pane opens on the right side of the current window; you can have multiple panes open at once, with each one represented by a tab that you can select to navigate between them . Most panes have a number of panels, often nested within subtabs, that you can hide or disclose by clicking the little arrow to the left of their names. To close a pane, click the x in its upper-right corner (or on the pane’s tab if multiple panes are open).
In Figure 3-4, the Format Picture pane (in PowerPoint) is displaying its tabs — Fill & Line, Effects, Size & Properties, and Picture, each represented with an icon — with the Picture tab selected. The Picture Color panel is open, or disclosed; note that the gray arrow to the left of its name points downward. The three other panels — Picture Corrections, Picture Transparency, and Crop — are closed, so their disclosure arrows point to the right rather than down.
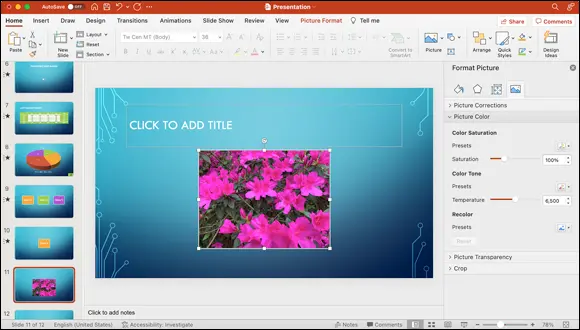
FIGURE 3-4:The Format Picture pane has multiple tabs you can use to work with your selected image.
We discuss various panes, subtabs, and panels throughout the rest of this tome, but because describing every item on every menu, pane, or ribbon tab is beyond the purview of this book, we urge you to take a few minutes to familiarize yourself with the items on each one in all the Office apps.
Читать дальшеИнтервал:
Закладка:
Похожие книги на «Office 2021 for Macs For Dummies»
Представляем Вашему вниманию похожие книги на «Office 2021 for Macs For Dummies» списком для выбора. Мы отобрали схожую по названию и смыслу литературу в надежде предоставить читателям больше вариантов отыскать новые, интересные, ещё непрочитанные произведения.


Обсуждение, отзывы о книге «Office 2021 for Macs For Dummies» и просто собственные мнения читателей. Оставьте ваши комментарии, напишите, что Вы думаете о произведении, его смысле или главных героях. Укажите что конкретно понравилось, а что нет, и почему Вы так считаете.