Bob LeVitus - Office 2021 for Macs For Dummies
Здесь есть возможность читать онлайн «Bob LeVitus - Office 2021 for Macs For Dummies» — ознакомительный отрывок электронной книги совершенно бесплатно, а после прочтения отрывка купить полную версию. В некоторых случаях можно слушать аудио, скачать через торрент в формате fb2 и присутствует краткое содержание. Жанр: unrecognised, на английском языке. Описание произведения, (предисловие) а так же отзывы посетителей доступны на портале библиотеки ЛибКат.
- Название:Office 2021 for Macs For Dummies
- Автор:
- Жанр:
- Год:неизвестен
- ISBN:нет данных
- Рейтинг книги:5 / 5. Голосов: 1
-
Избранное:Добавить в избранное
- Отзывы:
-
Ваша оценка:
Office 2021 for Macs For Dummies: краткое содержание, описание и аннотация
Предлагаем к чтению аннотацию, описание, краткое содержание или предисловие (зависит от того, что написал сам автор книги «Office 2021 for Macs For Dummies»). Если вы не нашли необходимую информацию о книге — напишите в комментариях, мы постараемся отыскать её.
Office 2021 For Macs For Dummies.
Office 2021 For Macs For Dummies
Office 2021 for Macs For Dummies — читать онлайн ознакомительный отрывок
Ниже представлен текст книги, разбитый по страницам. Система сохранения места последней прочитанной страницы, позволяет с удобством читать онлайн бесплатно книгу «Office 2021 for Macs For Dummies», без необходимости каждый раз заново искать на чём Вы остановились. Поставьте закладку, и сможете в любой момент перейти на страницу, на которой закончили чтение.
Интервал:
Закладка:
Don’t be shy to avail yourself of Microsoft’s support system if you need a helping hand or a bit of good advice from time to time (or every day, for that matter).
Part 2
Mastering Microsoft Word
IN THIS PART …
Start with the most basic of basics by navigating in a Word document by mouse and by keyboard and seeing how to best use Word’s various views.
Practice the tasks most people spend the majority of their time performing in Word: formatting, moving, and modifying text and images.
Take advantage of Word’s tools for making your work look better — spelling and grammar checkers, a dictionary, a thesaurus, and more.
Explore more advanced word processing features, such as templates, headers, footers, tabs, margins, and indents, plus columns, lists, tables, boxes, and styles.
Create a table of contents, collaborate with other Word users, and print envelopes and labels.
Chapter 4
Getting to Know Microsoft Word
IN THIS CHAPTER
 Introducing word processing
Understanding the various ways to view your documents onscreen
Navigating documents by mouse or keyboard
Tips for shortening your learning curve
According to the dictionary built into Word’s own Smart Lookup tool, a word processor is
… a program or machine for storing, manipulating, and formatting text entered from a keyboard and providing a printout.
We’ve come a long way from the days of typewriters, when ensuring that you had clean, error-free, good-looking documents took a great deal of time and labor (and a wee bit of luck).
The word processor changed all that. Using a word processor, you can go back and change anything you’ve typed at any time you like. You can save documents and reuse or modify them later. You can use dozens of different font faces, sizes, and weights (though you should probably limit yourself to no more than a handful per document). You can change the size of margins; add, resize, or modify pictures and drawings; and create multiple columns or tables (grids) in your documents with just a few clicks or keystrokes.
In other words, a word processor gives you nearly complete control over the contents of a document and the way the document looks. With a word processor, you can do all of this (and more):
Save, reuse, and print documents you create or receive from others
View and edit multipage documents
Make unlimited changes to the contents and formatting of documents
Add images to documents
Search for specific words or phrases in documents
Check the spelling of every word in documents
In this chapter, we introduce the basic aspects of Microsoft Word (which is itself the gold standard of word processors), starting with the various views you can switch among so that you can work most effectively depending on the task at hand. Then it’s on to basic navigation using the mouse and keyboard. Finally, we share a pair of tips to make life easier when you add text and graphics to your documents in later chapters.
Using a Variety of Versatile Views
Word has many ways to look at your document: the print layout, web layout, outline, draft, focus, immersive reader, and full screen views. Word also has many ways to change the view, but some methods aren't available to all views:
View tab: Click an icon on the View tab to change to any of the views except full screen view.
View menu: Choose the View menu and then choose any view — except immersive reader view — by name. A check mark in front of a name indicates that the view is active.
Icons at the bottom of a document window: You can select five of these views — all except immersive reader and full screen — by clicking the appropriate icon at the bottom of any document window. See Figure 4-1.
To change the view of a document, choose the view by name from the View menu (a check mark in front of its name indicates that the view is active) or from the View tab.
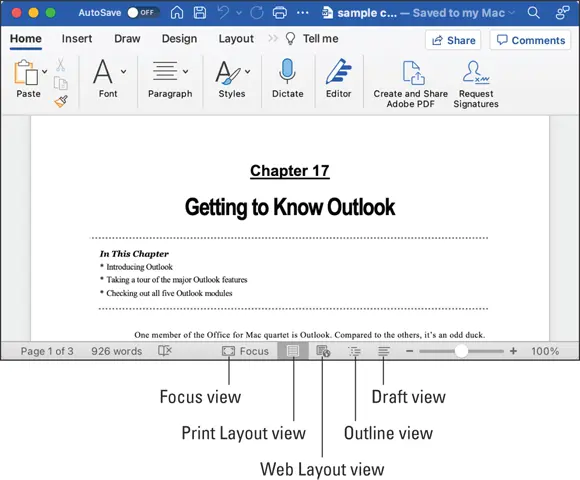
FIGURE 4-1:You can switch among these views by clicking their icons.
The following sections briefly describe each view.
Print layout view
Print layout view — which is Word’s default — is a What You See Is What You Get (WYSIWYG, pronounced “wiz-ee-wig”) view that shows you exactly what your printed document will look like, as shown in Figure 4-2.
Most users prefer to work in print layout view, but if your Mac is older or slower, you may be happier using draft view for composing and editing and then switching to print layout view just before printing a document.
Web layout view
Web layout view, shown in Figure 4-3, simulates the way your page will look when viewed in a web browser if you were to use Word’s File ⇒ Save As ⇒ Web Page command to save the page as an HTML document. The document has no page breaks because web pages have no page breaks. The text continues until the end of the page, regardless of the amount of text.
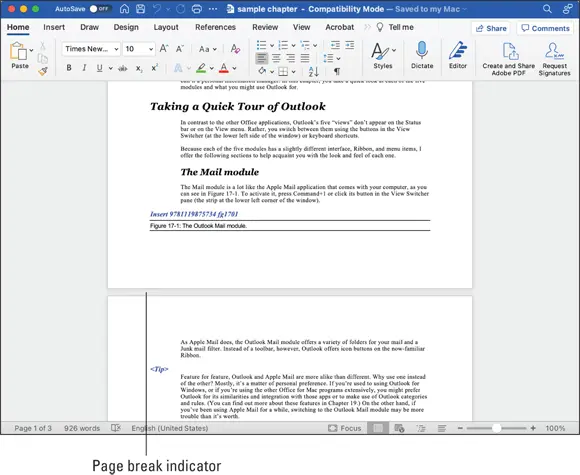
FIGURE 4-2:Print layout view shows exactly what your document will look like when printed.
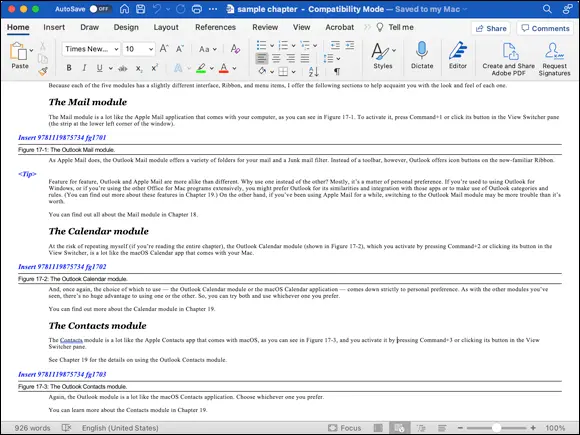
FIGURE 4-3:Web layout view displays your page as if it were in a web browser.
Also, note that the document in Figure 4-3 does not have left or right margins. That’s because text on web pages saved by Word fills the page from left to right. If you were to resize this window, the text would reflow, expanding or contracting so that each line is exactly the width of the window.
Outline view
Outline view, shown in Figure 4-4, is helpful for creating an outline or organizing a long document.
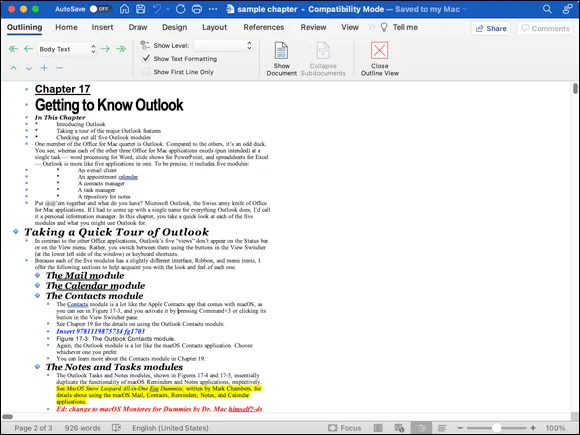
FIGURE 4-4:Outline view displays your document as an outline.
You can collapse and expand text below a heading or subheading in outline view by double-clicking the plus sign to its left; we’ve collapsed the text below the subheads “The Mail module” and “The Calendar module” in Figure 4-4. Note that these two subheads have plus signs to their left and are partially underlined. These visual cues indicate that both subheads have subordinate text or sub-subheads.
The other helpful feature of outline view is that you can drag a heading or subheading and the text below it to another location in your document by just clicking and dragging the plus sign, a feature that’s particularly convenient in longer documents.
Читать дальшеИнтервал:
Закладка:
Похожие книги на «Office 2021 for Macs For Dummies»
Представляем Вашему вниманию похожие книги на «Office 2021 for Macs For Dummies» списком для выбора. Мы отобрали схожую по названию и смыслу литературу в надежде предоставить читателям больше вариантов отыскать новые, интересные, ещё непрочитанные произведения.


Обсуждение, отзывы о книге «Office 2021 for Macs For Dummies» и просто собственные мнения читателей. Оставьте ваши комментарии, напишите, что Вы думаете о произведении, его смысле или главных героях. Укажите что конкретно понравилось, а что нет, и почему Вы так считаете.