Peter Weverka - Windows 10 For Seniors For Dummies
Здесь есть возможность читать онлайн «Peter Weverka - Windows 10 For Seniors For Dummies» — ознакомительный отрывок электронной книги совершенно бесплатно, а после прочтения отрывка купить полную версию. В некоторых случаях можно слушать аудио, скачать через торрент в формате fb2 и присутствует краткое содержание. Жанр: unrecognised, на английском языке. Описание произведения, (предисловие) а так же отзывы посетителей доступны на портале библиотеки ЛибКат.

- Название:Windows 10 For Seniors For Dummies
- Автор:
- Жанр:
- Год:неизвестен
- ISBN:нет данных
- Рейтинг книги:5 / 5. Голосов: 1
-
Избранное:Добавить в избранное
- Отзывы:
-
Ваша оценка:
Windows 10 For Seniors For Dummies: краткое содержание, описание и аннотация
Предлагаем к чтению аннотацию, описание, краткое содержание или предисловие (зависит от того, что написал сам автор книги «Windows 10 For Seniors For Dummies»). Если вы не нашли необходимую информацию о книге — напишите в комментариях, мы постараемся отыскать её.
, becoming familiarized with Windows 10 is a painless process. If you’re interested in learning the basics of this operating system without having to dig through confusing computer jargon, look no further.
This book offers a step-by-step approach that is specifically designed to assist first time Windows 10 users who are over-50, providing easy-to-understand language, large-print text, and an abundance of helpful images along the way!
Protect your computer Follow friends and family online Use Windows 10 to play games and enjoy media Check your security and maintenance status Step-by-step instructions are provided to ensure that you don't get lost at any point along the way.
Windows 10 For Seniors For Dummies — читать онлайн ознакомительный отрывок
Ниже представлен текст книги, разбитый по страницам. Система сохранения места последней прочитанной страницы, позволяет с удобством читать онлайн бесплатно книгу «Windows 10 For Seniors For Dummies», без необходимости каждый раз заново искать на чём Вы остановились. Поставьте закладку, и сможете в любой момент перейти на страницу, на которой закончили чтение.
Интервал:
Закладка:
Change App Settings
1 On the Start screen, select the Weather tile if the Weather app isn’t open already.
2 In the Weather app, select the Settings button on the app bar. The Settings screen appears, as shown in Figure 2-13. Settings is the bottommost option on the app bar. If you have trouble locating it, select the Show Options button, the topmost button on the app bar, to see the buttons on the app bar. FIGURE 2-13It may be hard to remember whether you need the Settings panel or the app bar to do something. In general, functions on the app bar are used more frequently than those on the Settings panel. When in doubt, guess — that’s how discoveries are made.
3 Choose whether to show air temperatures in Fahrenheit or Celsius.
4 Choose a Launch Location option. The Always Detect My Location option tells the Weather app to note by way of your Internet connection where you are currently and give the weather report for that place. Select Default Location and enter the name of the place where you live if you want to receive weather forecasts for that place.
 Select Privacy Statement in the Settings window if you’re interested in how Microsoft collects data about you when you use Weather and other apps made by Microsoft. You see a page clotted with legalese and other obfuscations.
Changes to settings take effect immediately. You don’t have to save or activate your changes.
Search for a Desktop App
1 Open the Start screen: Click the Windows button in the lower-left corner of the desktop or press .
2 In the Search box (you find it to the right of the Windows button), type calc (the first four letters of the word calculator ). The Search panel appears on the left side of the screen, as shown in Figure 2-14. To begin with, the Search panel lists what it thinks are the best matches for the term you entered. You can search for just about anything from the Search box. FIGURE 2-14Select a menu item at the top of the Search panel (refer to Figure 2-14) to redirect your search. For example, select Documents to search for files on your computer; select Web to search the web. You can select More to open a drop-down menu and search for any number of things, including folders, music files, photos, and videos.
3 Type ulator to finish typing the word calculator. The Search panel lists only items with the complete word calculator in them, including the Calculator app.
4 Select the Calculator app to open it on the desktop, as shown in Figure 2-15. To perform a calculation, select the buttons on the screen or use a keyboard. FIGURE 2-15
5 Return to the Start screen: Click the Windows button in the lower-left corner of the desktop or press .
6 Type calculator again in the Search box. Again, the Search panel appears, and the Calculator app appears at the top of the Search panel (refer to Figure 2-14).
7 Display the context menu on the Calculator app and choose Pin to Start on the context menu, as shown in Figure 2-16. (If Unpin from Start appears on the context menu, the Calculator tile is already on the Start screen; disregard this step.) Use one of these techniques to display the context menu:Mouse: Right-click Calculator in the Search panel.Touchscreen: Touch and hold Calculator in the Search panel until the context menu appears, and then release your finger.
8 Open the Start screen and note where the Calculator tile appears. You can open the Calculator by selecting this tile.
To remove a tile from the Start screen, display its context menu and select Unpin from Start.
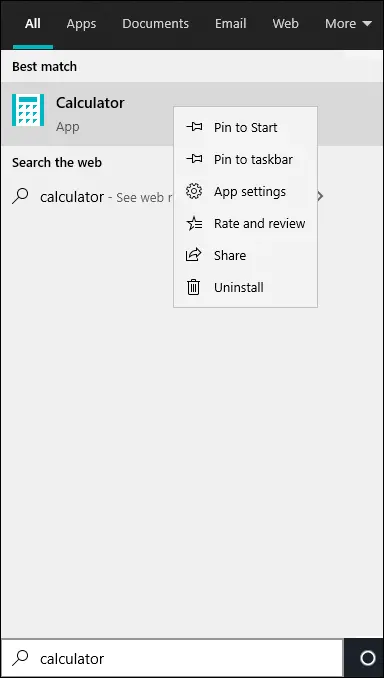
FIGURE 2-16
Arrange and Group Apps on the Start Screen
1 You can rearrange tiles on the Start screen by dragging them to different places. On the Start screen, drag the Calculator tile to a different location. As you move the tile, other tiles move out of the way, like a game of Dodge Tile.
2 To start with, the Start screen places tiles in one of two groups: Life at a Glance and Play and Explore. You can find these group names at the top of the start screen. Tap or click the words Play and Explore to change the name of the Play and Explore group. A text box appears, as shown in Figure 2-17. Enter a new name here (or keep the old name) and press Enter. FIGURE 2-17
3 Create a new group for Calculator by dragging the Calculator tile to the lower-right corner of the Start screen so that it's separate from other tiles. Then gently drag the pointer above the Calculator tile. The words Name group and two horizontal lines appear after you stop dragging, as shown in Figure 2-18, top.
4 Tap or click after you see the two vertical lines. A text box appears, as shown in Figure 2-18, middle. You just created a new group with Calculator as the tile.
5 Type a name for the group into the text box, as shown in Figure 2-18, bottom. You can change the name at any time by repeating Steps 3 and 4. To remove the name, select the X to the right of the text box. Create groups to organize app tiles on the Start screen.
6 Use one of the following methods to open the context menu on the Calculator tile:Mouse: Position the pointer over the tile and right-click. (A left click would open the app.)Touchscreen: Swipe slightly down or up on the tile. (A direct tap would open the app.)Change the size of the Calculator tile. On the context menu, select Resize and then select the Wide option on the submenu, as shown in Figure 2-19.(The options you see on a touchscreen are the same, but are arranged differently on the context menu.) As well as the Wide, Medium, and Small options, Windows 10 provides a Large option for some tiles. Choose the Large or Wide resize option for apps you use often. The larger the tile, the easier it is to find on the Start screen.
7 Locate a tile on the Start screen that doesn’t need to be there. Then select the tile and select Unpin from Start on the context menu to remove the tile from the Start screen. (See Step 6 if you need instructions for displaying the context menu.) The Start screen becomes more useful and personal when you eliminate tiles that you don’t need and arrange tiles to suit your sense of order.
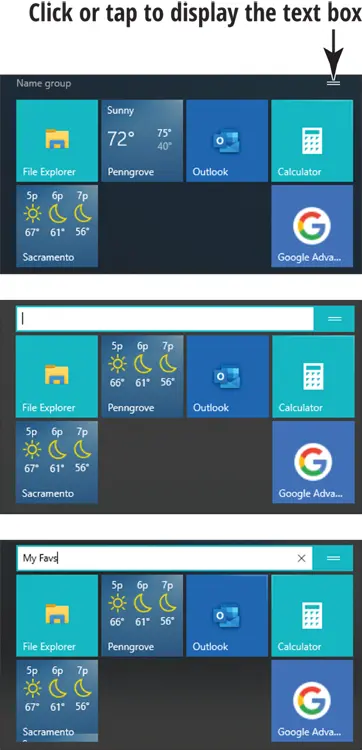
FIGURE 2-18
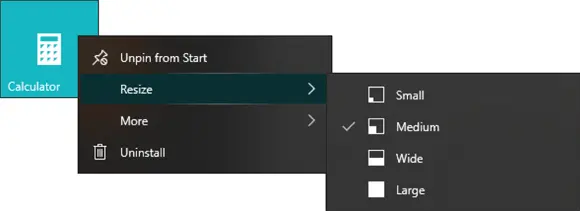
FIGURE 2-19
Конец ознакомительного фрагмента.
Интервал:
Закладка:
Похожие книги на «Windows 10 For Seniors For Dummies»
Представляем Вашему вниманию похожие книги на «Windows 10 For Seniors For Dummies» списком для выбора. Мы отобрали схожую по названию и смыслу литературу в надежде предоставить читателям больше вариантов отыскать новые, интересные, ещё непрочитанные произведения.


Обсуждение, отзывы о книге «Windows 10 For Seniors For Dummies» и просто собственные мнения читателей. Оставьте ваши комментарии, напишите, что Вы думаете о произведении, его смысле или главных героях. Укажите что конкретно понравилось, а что нет, и почему Вы так считаете.