Sean McManus - Raspberry Pi For Dummies
Здесь есть возможность читать онлайн «Sean McManus - Raspberry Pi For Dummies» — ознакомительный отрывок электронной книги совершенно бесплатно, а после прочтения отрывка купить полную версию. В некоторых случаях можно слушать аудио, скачать через торрент в формате fb2 и присутствует краткое содержание. Жанр: unrecognised, на английском языке. Описание произведения, (предисловие) а так же отзывы посетителей доступны на портале библиотеки ЛибКат.
- Название:Raspberry Pi For Dummies
- Автор:
- Жанр:
- Год:неизвестен
- ISBN:нет данных
- Рейтинг книги:3 / 5. Голосов: 1
-
Избранное:Добавить в избранное
- Отзывы:
-
Ваша оценка:
Raspberry Pi For Dummies: краткое содержание, описание и аннотация
Предлагаем к чтению аннотацию, описание, краткое содержание или предисловие (зависит от того, что написал сам автор книги «Raspberry Pi For Dummies»). Если вы не нашли необходимую информацию о книге — напишите в комментариях, мы постараемся отыскать её.
Raspberry Pi For Dummies explores the latest technology—the Raspberry Pi 4 and 400, Scratch 3 programming language, new games bundled with the Raspberry Pi, and the hottest Add-Ons out there. This introductory guide is the perfect place to start if you want to get a taste of everything the Raspberry Pi can do!
Set up your Raspberry Pi, install the operating system, and connect to the Internet Learn the basics of the Linux desktop and Linux shell so you can program, work, and play Use Python, Scratch, and Sonic Pi to write your first programs and make games and digital music Discover how circuits work hand-in-hand with your Pi If you want to make the most of the Raspberry Pi for school, work, or play, you’ll love this easy-to-read reference.
Raspberry Pi For Dummies — читать онлайн ознакомительный отрывок
Ниже представлен текст книги, разбитый по страницам. Система сохранения места последней прочитанной страницы, позволяет с удобством читать онлайн бесплатно книгу «Raspberry Pi For Dummies», без необходимости каждый раз заново искать на чём Вы остановились. Поставьте закладку, и сможете в любой момент перейти на страницу, на которой закончили чтение.
Интервал:
Закладка:
4 Connect a composite video screen.If your TV has an HDMI socket, use that socket for optimal results. Alternatively, you can use the composite video socket if your Raspberry Pi has a socket. On the original Model A and B, it’s a round, yellow-and-silver socket. On later (and current) models, it’s the same socket as the audio output. You’ll need to use a special RCA cable for this socket — you can’t just connect an audio cable. Connect one end of your RCA cable to the socket and the other end to the Video In socket on your TV, which is likely to be silver and yellow.You may need to use your TV’s remote control to switch your TV over to view the external signal coming from the Raspberry Pi. If you’re using HDMI on your TV, you may need to turn on the TV so that the Raspberry Pi can detect it when you switch it on.Note that the Pi Zero models do not have a composite video socket, but they do have composite video output. You can solder your own connector to the board where it’s labelled TV. For instructions, see https://magpi.raspberrypi.org/articles/rca-pi-zero .There is no composite video support on the Raspberry Pi 400.On a Raspberry Pi 4, you need to enable composite output. Enable enable_tvout=1 in config.txt. See the appendixof this book for guidance on editing config.txt. The easiest solution is to connect another screen temporarily to make this change.
5 Connect to the network.The Raspberry Pi Model A, A+, and Zero have no wired network connection on the board. The other Raspberry Pi models have an Ethernet socket on the right edge of the board. Use this socket to connect your Raspberry Pi to your Internet router with a standard Ethernet cable. The Raspberry Pi automatically connects to the Internet when used with a router that supports the Dynamic Host Configuration Protocol (DHCP), which means it works with most domestic routers. For advice on troubleshooting your Internet connection, see the appendix.If you're using a Wi-Fi adapter, you can plug it into a USB socket so that it’s ready for when you switch on your Raspberry Pi. Many models, including the Raspberry Pi 4, Raspberry Pi 400, and Raspberry Pi Zero W and WH, have built-in Wi-Fi.
6 Connect the audio.If you’re using an HDMI TV, the sound is routed through the HDMI cable to the screen, so you don’t need to connect a separate audio cable. Otherwise, the audio socket of your Raspberry Pi is a small black or blue box stuck along the top edge of the board on the Model A and B, and on the bottom edge of the board on later and current models. If you have earphones or headphones from a portable music player, you can plug them directly into this socket. Alternatively, you can plug a suitable cable into this socket to feed the audio into a TV, stereo, or PC speakers for a more impressive sound. If you’re using PC speakers, note that they need to have their own power supply. There is no audio socket on the Raspberry Pi 400 and Pi Zero models.
7 Connect the power.The last thing you should do is connect the power. Take particular care with the Raspberry Pi Zero, because the power socket looks the same as the USB socket to its left.
 The Raspberry Pi Foundation warns against using battery power unless you know what you’re doing, because it’s easy to damage your Pi unless you provide a steady 5 volts (5V) of power. Some cellphone emergency battery chargers can be used to provide that steady power, but proceed with caution.
The Raspberry Pi has no on/off switch, so when you connect the power, it starts working. To turn it off again, you disconnect the power. To avoid losing data, you should shut down first (see Chapters 4and 5) and wait for that process to finish.
Setting Up Your Raspberry Pi
When you switch on your Raspberry Pi for the first time using Raspberry Pi OS, you’re guided through the basic settings.
First you set your country, language, and time zone. Then, you’re prompted to change the password. The default Raspberry Pi OS username is pi and the password is raspberry. Both of these are case-sensitive, so you can’t use PI instead, for example. It’s a good idea to change the password, but you can click Next to skip any step in the setup process. If your screen display has a black border around it, the Set Up Screen option helps fix this.
Next, you can set up your wireless network. Start by choosing your network from those that the Raspberry Pi has detected. Click Next, and you’re prompted for the password. When you click Next again, your Pi connects to the network. There’s an option to update the software, which checks whether any of the software on your card needs updating. Even if you’ve just created your microSD card, there may be updates ready to install. The microSD card images are updated less frequently than the software updates available.
When the setup is complete, you have the option to restart now, so any changes you’ve made to the settings take effect, or to restart later. We recommend you restart now.
Configuring Your Raspberry Pi in Raspberry Pi OS
For most of the rest of this book, we assume that you’re using Raspberry Pi OS with the desktop. It’s the most user-friendly option and the best way to get started with the Pi.
When your Pi has finished booting, you should be in the desktop environment. You’ll learn more about this topic in Chapter 4, but for now, let’s take a look at how you use it to finish setting up your Pi or adjust its settings in the future.
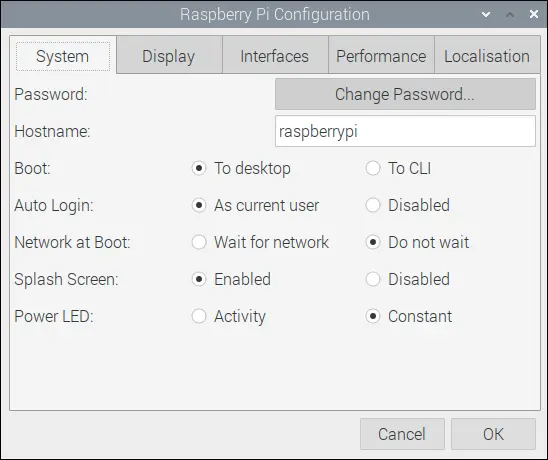
Click the button in the top left, with the Raspberry Pi logo on it, to open the menu. Move down to Preferences and choose Raspberry Pi Configuration. The tool that opens is shown in Figure 3-1.
Sean McManus
FIGURE 3-1:The Raspberry Pi Configuration tool in the desktop.
By default, the tool opens to its System tab. The options here include
Change the password. The default password for the username pi is raspberry.
Change the hostname (which is the name used for this Raspberry Pi on the network).
Control whether it boots into the desktop or the command line interface (CLI), which is explained in Chapter 5.
Set whether the pi user is automatically logged in.
Set the Pi to wait for the network at the start.
Display the graphical splash screen that shows when the Pi is booting.
Change whether the power LED on the board is constantly lit, or only when there is activity on the microSD card.
The tool’s Display tab allows you to enable pixel doubling, so you can better see the screen output on very high-resolution displays and to enable or disable the screen blanking screensaver. You can also enable or disable underscan. Underscan and overscan change the size of the displayed screen image to optimally fill the screen. Underscan should be disabled to fill the screen if you see a black border around your screen and enabled if the desktop doesn’t all fit on the screen.
The tool’s Interfaces tab enables you to enable or disable various connection options on your Raspberry Pi, including enabling the Raspberry Pi camera. Other options here include SSH (short for Secure Shell), which is a way of setting up a secure connection between computers, usually so that you can control one computer from another computer. The VNC software enables remote access to your Raspberry Pi with a graphical interface and is also enabled here. (For more on SSH and VNC, see “ Connecting Using SSH” and “ Connecting Using VNC,” later in this chapter.) The other interfaces are SPI, I2C, Serial Port, Serial Console, 1-Wire, and Remote GPIO (which enables another machine on the network to access the Pi’s GPIO pins). In most cases, you only need to change these settings if you’re using a particular add-on or working on a project that requires them.
Читать дальшеИнтервал:
Закладка:
Похожие книги на «Raspberry Pi For Dummies»
Представляем Вашему вниманию похожие книги на «Raspberry Pi For Dummies» списком для выбора. Мы отобрали схожую по названию и смыслу литературу в надежде предоставить читателям больше вариантов отыскать новые, интересные, ещё непрочитанные произведения.


Обсуждение, отзывы о книге «Raspberry Pi For Dummies» и просто собственные мнения читателей. Оставьте ваши комментарии, напишите, что Вы думаете о произведении, его смысле или главных героях. Укажите что конкретно понравилось, а что нет, и почему Вы так считаете.