Sean McManus - Raspberry Pi For Dummies
Здесь есть возможность читать онлайн «Sean McManus - Raspberry Pi For Dummies» — ознакомительный отрывок электронной книги совершенно бесплатно, а после прочтения отрывка купить полную версию. В некоторых случаях можно слушать аудио, скачать через торрент в формате fb2 и присутствует краткое содержание. Жанр: unrecognised, на английском языке. Описание произведения, (предисловие) а так же отзывы посетителей доступны на портале библиотеки ЛибКат.
- Название:Raspberry Pi For Dummies
- Автор:
- Жанр:
- Год:неизвестен
- ISBN:нет данных
- Рейтинг книги:3 / 5. Голосов: 1
-
Избранное:Добавить в избранное
- Отзывы:
-
Ваша оценка:
Raspberry Pi For Dummies: краткое содержание, описание и аннотация
Предлагаем к чтению аннотацию, описание, краткое содержание или предисловие (зависит от того, что написал сам автор книги «Raspberry Pi For Dummies»). Если вы не нашли необходимую информацию о книге — напишите в комментариях, мы постараемся отыскать её.
Raspberry Pi For Dummies explores the latest technology—the Raspberry Pi 4 and 400, Scratch 3 programming language, new games bundled with the Raspberry Pi, and the hottest Add-Ons out there. This introductory guide is the perfect place to start if you want to get a taste of everything the Raspberry Pi can do!
Set up your Raspberry Pi, install the operating system, and connect to the Internet Learn the basics of the Linux desktop and Linux shell so you can program, work, and play Use Python, Scratch, and Sonic Pi to write your first programs and make games and digital music Discover how circuits work hand-in-hand with your Pi If you want to make the most of the Raspberry Pi for school, work, or play, you’ll love this easy-to-read reference.
Raspberry Pi For Dummies — читать онлайн ознакомительный отрывок
Ниже представлен текст книги, разбитый по страницам. Система сохранения места последней прочитанной страницы, позволяет с удобством читать онлайн бесплатно книгу «Raspberry Pi For Dummies», без необходимости каждый раз заново искать на чём Вы остановились. Поставьте закладку, и сможете в любой момент перейти на страницу, на которой закончили чтение.
Интервал:
Закладка:
In 1991, Linus Torvalds released the central component of Linux, the kernel , which acts as a conduit between the applications software and the hardware resources, including the memory and processor. He still works on the Linux kernel, sponsored by the Linux Foundation, which is the nonprofit consortium that promotes Linux and supports its development. The Linux Foundation reports that 1,730 different organizations contributed to the kernel between 2007 and 2019.
GNU/Linux brings together the Linux kernel with the GNU components it needs to be a complete operating system, reflecting the work of thousands of people on both the GNU and Linux projects. That so many people could cooperate to build something as complex as an operating system, and then give it away for anyone to use, is a modern miracle.
Because GNU/Linux can be modified and distributed by anyone, lots of different versions of it exist. They’re called distributions, or distros , but not all of them are suitable for the Raspberry Pi. The recommended distribution of Linux for the Raspberry Pi is Raspberry Pi OS. Software created for one version of Linux usually works on another version, but Linux isn’t designed to run Windows or macOS software.
Strictly speaking, Linux is just the kernel in the operating system, but as is commonly done, we refer to GNU/Linux as Linux in the rest of this book.
 Older Raspberry Pi models use SD cards instead of microSD cards. When we say “microSD card” in this book, the same applies to an SD card.
Imaging a microSD Card for Your Raspberry Pi
It’s possible to buy a microSD card with Raspberry Pi OS already installed. If you’ve already got a microSD card, you can skip to Chapter 3now.
If you want to use a different operating system on your microSD card, or want to reuse an old microSD card that has no software on it yet, you’ll need to set it up first.
To set up a microSD card for your Raspberry Pi, there are two steps. You carry these out on another computer, not your Raspberry Pi.
Download the image file of the operating system you want to use. The image file is a special format that describes all the different files that need to be created on the microSD card.
To convert the image file into a microSD card that will work on the Raspberry Pi, you need to flash the card. You can’t just copy the file across. (Flashing is a process for copying an operating system onto the microSD card. During the process, the many files required by the operating system are extracted from the single image file you download.)
Raspberry Pi Imager is simple software that downloads the operating system and flashes it to the microSD card for you. It’s available for the Windows, macOS, and Ubuntu operating systems. You can download it from www.raspberrypi.org/software and install it in the same way as any other software for your computer.
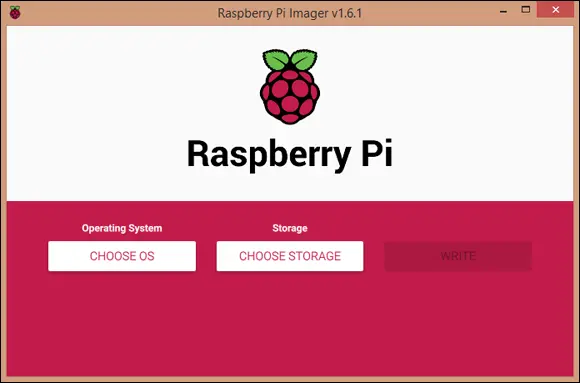
When you run Raspberry Pi Imager, you see a simple user interface, as shown in Figure 2-1. When it runs, you need to give the software permission to make changes on your computer, even though it will only be changing your microSD card.
 If you press Ctrl+Shift+X on Windows, you can open the advanced settings. Here, you can set up the Wi-Fi for your new SD card, enable SSH for remote access to the Raspberry Pi, set the hostname for the Pi on your local network, and change the locale settings (time zone and keyboard layout). On macOS, press Cmd+Shift+X to access options to disable overscan, set the hostname, and enable SSH.
Sean McManus
FIGURE 2-1:The Raspberry Pi Imager software.
To use the software, follow these steps:
1 Click Choose OS.Here you choose which operating system you’d like to use. We offer advice on your choice in the next section. If you’re eager to get started straight away, click Raspberry Pi OS (other), and choose Raspberry Pi OS Full, including recommended applications. This will give you the software you need for the rest of this book. Your operating system is stored (or cached) on your computer, so it can be flashed to another card later without needing to download it again.
2 Click Choose Storage.You need to tell your computer where your SD card is. Take care here: The selected drive will be wiped, and the software can show options that include USB drives that are plugged in or even your watch when it’s plugged in to charge. To be safe, you could disconnect other drives you’re not using. Select your microSD card. Remember to eject or unmount the drives before disconnecting them to avoid losing data.
3 Click Write.The operating system is downloaded (if necessary) and written to your microSD card.
When it finishes, you’re ready to insert your microSD card into your Raspberry Pi, and connect it up as described in Chapter 3.
Choosing the Right Operating System for Your Raspberry Pi
A number of operating systems are supported by the Raspberry Pi Imager software (see Figure 2-2). They’re all available for free forever, except for TLXOS, which offers only a free trial. They’re grouped into categories, such as general-purpose operating systems, media players, and gaming operating systems.
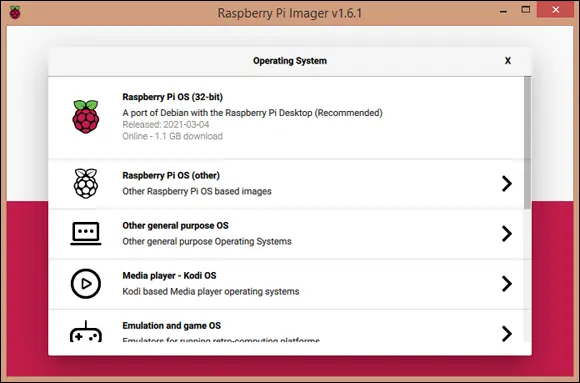
FIGURE 2-2:Some of the operating system options that appear when you click Choose OS in Raspberry Pi Imager.
Here’s an overview of the options:
Raspberry Pi OS: The distribution that the Raspberry Pi Foundation recommends is called Raspberry Pi OS. It’s a version of a Linux distribution called Debian that has been optimized for the Raspberry Pi. It includes graphical desktop software (see Chapter 4), a web browser (see Chapter 4), and various development and programming tools. Raspberry Pi OS is the quickest way to get up and running with your Raspberry Pi, and for most users, it’s the one you’ll want to use. There are three versions available: one with the desktop and recommended applications, one with the desktop but no recommended applications, and one that does not have the desktop environment or recommended applications. We recommend that you choose the one with the desktop and recommended applications (in this book, we assume that’s what you’re using). Click Raspberry Pi OS (Other) and select the operating system with the recommended applications.
Ubuntu: Ubuntu is a popular Linux distribution, and it’s available here in three versions. The desktop version gives you a familiar desktop environment, the server edition enables you to use your Raspberry Pi as a server, and the core version is for if you’re using your Raspberry Pi as part of an Internet of Things setup. If you don’t know how to use the server and core versions, the desktop is the one you need!
Manjaro ARM Linux: This is another Linux distribution for the desktop, with built-in features to make it easy to customize.
RISC OS Pi: Most people run Linux on the Raspberry Pi, but you can also use an alternative operating system called RISC OS, which has a graphical user interface (GUI). RISC OS dates back to 1987, when Acorn Computers created it for use with the upmarket Archimedes home computer. You can find documentation at www.riscosopen.org .
Интервал:
Закладка:
Похожие книги на «Raspberry Pi For Dummies»
Представляем Вашему вниманию похожие книги на «Raspberry Pi For Dummies» списком для выбора. Мы отобрали схожую по названию и смыслу литературу в надежде предоставить читателям больше вариантов отыскать новые, интересные, ещё непрочитанные произведения.


Обсуждение, отзывы о книге «Raspberry Pi For Dummies» и просто собственные мнения читателей. Оставьте ваши комментарии, напишите, что Вы думаете о произведении, его смысле или главных героях. Укажите что конкретно понравилось, а что нет, и почему Вы так считаете.