Sean McManus - Raspberry Pi For Dummies
Здесь есть возможность читать онлайн «Sean McManus - Raspberry Pi For Dummies» — ознакомительный отрывок электронной книги совершенно бесплатно, а после прочтения отрывка купить полную версию. В некоторых случаях можно слушать аудио, скачать через торрент в формате fb2 и присутствует краткое содержание. Жанр: unrecognised, на английском языке. Описание произведения, (предисловие) а так же отзывы посетителей доступны на портале библиотеки ЛибКат.
- Название:Raspberry Pi For Dummies
- Автор:
- Жанр:
- Год:неизвестен
- ISBN:нет данных
- Рейтинг книги:3 / 5. Голосов: 1
-
Избранное:Добавить в избранное
- Отзывы:
-
Ваша оценка:
Raspberry Pi For Dummies: краткое содержание, описание и аннотация
Предлагаем к чтению аннотацию, описание, краткое содержание или предисловие (зависит от того, что написал сам автор книги «Raspberry Pi For Dummies»). Если вы не нашли необходимую информацию о книге — напишите в комментариях, мы постараемся отыскать её.
Raspberry Pi For Dummies explores the latest technology—the Raspberry Pi 4 and 400, Scratch 3 programming language, new games bundled with the Raspberry Pi, and the hottest Add-Ons out there. This introductory guide is the perfect place to start if you want to get a taste of everything the Raspberry Pi can do!
Set up your Raspberry Pi, install the operating system, and connect to the Internet Learn the basics of the Linux desktop and Linux shell so you can program, work, and play Use Python, Scratch, and Sonic Pi to write your first programs and make games and digital music Discover how circuits work hand-in-hand with your Pi If you want to make the most of the Raspberry Pi for school, work, or play, you’ll love this easy-to-read reference.
Raspberry Pi For Dummies — читать онлайн ознакомительный отрывок
Ниже представлен текст книги, разбитый по страницам. Система сохранения места последней прочитанной страницы, позволяет с удобством читать онлайн бесплатно книгу «Raspberry Pi For Dummies», без необходимости каждый раз заново искать на чём Вы остановились. Поставьте закладку, и сможете в любой момент перейти на страницу, на которой закончили чтение.
Интервал:
Закладка:
Cables: You’ll need cables to connect it all up, too. In particular, you need an HDMI cable (if you’re using an HDMI or DVI monitor), an HDMI-to-DVI adapter (if you’re using a DVI monitor), an RCA cable (if you’re connecting to an older TV), an audio cable (if you’re connecting the audio jack to your stereo), and an Ethernet cable (for networking on models with an Ethernet port). The Raspberry Pi 4 and 400 use Micro HDMI connections, so you’ll need a cable that connects Micro HDMI to (normal) HDMI for your monitor, or an adapter. Note that the Raspberry Pi 2 and later (including Raspberry Pi 4) send the RCA video signal through a 3.5mm jack (headphone socket). Earlier models had a dedicated RCA socket. You need a different cable, depending on which version of the Pi’s design you have, if you plan to use RCA. If you have a Raspberry Pi Zero, you’ll need a converter for the Mini HDMI socket and for the Micro USB socket (see Figure 1-4). You can get these cables from an electrical components retailer, and you may be able to buy them at the same time as you buy your Raspberry Pi. Any other cables you need (for example, to connect to PC speakers or a USB hub) should come with those devices.
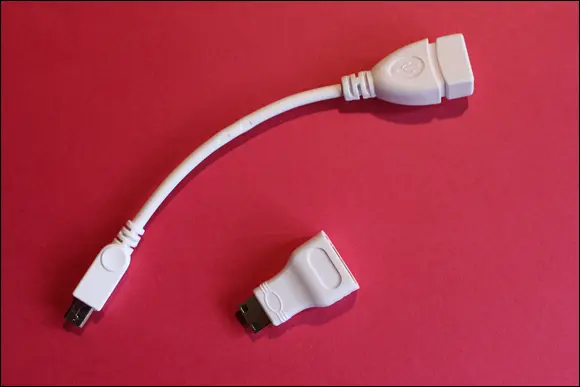
FIGURE 1-4:The Micro USB–to–USB converter cable and the Mini HDMI–to–HDMI converter for the Raspberry Pi Zero.
Optional extras
There are a few additional items you may want to get for your Raspberry Pi. They can make your Raspberry Pi easier to use and enable new applications.
USB hub: The Raspberry Pi has one, two, or four USB sockets (depending on the model you get). Consider using a powered USB hub, for two reasons. Firstly (and especially if you have a Model A, A+, B, or Zero), you’re going to want to connect other devices to your Pi at the same time as your keyboard and mouse, which need two sockets. And secondly, a USB hub provides external power to your devices and minimizes the likelihood of experiencing problems using your Raspberry Pi, especially if connecting relatively power-intensive devices such as hard drives. Make sure your USB hub has its own power source, independent of the Raspberry Pi.
External hard drive: If you want lots of storage, perhaps so that you can use your music or video collection with the Raspberry Pi, you can connect an external hard drive to it over USB. You’ll need to connect your hard drive through a powered USB hub, or use a hard drive that has its own external power source.
Raspberry Pi Camera: The Raspberry Pi has stimulated entrepreneurs to create all kinds of add-ons for it, but the Camera Module is a product that originated at the Raspberry Pi Foundation. This fixed-focus camera can be used to shoot HD video and take still photos. The standard camera has 8-megapixel resolution, and the Raspberry Pi High Quality Camera offers 12-megapixel resolution. There is also a version of the standard camera without an infrared filter (the PiNoIR Camera), which can be used for wildlife photography at night or weird special effects by day.
Speakers: Raspberry Pis (excluding the Pi 400) have a standard audio out socket, compatible with headphones and PC speakers that use a 3.5mm audio jack. You can plug headphones directly into it, or use the audio jack to connect to speakers, a stereo, or a TV. If you’re using a TV or stereo for sound, you can get a cable that connects the 3.5mm audio jack and the audio input(s) on your television or stereo. You won’t always need speakers: If you’re using an HDMI connection, the audio is sent to the screen with the video signal, so you won’t need separate speakers. If you’re using a DVI monitor, you can get an HDMI-to-DVI adapter that includes audio extraction, so you can connect the audio separately. Some adapters can also convert from HDMI to VGA, with sound extracted separately.
Case: It’s safe to operate your Raspberry Pi as is, but many people prefer to protect it from spills and precariously stacked desk clutter by getting a case for it. The Pibow Coupe ( https://shop.pimoroni.com/collections/pibow ) is one of the most attractively designed cases, assembled from layers of colored plastic (see Figure 1-5). It’s designed by Paul Beech, who designed the Raspberry Pi logo. There are also official red-and-white cases for current Raspberry Pi models. The case for the Pi Zero includes three different tops, so you can either seal it, leave a camera hole, or have access to the GPIO pins. You don’t have to buy a case, though. You can go without or make your own using cardboard or Lego bricks. Whatever case you go with, make sure you can still access the GPIO pins so that you can experiment with connecting your Pi to electronic circuits and try the projects in Part 5of this book. FIGURE 1-5:The Pibow Coupe case on the Raspberry Pi 4.
Raspberry Pi 4 Case Fan: If you’re really pushing the performance of your Raspberry Pi 4, you might find it gets a bit hot. The Raspberry Pi 4 Case Fan (see Figure 1-6) is an official accessory that fits inside the official Raspberry Pi case. It connects to your GPIO pins, and the fan spins to keep air flowing through the case. It’s useful for power users, but most people won’t need one.
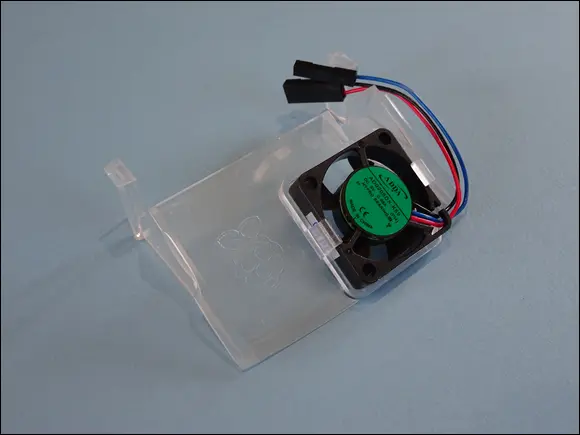
FIGURE 1-6:The Raspberry Pi 4 Case Fan.
Chapter 2
Downloading the Operating System
IN THIS CHAPTER
 Introducing Linux
Using Raspberry Pi Imager to set up your microSD card
Choosing an operating system for your Raspberry Pi
Before you can do anything with your Raspberry Pi, you need to provide it with an operating system (OS). The operating system software enables you to use the computer’s basic functions and looks after activities such as managing files and running applications, like word processors or web browsers. Those applications use the operating system as an intermediary to talk to the hardware, and they won’t work without it. This concept isn’t unique to the Raspberry Pi. On your laptop, the operating system might be Microsoft Windows or macOS. On iPads it’s iPadOS, on iPhones it’s iOS, and on other devices it might be Android.
In this chapter, we introduce you to Linux, the operating system most frequently used on the Raspberry Pi, and we show you how to create a microSD card with an operating system on it. You’ll need to use another computer to set up the microSD card. It doesn’t matter whether you use a Windows, macOS, or Linux machine, but the computer needs to be able to write to microSD cards, and must have a connection to the Internet.
Introducing Linux
The operating system used on the Raspberry Pi is GNU/Linux, or often just Linux. The Raspberry Pi might be the first Linux computer you’ve used, but the operating system has a long and honorable history.
Richard Stallman created the GNU Project in 1984 with the goal of building an operating system that users were free to copy, study, and modify. Such software is known as free software, and although this software is often given away, the ideology is about free as in “free speech” rather than free as in “free beer.” Thousands of people have joined the GNU Project, creating software packages that include tools, applications, and even games. Stallman aimed to make his operating system compatible with Unix, an operating system that was created by AT&T’s Bell Labs and that started to gain popularity in the 1970s. That would make it easy for existing Unix users to switch to using the GNU Project.
Читать дальшеИнтервал:
Закладка:
Похожие книги на «Raspberry Pi For Dummies»
Представляем Вашему вниманию похожие книги на «Raspberry Pi For Dummies» списком для выбора. Мы отобрали схожую по названию и смыслу литературу в надежде предоставить читателям больше вариантов отыскать новые, интересные, ещё непрочитанные произведения.


Обсуждение, отзывы о книге «Raspberry Pi For Dummies» и просто собственные мнения читателей. Оставьте ваши комментарии, напишите, что Вы думаете о произведении, его смысле или главных героях. Укажите что конкретно понравилось, а что нет, и почему Вы так считаете.