Sean McManus - Raspberry Pi For Dummies
Здесь есть возможность читать онлайн «Sean McManus - Raspberry Pi For Dummies» — ознакомительный отрывок электронной книги совершенно бесплатно, а после прочтения отрывка купить полную версию. В некоторых случаях можно слушать аудио, скачать через торрент в формате fb2 и присутствует краткое содержание. Жанр: unrecognised, на английском языке. Описание произведения, (предисловие) а так же отзывы посетителей доступны на портале библиотеки ЛибКат.
- Название:Raspberry Pi For Dummies
- Автор:
- Жанр:
- Год:неизвестен
- ISBN:нет данных
- Рейтинг книги:3 / 5. Голосов: 1
-
Избранное:Добавить в избранное
- Отзывы:
-
Ваша оценка:
Raspberry Pi For Dummies: краткое содержание, описание и аннотация
Предлагаем к чтению аннотацию, описание, краткое содержание или предисловие (зависит от того, что написал сам автор книги «Raspberry Pi For Dummies»). Если вы не нашли необходимую информацию о книге — напишите в комментариях, мы постараемся отыскать её.
Raspberry Pi For Dummies explores the latest technology—the Raspberry Pi 4 and 400, Scratch 3 programming language, new games bundled with the Raspberry Pi, and the hottest Add-Ons out there. This introductory guide is the perfect place to start if you want to get a taste of everything the Raspberry Pi can do!
Set up your Raspberry Pi, install the operating system, and connect to the Internet Learn the basics of the Linux desktop and Linux shell so you can program, work, and play Use Python, Scratch, and Sonic Pi to write your first programs and make games and digital music Discover how circuits work hand-in-hand with your Pi If you want to make the most of the Raspberry Pi for school, work, or play, you’ll love this easy-to-read reference.
Raspberry Pi For Dummies — читать онлайн ознакомительный отрывок
Ниже представлен текст книги, разбитый по страницам. Система сохранения места последней прочитанной страницы, позволяет с удобством читать онлайн бесплатно книгу «Raspberry Pi For Dummies», без необходимости каждый раз заново искать на чём Вы остановились. Поставьте закладку, и сможете в любой момент перейти на страницу, на которой закончили чтение.
Интервал:
Закладка:
The tool’s Performance tab gives you access to options for overclocking and changing the GPU memory.
So, what is overclocking, anyway? It’s when you make a computer work faster than the manufacturer recommends, by changing some of its settings. That said, the options offered to you within this tool have been chosen by the Raspberry Pi Foundation, and they have previously said they don’t expect overclocking to cause any measurable reduction in your Pi’s lifetime. The speed of the CPU is measured in MHz, and the highest overclocking setting increases the speed to 1000 MHz. You won’t necessarily be able to use the top setting: It depends on your Pi and your power supply. Overclocking is not currently supported on the Raspberry Pi 3, 4, or 400.
As for changing the GPU memory, here’s the lowdown on that particular option: Your Raspberry Pi’s memory is shared between the central processing unit (CPU) and the graphics processing unit (GPU). These processors work together to run the programs on your Raspberry Pi, but some programs are more demanding of the CPU, and others rely more heavily on the GPU. If you plan to do lots of graphics-intensive work, including playing videos and 3D games, you can improve your Raspberry Pi’s performance by giving more of the memory to the GPU. Otherwise, you may be able to improve performance by stealing some memory from the GPU and handing it over to the CPU. Raspberry Pi OS allocates 76MB to the graphics processor and gives the rest to the CPU. In most cases, this setting will work fine, but if you experience problems, you can change how the memory is shared between the two processors. The configuration menu asks how much memory you want to give to the GPU and fills the entry box with the current value as a guide. The rest of the memory is allocated to the CPU. You can safely experiment with the memory split to see which works best for the kind of applications you like to use.
If you’re using the Raspberry Pi Case Fan (see Chapter 1), you need to enable it in the Performance tab.
The options on the tool’s Localisation tab enable you to set the character set used in your language (the locale), your time zone, the keyboard setup you want to use, and your Wi-Fi country. If you’re using the Raspberry Pi outside its home country of the U.K., you may find you need to adjust settings here, especially if you see unexpected results when using the keyboard.
 You can adjust the mouse and keyboard sensitivity separately by going through the main menu to the mouse and keyboard settings, also in the
 Preferencesfolder.
If you’re using Raspberry Pi OS without the desktop, you can find an alternative tool for configuration options by typing sudo raspi-configon the command line. Note that you can’t use the mouse to move through its menus. You use up- and down-arrow keys to select different options on the screen, and left- and right-arrow keys (or Tab, which is usually above the Caps Lock key) to select actions such as OK, Cancel, Select, and Finish. Press Enter to confirm a choice.
There’s a screen configuration tool for adjusting the screen resolution and orientation. Open the menu, go to the Preferences category, and choose Screen Configuration. In the tool, click Configure on the menu, select Screens, and choose your screen. Alternatively, you can right-click the large screen name (for example, HDMI-1). You can then adjust the resolution as shown in Figure 3-2. After choosing your settings, click the green tick to confirm and then click OK if it looks fine. If the changes stop your screen from working properly, just wait and the previous settings will revert after 10 seconds.
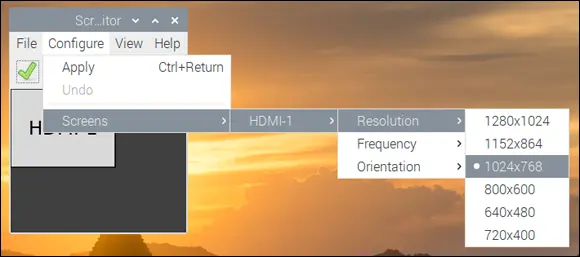
FIGURE 3-2:Adjusting the screen resolution.
Changing Your Wi-Fi Settings
To change your Wi-Fi settings, click the fan-shaped icon in the top right, shown in Figure 3-3. It opens a menu that shows you the available networks, together with an option to turn off Wi-Fi.
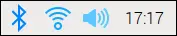
FIGURE 3-3:The Bluetooth and Wi-Fi buttons, beside the volume control and clock.
Click a network to select it and you’re prompted to enter the Pre-shared Key, which is the Wi-Fi password. If the connection fails or drops, the Wi-Fi icon changes to an icon with two red crosses on it.
You can test whether your connection is working by opening the web browser and visiting a web page with it (see Chapter 4).
After you’ve set up a Wi-Fi network using the tool, your Raspberry Pi remembers it, so it automatically reconnects whenever you restart your Raspberry Pi or reconnect after previously turning off Wi-Fi. You can also use the network connection you have set up from the command line.
 When you connect to a new network, the Pi doesn’t remember the previous network’s password, so you need to reenter it if you want to reconnect to it later.
Configuring Bluetooth Devices
The Raspberry Pi 4, 400, 3, and Pi Zero W are Bluetooth-enabled, so you can use a wireless Bluetooth keyboard and/or mouse with your Pi.
 Not all wireless devices are Bluetooth-enabled: Keyboards and mice that come with their own USB dongles typically don’t use Bluetooth.
The process of getting two Bluetooth devices to work together is called pairing them. Check the instructions for your device to see how you make it discoverable so that your Raspberry Pi can pair with it. This isn’t always obvious: On Sean’s mouse, the process involved pushing and holding a button and then pushing the two mouse buttons together and holding them until the mouse started flashing.
Once you have made your device discoverable, click the Bluetooth menu at the top of the screen (refer to Figure 3-3) and choose Add Device. Your Raspberry Pi will search for devices. When it finds your device, click it and then click the Pair button. When setting up a keyboard, we had to enter a code shown on the screen on the new keyboard. With the mouse, we were asked to confirm that a code was showing on the mouse (which it couldn’t be, because the mouse has no display), but we confirmed that it was, to complete the setup.
Connecting the Raspberry Pi Camera Module
Lots of accessories and add-ons are available for the Raspberry Pi, but the Raspberry Pi Camera Module devices are official products from the Raspberry Pi Foundation. The camera module is a small circuit board with a strip of ribbon cable that plugs directly into the Raspberry Pi board. The Raspberry Pi High Quality Camera is a heavier and larger board, with a built-in screw mount for a tripod. You need to buy a lens separately and fix it to the camera. You can see both in Figure 3-4.
It’s easiest to connect your camera before you plug your Raspberry Pi into any cables.
Интервал:
Закладка:
Похожие книги на «Raspberry Pi For Dummies»
Представляем Вашему вниманию похожие книги на «Raspberry Pi For Dummies» списком для выбора. Мы отобрали схожую по названию и смыслу литературу в надежде предоставить читателям больше вариантов отыскать новые, интересные, ещё непрочитанные произведения.


Обсуждение, отзывы о книге «Raspberry Pi For Dummies» и просто собственные мнения читателей. Оставьте ваши комментарии, напишите, что Вы думаете о произведении, его смысле или главных героях. Укажите что конкретно понравилось, а что нет, и почему Вы так считаете.