Sean McManus - Raspberry Pi For Dummies
Здесь есть возможность читать онлайн «Sean McManus - Raspberry Pi For Dummies» — ознакомительный отрывок электронной книги совершенно бесплатно, а после прочтения отрывка купить полную версию. В некоторых случаях можно слушать аудио, скачать через торрент в формате fb2 и присутствует краткое содержание. Жанр: unrecognised, на английском языке. Описание произведения, (предисловие) а так же отзывы посетителей доступны на портале библиотеки ЛибКат.
- Название:Raspberry Pi For Dummies
- Автор:
- Жанр:
- Год:неизвестен
- ISBN:нет данных
- Рейтинг книги:3 / 5. Голосов: 1
-
Избранное:Добавить в избранное
- Отзывы:
-
Ваша оценка:
Raspberry Pi For Dummies: краткое содержание, описание и аннотация
Предлагаем к чтению аннотацию, описание, краткое содержание или предисловие (зависит от того, что написал сам автор книги «Raspberry Pi For Dummies»). Если вы не нашли необходимую информацию о книге — напишите в комментариях, мы постараемся отыскать её.
Raspberry Pi For Dummies explores the latest technology—the Raspberry Pi 4 and 400, Scratch 3 programming language, new games bundled with the Raspberry Pi, and the hottest Add-Ons out there. This introductory guide is the perfect place to start if you want to get a taste of everything the Raspberry Pi can do!
Set up your Raspberry Pi, install the operating system, and connect to the Internet Learn the basics of the Linux desktop and Linux shell so you can program, work, and play Use Python, Scratch, and Sonic Pi to write your first programs and make games and digital music Discover how circuits work hand-in-hand with your Pi If you want to make the most of the Raspberry Pi for school, work, or play, you’ll love this easy-to-read reference.
Raspberry Pi For Dummies — читать онлайн ознакомительный отрывок
Ниже представлен текст книги, разбитый по страницам. Система сохранения места последней прочитанной страницы, позволяет с удобством читать онлайн бесплатно книгу «Raspberry Pi For Dummies», без необходимости каждый раз заново искать на чём Вы остановились. Поставьте закладку, и сможете в любой момент перейти на страницу, на которой закончили чтение.
Интервал:
Закладка:
The Raspberry Pi 400 does not have a camera connector.
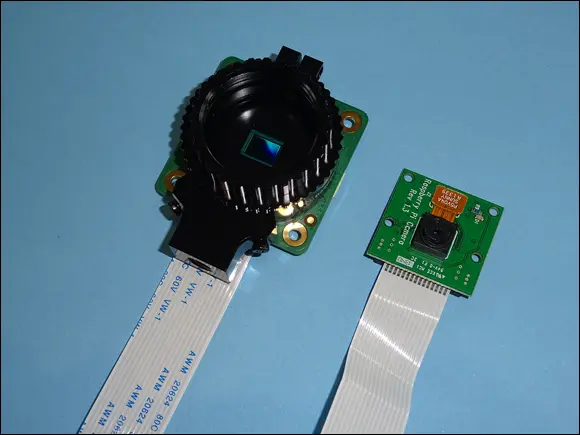
FIGURE 3-4:The Raspberry Pi High Quality Camera (left) and Camera Module (right). The Camera Module has a lens built in, but there is no lens fixed to this High Quality Camera yet.
Connecting the camera on a Pi Zero
The Pi Zero camera socket uses a different width of cable to the main Raspberry Pi boards. You can buy the cable separately or get it with the official Pi Zero case.
The camera and the Pi board have similar sockets for the cable. You press the connector between your thumb and finger and gently pull to open the connector. The parts don’t separate, but there’s enough of a gap to remove and insert the cable. On the Raspberry Pi, the camera connector is on the right of the board.
Figure 3-5 shows the camera connected to a Raspberry Pi Zero. On the camera, insert the cable with the shiny contacts facing the camera front, and then press the socket closed again. On the Raspberry Pi Zero, insert the cable with the shiny contacts facing the bottom of the board (the flat side). When the cable is flat, the camera will be facing down, but you can bend the cable so that the camera sits on top of the board and faces up. One of the covers for the official Pi Zero case has a hole in it for the camera lens.
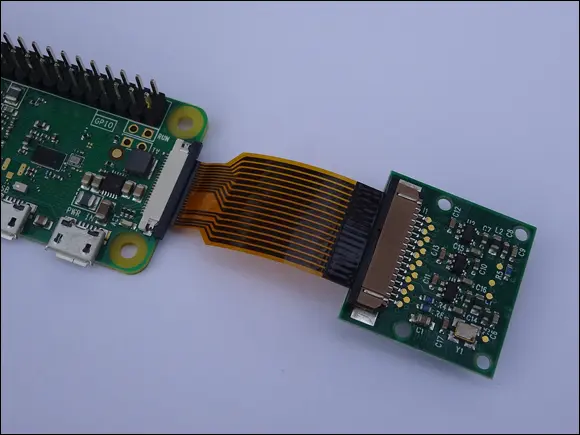
FIGURE 3-5:Connecting the Raspberry Pi Camera Module to a Raspberry Pi Zero.
Connecting the camera on other Raspberry Pi models
The camera connector socket on the other Raspberry Pi models is about 1 inch long, and it touches the bottom edge of the board.
To open the camera connector on your Raspberry Pi board, hold the ends between your finger and thumb and gently lift. The plastic parts don’t separate, but they move apart to make a gap. This is where you insert the camera’s cable.
At the end of the camera’s cable are silver connectors on one side. Hold the cable so that this side faces to the left, away from the side with the USB socket(s). Insert the cable into the connector on the board and press it gently home, and then press the socket back together again.
If the cable needs to be connected at the camera end, the shiny side of the cable should point towards the camera front. Figure 3-6 shows a camera connected to a Raspberry Pi 4.
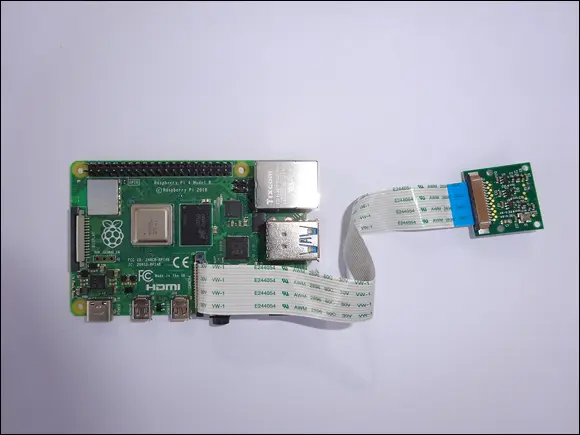
FIGURE 3-6:Connecting the Raspberry Pi Camera Module to a Raspberry Pi 4.
Testing the Camera Module
Let’s test whether your camera is working correctly.
 Make sure the camera is enabled: Go into the Raspberry Pi Configuration tool, click Interfaces, and select Enabled beside the Camera option. For more information, see the “ Configuring Your Raspberry Pi in Raspberry Pi OS” section, earlier in this chapter. You’ll need to reboot after enabling the camera.
We’ll test the camera from the command line interface, which is covered in more depth in Chapter 5. Click the Terminal icon at the top of the screen to start. It has a >_symbol on it. To take a still photo, type in this command:
raspistill -o testshot.jpg
You should see what the camera sees onscreen for a moment before it takes the photo. The picture is saved with the filename testshot.jpg. You can verify that the image was created by looking at the files in your directory with this command:
ls
You can use lots of different options to take still photos, too. This example takes a shot with the pastel filter and flips the picture horizontally ( -hf) and vertically ( -vf):
raspistill -ifx pastel -hf -vf -o testshot2.jpg
All those hyphens and letter combinations might seem a bit random to you now, but after you read Chapter 5, they should make more sense. To see the documentation for raspistill, type
raspistill | less
Use the down-arrow key to move through the information, and press Q to finish.
Your photos are stored in your pidirectory. See Chapter 4for instructions on how to use File Manager to find your files and Image Viewer to see them.
To shoot video, you use raspivid. Enter this command to shoot a 5-second film:
raspivid -o testvideo.h264 -t 5000
The video is saved with the filename testvideo.h264and is 5000 milliseconds (5 seconds) long. You can view the video you made using
omxplayer testvideo.h264
The video footage is captured as a raw H264 video stream. For greater compatibility with media players, it's a good idea to convert it to an MP4 file. Start by installing MP4Box using this command:
sudo apt install gpac
Then you can convert your video file (called testvideo.h264) into an MP4 file (called testvideo.mp4) like this:
MP4Box -add testvideo.h264 testvideo.mp4
You can get help on using raspividwith
raspivid | less
There is also a library called picamera that you can use in Python to access the camera from your own Python programs. By adding the Video Sensing extension in Scratch, you can use the camera to make onscreen characters react to movement in the video.
For more information on using the Raspberry Pi Camera Module, see the documentation at www.raspberrypi.org/documentation/usage/camera .
Connecting Using SSH
If your Raspberry Pi has a network connection, you should be able to access it with another computer on the same network using Secure Shell (also known as SSH), which is a way to make a secure connection between computers. This can be helpful if you have set up your Pi to use it headerless (without a screen). Here's how to set it up:
1 Change your password.To prevent unauthorized access to your Raspberry Pi after a remote connection is enabled, start by changing your password. You can use the Raspberry Pi Configuration tool (see “ Configuring Your Raspberry Pi in Raspberry Pi OS,” earlier in this chapter), or see Chapter 5for instructions on changing the password in the command line.
2 Enable SSH on your Pi.Use the Raspberry Pi Configuration tool to enable SSH on the Interfaces tab. Alternatively, use this instruction to create an empty file in the boot directory called ssh and then reboot your Pi:sudo touch /boot/ssh
3 Get your Pi's IP address.Use ifconfig in the command line to get your Raspberry Pi’s IP address (shown as inet on wlan0 for a WiFi connection or on eth0 for an Ethernet connection).
4 Connect from your other device.In Windows 10, macOS, and Linux, the SSH software is already installed. You can use it from the command line by typing in ssh pi@198.51.100.0. You replace the numbers with your Raspberry Pi's IP address. If you changed the username on your Raspberry Pi, change pi too. If you’re using a computer that doesn’t have SSH software, or you prefer to use a graphical interface, you can download an SSH client such as Putty. In Putty, you input the IP address of your Raspberry Pi and click the Open button. After you enter your Pi’s password, you can use the command line on the Raspberry Pi to manage and fix files, viewing it through your PC screen and using your PC keyboard. SSH apps are also available for the iPhone/iPad and Android. You can find fuller instructions for using SSH on your other machine at www.raspberrypi.org/documentation/remote-access/ssh .
Интервал:
Закладка:
Похожие книги на «Raspberry Pi For Dummies»
Представляем Вашему вниманию похожие книги на «Raspberry Pi For Dummies» списком для выбора. Мы отобрали схожую по названию и смыслу литературу в надежде предоставить читателям больше вариантов отыскать новые, интересные, ещё непрочитанные произведения.


Обсуждение, отзывы о книге «Raspberry Pi For Dummies» и просто собственные мнения читателей. Оставьте ваши комментарии, напишите, что Вы думаете о произведении, его смысле или главных героях. Укажите что конкретно понравилось, а что нет, и почему Вы так считаете.